Advertisement
FEATURES OVERVIEW
- Turn the radio over and remove yellow battery pull tab.
![warning]() Note: Ensure the battery pull tab is completely removed before attempting to power on the unit.
Note: Ensure the battery pull tab is completely removed before attempting to power on the unit. - To power on the radio, press and hold
![]() for three seconds.
for three seconds. - Press
![]() to cycle through AM, FM and WX bands.
to cycle through AM, FM and WX bands. - To activate weather alerts, press
![]() . The WX icon on the LCD will fl ash when weather alerts are active.
. The WX icon on the LCD will fl ash when weather alerts are active. - To use the fl ashlight, press
![]() on the top of the radio. Use
on the top of the radio. Use ![]() to cycle between low power mode, high power mode, SOS morse code beacon and off.
to cycle between low power mode, high power mode, SOS morse code beacon and off. - To charge the internal battery, connect the included charging cable to a USB power source then connect the radio's micro-USB port to the charge cable.
- To access the settings menu, hold down
![]() button for three seconds.
button for three seconds.
 for three seconds.
 to cycle through AM, FM and WX bands.
 . The WX icon on the LCD will fl ash when weather alerts are active.
 on the top of the radio. Use
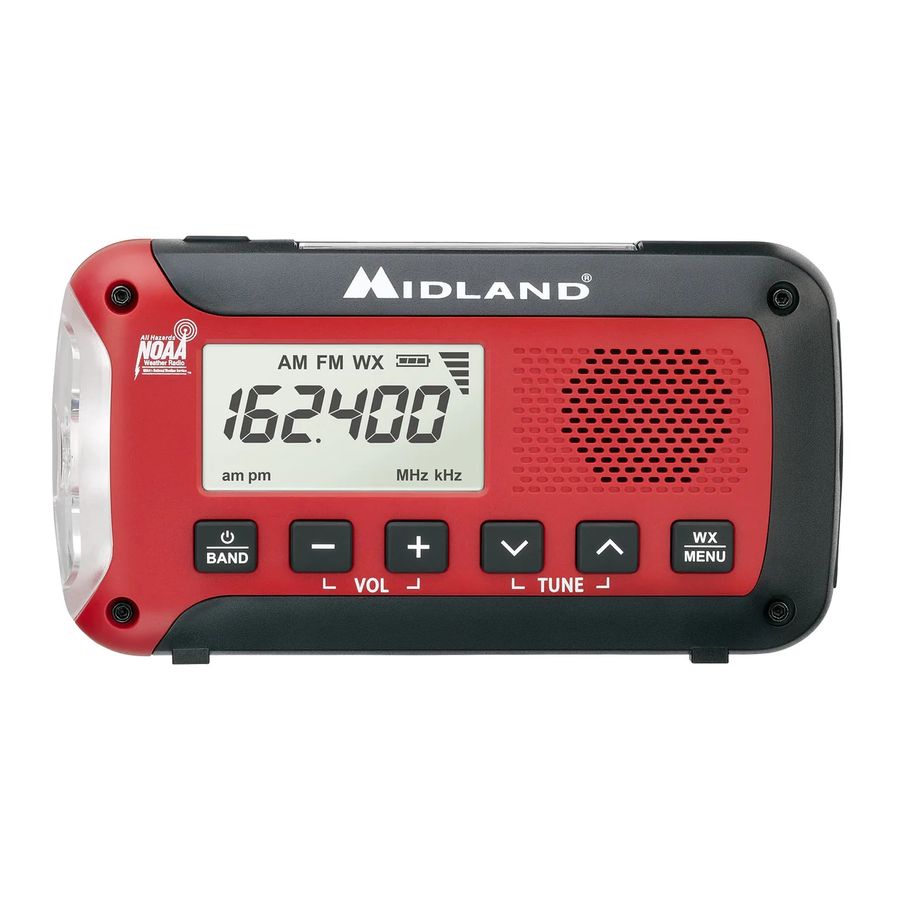
 LCD DISPLAY

- AM BAND
- FM BAND
- WEATHER BAND
- BATTERY LEVEL AND CHARGING
- VOLUME INDICATOR
- FREQUENCY INDICATOR
- CLOCK AND CHANNEL NUMBER
- AM/PM ICON
CONTROLS/FEATURES

- FLASHLIGHT
- FLASHLIGHT BUTTON
- WEATHER ALERTS AND MENU BUTTON
- TUNE BUTTONS
- VOLUME BUTTONS
- POWER AND BAND SELECTION BUTTON

- HEADPHONE JACK
- USB DEVICE CHARGING PORT (OUT)
- MICRO-USB RADIO CHARGING PORT (IN)
- SOLAR PANEL
- TELESCOPIC ANTENNA
- HAND CRANK
OPERATING YOUR RADIO
TURNING THE RADIO ON/OFF
The fi rst time you power on your ER50, you will need to remove and discard the yellow battery pull tab.
- To turn the radio on, press and hold
![]() for three seconds.
for three seconds. - To turn the radio off, press and hold
![]() for three seconds.
for three seconds.
 for three seconds.
 NOTE: When the radio is powered off, the LCD will display the clock, battery status and weather alerts (if enabled).
POWERING YOUR RADIO
The included rechargeable battery is in the battery compartment. The battery is a 3.7V DC, 2600 mAh lithium ion cell (18650). There are three different ways to charge your ER50 radio:
- USB Charging – Use the provided cable and a USB power source to charge your radio. Insert the USB charge cable into a USB power source and plug the micro USB connector into the micro-USB port. See Battery Level Indicator section for directions on how to tell if your radio is fully charged.
- Hand Crank Charging – Charge your ER50 by rotating the hand crank. Speed of cranking and length of time cranked will determine the charge of the Li-Ion battery. See Battery Level Indicator section for directions on how to tell if your radio is fully charged.
- Solar Panel Charging – Charge your ER50 by placing the solar panel in direct sunlight. See Battery Level Indicator section for directions on how to tell if your radio is fully charged.
NOTES:
- Before applying power to your ER50 ensure the yellow battery pull tab has been removed.
- Only use the provided Midland USB cable for charging.
- Only use the provided Midland Li-Ion battery.
- This radio does not support Alkaline Batteries. Do not mix Alkaline, Standard or Rechargeable Batteries.
CHARGING EXTERNAL DEVICES
Cell phones and USB-powered devices can be charged using the USB charge cable for that device. Connect the charge cable to the port labeled USB on the side of the ER50. If the radio is on, it will automatically turn off and go into charge mode. The radio should be fully charged before charging external devices.
- Your ER50 will not receive weather alerts when charging an external device.
BATTERY LEVEL INDICATOR

SELECTING A BAND
To select between AM, FM and weather band, press  . Each press will cycle through the bands in the order listed.
ADJUSTING THE VOLUME
To adjust the volume up, press . Then adjust the volume down, press
  .
.
TUNING THE RADIO
Press to cycle through AM, FM and weather bands. Once the desired radio band is selected, tune to the desired station using  . Press and hold to automatically scan to the next radio station.
NOTE: For best FM and weather band reception, fully extend the telescopic antenna and rotate until reception is clear
SELECTING A WEATHER CHANNEL
| Ch. # | Frequency |
| 1 | 162.400 MHz |
| 2 | 162.425 MHz |
| 3 | 162.450 MHz |
| 4 | 162.475 MHz |
| 5 | 162.500 MHz |
| 6 | 162.525 MHz |
| 7 | 162.550 MHz |
The radio has 7 NOAA/NWS weather channels to choose from. Press  to select the WX band. Then use
  to select the weather channel for your area. Press and hold to scan to the next active channel.
Visit weather.gov/nwr/counties for your location specifi c channel.
WEATHER ALERTS
To activate the weather alert function:
• Press  to activate weather alerts. When weather alerts are activated the WX icon on the LCD will fl ash. Receiving weather alerts:
• When an alert is received, the radio will sound an audible siren and the fl ashlight will fl ash. The radio will then switch to the current tuned weather radio station to provide you with information on the alert.
Press any button to cancel the alert.
To disable the weather alert function:
- Press
![]() to disable weather alerts. When the weather alerts are disabled the WX icon on the LCD will stop flashing (when in weather band mode) or disappear (when in AM/FM mode).
to disable weather alerts. When the weather alerts are disabled the WX icon on the LCD will stop flashing (when in weather band mode) or disappear (when in AM/FM mode).
NOTE: Weather alerts can be activated and disabled when the radio is powered off.
NOTE: The ER50 will receive weather alerts when the radio is powered off, tuned to a local weather station and the alerts are activated.
NOTE: The ER50 will not receive weather alerts when the unit is charging an external device.
MENU FUNCTIONS
ACCESSING AND USING THE MENU
Press and hold  for three seconds. To adjust the menu settings use
  . To toggle through the menu options, press
  . To exit the menu, toggle through all the menu options using or wait 10 seconds and the menu will timeout. Menu settings are saved when the menu is exited or timed out.
SETTING THE CLOCK
To set the clock, press and hold for three seconds. Setting the clock is the fi rst menu setting. First, use arrows to select a 12- or 24-hour clock. Press to confi rm your selection. Then, use to begin adjusting the hours. Press to confi rm your hour setting and begin adjusting the minutes. Press the one fi nal time to confi rm the clock settings. Menu settings are saved when the menu is exited or timed out.
BACKLIGHT
The ER50 comes with three backlight options: always on, 5 second timeout timer or always off. To set the backlight, press and hold for three seconds. Setting the backlight is the second menu option.
Press three times to get to the backlight settings. Then, use to toggle between the three options (ON, 5, OFF). Press to confi rm the backlight settings. Menu settings are saved when the menu is exited or timed out.
NOTE: Setting backlight to "ON" will reduce battery life.
WEATHER CHANNEL DISPLAY
There are two weather channel display options; channel and frequency. To adjust the display, press and hold for three seconds. Setting the weather channel display is the third menu option. Press four times to get to the weather channel display settings. Then, use to toggle between the two options (Ch, Fr). Press to confi rm the backlight settings. Menu settings are saved when the menu is exited or timed out.
FLASHLIGHT
To use the fl ashlight, press  . The fl ashlight will be in low power mode. Use
  to cycle through high power mode, SOS strobe and to power off.
ABOUT NOAA/NWS
NOAA and the NWS operate a system of all-hazard alert broadcasts covering most of the United States. To listen, fully extend the telescopic antenna and rotate until reception is clear. The ER50 can receive broadcasts up to 50 miles from the weather station depending on your location and conditions of weather, terrain, etc. If reception is not good, try a different location. If indoors, placement near a window usually improves reception.
CUSTOMER SERVICE
For Midland Radio Corporation product questions and issues contact Midland Radio Customer Service at (816) 241-8500. Our Customer Service team is available Monday-Friday 8:00 am – 4:30 pm CST.
LIMITED WARRANTY (United States and Canada)
Subject to the exclusions set forth below, Midland Radio Corporation will repair or replace, at its option without charge, any Midland ER50 which fails due to a defect in material or workmanship within One Year following the initial consumer purchase. This warranty does not apply to water damage, battery leak, abuse or misuse of unauthorized accessories, unauthorized service or modifi cation or altered products. Accessories have a 90-day warranty from date of purchase, including any charge cables or batteries.
For Product Purchased in Canada: Performance of any obligation under this warranty may be obtained by returning the warranted product, along with proof of purchase, to your place of purchase in Canada. This warranty gives you specifi ed legal rights. Additional warranty rights may be provided by law in some areas within Canada.
This warranty gives you specifi c legal rights, and you may also have other rights, which vary from state to state.
Note: The above warranty applies only to merchandise purchased in the United States of America or any of the territories or possessions thereof, or from a U.S. Military exchange.
For Product Purchased in the USA: Performance of any obligation under this warranty may be obtained by returning the warranted product, prepaid freight, along with proof of purchase to:
Midland Radio Corporation
Warranty Service Department
5900 Parretta Drive
Kansas City, MO 64120 8
Midland Radio Corporation
5900 Parretta Drive
Kansas City, Missouri 64120
Phone: (816) 241-8500
Fax: (816) 241-5713
E-mail: mail@midlandradio.com
www.midlandusa.com


VideosMidland ER50 / ER40 AM FM Emergency Alert Weather Radio Review Video
Documents / Resources
References
Download manual
Here you can download full pdf version of manual, it may contain additional safety instructions, warranty information, FCC rules, etc.
Download Midland ER50 - Emergency Alert Weather Radio Manual
Advertisement


Need help?
Do you have a question about the ER50 and is the answer not in the manual?
Questions and answers