SonicWALL NSa 4650/5650/6650 - Network Security appliance Quick Start Guide
- Installation manual (2 pages) ,
- Installation manual (2 pages) ,
- Safety and regulatory reference manual (58 pages)
Advertisement
- 1 About this Guide
- 2 NSa 4650/5650/6650 Hardware Overview
- 3 Checking Package Contents
- 4 Determining the WAN Type
- 5 System Requirements
- 6 SonicWall NSa LED Activity
- 7 Connecting and Powering On
- 8 Using the Setup Wizard
- 9 Connecting the LAN and WAN Interfaces
- 10 Testing and Troubleshooting Connectivity
- 11 Registering the Appliance
- 12 Upgrading to the Latest Firmware
- 13 Licensing Services
- 14 Rack Mounting the Appliance
- 15 Safety and Regulatory Information
- 16 Documents / Resources
About this Guide
This SonicWall® NSa 4650/5650/6650 Quick Start Guide provides instructions for basic installation and configuration of SonicWall NSa 4650/5650/6650 appliances.
NSa 4650/5650/6650 Hardware Overview
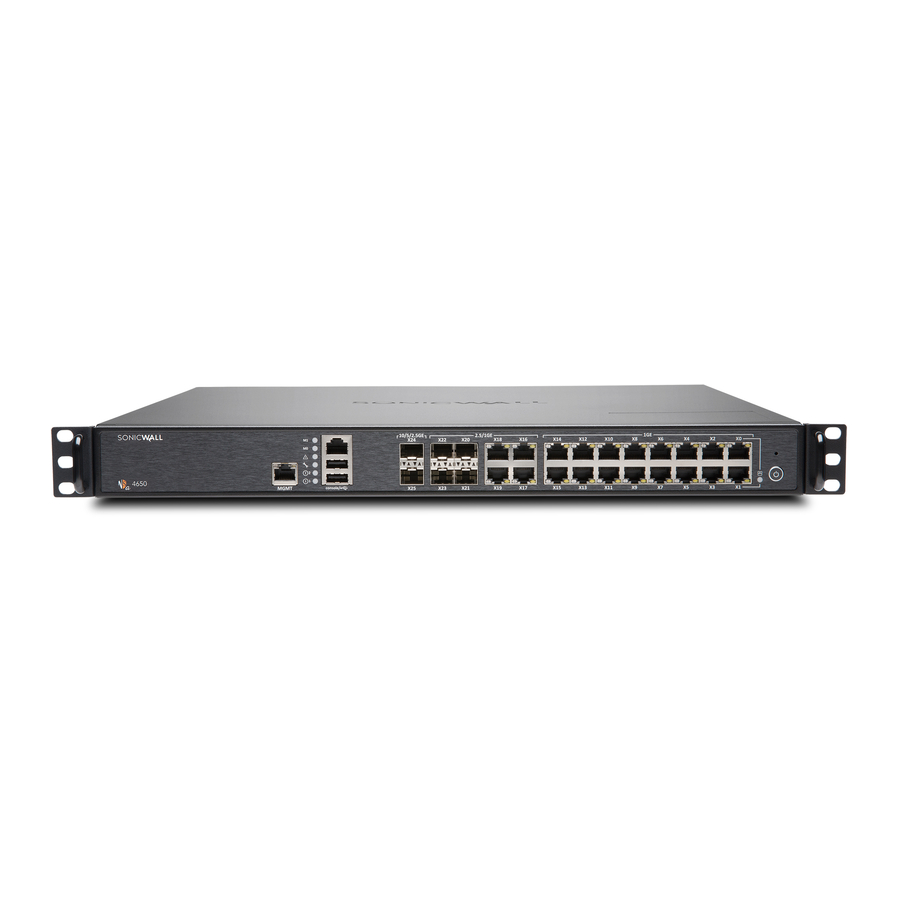
NSa 4650 Front Panel

NSa 5650 Front Panel

NSa 6650 Front Panel

NSa 4650/5650/6650 Back Panel

Checking Package Contents
Before you begin the setup process, verify that your package contains the following items:
- One NSa 4650/5650/6650 appliance
- One power cord
- One Ethernet cable
- One serial console cable
- One torx wrench
- One rack mount kit
- One SonicWall NSa 4650/5650/6650 Quick Start Guide
- One Safety, Environmental, and Regulatory Information document
 NOTE: The included power cord is approved for use only in specific countries or regions. Before using a power cord, verify that it is rated and approved for use in your location.
Package Contents

Determining the WAN Type
Before configuring your SonicWall NSa appliance, you need to determine the type of WAN connection that your setup uses. SonicWall supports the following types:
- Static—Configures the appliance for a network that uses static IP addresses.
- DHCP—Configures the appliance to request IP settings from a DHCP server on the Internet.
- PPPoE—Point-to-Point Protocol over Ethernet (PPPoE) is typically used with a DSL modem. If your ISP requires desktop software with a username and password, select NAT with PPPoE mode.
- PPTP—Point-to-Point Tunneling Protocol (PPTP) is used to connect to a remote server. PPTP typically supports older Microsoft Windows implementations that require tunneling connectivity.
- L2TP—Layer 2 Tunneling Protocol (L2TP) is used to transmit Layer 2 data over IP or other Layer 3 routed networks. Internet Service Providers (ISPs) often use it to enable virtual private networks (VPNs) for customers over the Internet. It does not encrypt network traffic itself. If L2TP is not available in the Setup Wizard, you can configure it later in the SonicOS management interface.
- Wire Mode (2-Port Wire)—Inserts the appliance into the network using two paired interfaces. Available Wire Mode types include Bypass, Inspect, and Secure. Bypass mode allows for quick and non-disruptive insertion into the data path. Inspect mode extends Bypass mode with traffic inspection for classification and flow reporting. Secure mode provides full SonicWall ReAssembly-Free Deep Packet Inspection™ (RF-DPI) and control of network traffic. Secure Mode also affords the same level of visibility and enforcement as conventional NAT or L2 Bridged Mode deployments, but without any L3/L4 transformations, and with no alterations of ARP or routing behavior. If Wire Mode is not available in the Setup Wizard, you can configure it later in the SonicOS management interface.
NOTE: When operating in Wire Mode, the firewall's MGMT interface is used for local management. To enable remote management and dynamic security services and application intelligence updates, a WAN interface (separate from the Wire Mode interfaces) must be configured for Internet connectivity.
- Tap Mode (1-Port Tap)—Using a single interface, the firewall connects to and receives mirrored packets from an adjacent switch SPAN port. Similar to Inspect mode in Wire Mode, but with a single port and not in the physical path of traffic. If Tap Mode is not available in the Setup Wizard, you can configure it later in the SonicOS management interface.
For more information about WAN types including Wire Mode, Tap Mode, L2TP, and others, refer to the SonicOS 6.5 Administration documentation or online help.
System Requirements
Before beginning the setup process, verify that you have:
- An Internet connection
- A web browser supporting Java Script and HTTP uploads
The following browsers are supported for SonicOS management:
- Chrome, version 45 and higher
- Firefox, version 38 and higher
- Internet Explorer, version 10 and higher
- Edge, all versions
- Opera, version 32 and higher
- Safari (running on non-Windows machines), version 10 and higher
NOTE: Mobile device browsers are not recommended for SonicWall appliance system administration.
SonicWall NSa LED Activity
The system LEDs provide essential status information about the appliance.
Power 1 and Power 2 LEDs
| LED Color | Description |
| Off | Respective power supply is not detected in the chassis. If both power supply LEDs are off, the system is not powered on. NOTE: When the optional power supply is not installed, it might take 1 to 2 minutes until the system detects the absence of the optional power supply. The LED may appear yellow at first, but will turn off once booting is finished. |
| Blue | Respective power supply is on and operating properly. |
| Yellow | Respective power supply is defective, not connected to an AC source, or switched off. NOTE: There may be a 10-20 second delay from the moment when a power LED becomes yellow. This is normal and associated with voltage decay. |
The Power 1 LED is the bottom LED next to the MGMT port. It is for the primary power supply. The Power 2 LED for the redundant power supply is above the Power 1 LED.
Test/Wrench LED
| LED Color | Description |
| Off | System booted and is operational. |
| Solid Yellow | System booting is in progress. |
| Slow blinking yellow | System is in SafeMode. |
| Rapid blinking yellow | System is shutting down. Do not remove power during the shutdown process. You risk damaging your appliance. |
Alarm LED
| LED Color | Description |
| Off | No alarms present. |
| Blinking or solid yellow | Minor system alarm. |
| Blinking or solid red | Major or critical system alarm (thermal, fan, etc). |
Module 0 / Module 1 LEDs
| LED Color | Description |
| Off | Module is not detected in respective slot. |
| Solid green | Module is present in the slot and operational. |
| Solid yellow | Module warning. |
MGMT Port LEDs
| LED Color | Description |
| Off | No link. |
| Solid green | Linked at 1 Gbps, 100 Mbps, or 10 Mbps. |
| Blinking yellow | Traffic is active. |
LAN Bypass LED
| LED Color | Description |
| Off | LAN Bypass is disabled, ports are isolated from each other. |
| Solid green | LAN Bypass is armed, but not active. Ports are isolated until event such as power failure/reboot, which will activate bypass. |
| Solid yellow | LAN Bypass is active, ports are connected together. LED will appear Off if power has failed, but bypass is still active. |
1 Gigabit Ethernet Copper Ports LEDs
| LED Color | Description |
| Off | No link. |
| Solid green | Linked at 1 Gbps, 100 Mbps, or 10 Mbps. |
| Blinking yellow | Traffic is active. |
2.5 / 1 GE Copper Ports and SFP Ports LEDs
| LED Color | Description |
| Off | No link. |
| Solid green | Linked at 1 Gbps or 100 Mbps. |
| Solid amber | Linked at 2.5 Gbps. |
| Blinking yellow | Traffic is active. |
10 / 5 / 2.5 GE Copper Ports and SFP+ Ports LEDs
| LED Color | Description |
| Off | No link. |
| Solid green | Linked at 1 Gbps or 100 Mbps. |
| Solid amber | Linked at 10 Gbps, 5 Gbps, or 2.5 Gbps. |
| Blinking yellow | Traffic is active. |
Connecting and Powering On

To connect your management computer to the NSa appliance for initial setup:
- Using the provided Ethernet cable, connect one end to your management computer and the other to the MGMT port on the appliance.
The MGMT port is a dedicated 1 Gigabit Ethernet interface for appliance management and SafeMode access. - Connect the power cord to the appliance and to an appropriate electrical outlet (100- 240 volts).
TIP: Optionally connect the appliance WAN interface (X1) to your Internet connection at this point. Since the WAN type is DHCP by default, this will prevent an error message during IP configuration in the setup wizard. See Connecting the LAN and WAN Interfaces.
Using the Setup Wizard
The SonicOS setup wizard helps you quickly configure the SonicWall appliance to secure your Internet connection.
To use the setup wizard:
- Configure the Local Area Connection IPv4 properties on your management computer with a static IP address on the 192.168.1.0/24 subnet, such as 192.168.1.20, and set the subnet mask to 255.255.255.0. This allows your computer to connect to SonicOS via the MGMT interface.
- In a web browser on your computer, navigate to the default MGMT IP address: http://192.168.1.254
- In the initial screen, launch the SonicOS setup wizard by clicking the first link, To launch the SonicWall Setup Guide, click here.
- The SonicOS Startup Guide opens. Click NEXT.

- In the Credentials screen, optionally configure the admin password and settings, and then click NEXT.
![information]() NOTE: The default administrator credentials are:
NOTE: The default administrator credentials are:
Username: admin
Password: password

- In the IP Configuration screen, the wizard defaults to DHCP for the WAN type and requests IP settings from the DHCP server on the network. Do one of the following:
- Click NEXT to accept these settings.
- Click Manual Config to configure a different WAN type and then click NEXT. For example, change the WAN type to Static using the drop-down list and manually enter a static IP address and other settings. For information about WAN types, see Determining the WAN Type.


- In the Manual Configuration screen, click RETRY if you want to revert to DHCP.
- In the Setup Complete screen:
- Review the settings.
- Optionally select Automatic secure crash analysis reporting.
- Optionally select Periodic secure diagnostic reporting for support purposes.
- If the settings are correct, click DONE to apply the configuration. The Setup Guide exits and the appliance displays the login page.
- Optionally log in with the username and password that you set up in credentials are admin / password).
Connecting the LAN and WAN Interfaces
After initial setup is complete, physically connect the LAN and WAN interfaces to the appropriate network devices in your environment to provide access to your networks or the Internet.
NOTE: Internet connectivity is needed for the recommended product registration process. For initial Internet access, connect your computer to the NSa X0 interface or to the LAN subnet. You cannot reach the Internet or other external destinations while connected to the MGMT interface without first configuring a default gateway in its interface settings.
LAN and WAN Connections

To connect the interfaces:
- Using a standard Ethernet cable, connect the appliance LAN interface (X0) to your local network switch or device, or to your computer.
- Using another Ethernet cable, connect the appliance WAN interface (X1) to your Internet connection. If you have a router, DSL modem, or cable modem, connect the Ethernet cable to a LAN port on the router or modem.
NOTE: If X1 is configured in Wire Mode, you can configure a different interface with one of the other WAN types for use in this step.
Testing and Troubleshooting Connectivity
To test your Internet connection:
- Reset your computer to use DHCP IP addressing and connect it to your LAN subnet or to the appliance X0 interface.
- Point your browser to the X0 IP address configured during initial setup (default: 192.168.168.168).
- Log into SonicOS using the configured credentials (default: admin/password).
- In a command prompt window, type: ping sonicwall.com. You should receive a reply.
- Open another browser tab or window and point it to https://www.sonicwall.com another valid web site. If the site displays, you have correctly configured your appliance.
To troubleshoot your Internet connection:
- Verify that the Local Area Connection settings on your management computer are set to use either DHCP or a static IP on the LAN subnet. Restart it or renew the DHCP address.
- Verify that the WAN interface being used for Internet connectivity is not configured in Wire Mode or Tap Mode.
- Restart your Internet router or modem to communicate with the DHCP client in SonicOS on the appliance.
- Check all cable connections and IP addresses.
To troubleshoot your MGMT connection, consider the following:
- Did you correctly enter the SonicWall NSa management IP address beginning with "http://" or "https://" in your web browser?
- Did you try restarting your management station while it is connected to the appliance?
- Are the Local Area Connection settings on your computer set to a static IP address on the 192.168.1.0/24 subnet?
- Is the Ethernet cable connected to your computer and to the MGMT port on your appliance, and are the connector clips properly seated in the ports?
To troubleshoot your LAN connection, consider the following:
- Did you correctly enter the IP address for the SonicWall NSa X0 interface into your web browser, beginning with "http://" or "https://"?
- Did you try restarting your management station while it is connected to the appliance?
- Are the Local Area Connection settings on your computer set to one of the following:
- Obtain an IP address automatically using DHCP
- A static IP address on the default LAN subnet (192.168.168.0/24)
- A static IP address on the configured LAN subnet, if you changed it during initial setup
- Is the Ethernet cable connected to your computer and to the X0 (LAN) port on your appliance, and are the connector clips properly seated in the ports?
Registering the Appliance
Registration is an important part of the setup process and is necessary in order to receive the benefits of SonicWall security services, firmware updates, and technical support
To register the appliance from SonicOS:
- Point your browser to the appliance LAN IP address (default https://192.168.168.168) and log in using the administrator credentials.
- Click the Register link in the top, right corner of the SonicOS management interface.
![information]() TIP: Registering the appliance from SonicOS requires that DNS settings are configured for the WAN interface.
TIP: Registering the appliance from SonicOS requires that DNS settings are configured for the WAN interface. - Enter your MySonicWall account name and password. If you do not have a MySonicWall account, click the Create MySonicWall account link to create an account. MySonicWall gets the necessary information directly from the appliance.
- If asked, you can specify a Friendly Name or Product Group for the appliance.
- Click CONTINUE in the registration completed notification.
![information]() NOTE: Your appliance must be registered to download the latest firmware.
NOTE: Your appliance must be registered to download the latest firmware.
Upgrading to the Latest Firmware
SonicWall recommends that you run the latest available firmware on your appliance by upgrading the factory-installed firmware to the latest version available on MySonicWall.
To obtain the latest firmware and upgrade your appliance:
- On your management computer, point your browser to http://www.mysonicwall.com.
- Click DOWNLOADS and click on NSa x650 Firmware in the displayed list, where NSa x650 is either 4650, 5650 or 6650 depending on your appliance model.
- Mouse over the displayed firmware and click the Download icon
![]() to save the file to a location on your computer.
to save the file to a location on your computer. - Log into the appliance as an administrator and navigate to the MANAGE | Firmware & Backups page.
- Click the Upload Firmware option, and then click the Browse button to select the firmware you just downloaded.
- Click Upload and wait for the upload to complete.
- In the Firmware & Backups page, click the Boot icon for the new firmware, using with Current Configuration.
![information]() NOTE: Selecting Factory Defaults for the Boot option will delete any custom configurations.
NOTE: Selecting Factory Defaults for the Boot option will delete any custom configurations. - Click OK. to confirm. The appliance restarts and then displays the login page.
- Enter your user name and password. The new SonicOS image version information is displayed on the MONITOR | Current Status | System Status page.
![information]() NOTE: If you are unable to connect to the SonicOS management interface, you can restart the security appliance in SafeMode. The SafeMode feature allows you to recover quickly from uncertain configuration states with a simplified management interface. See the SonicOS 6.5 Upgrade Guide for information about using SafeMode.
NOTE: If you are unable to connect to the SonicOS management interface, you can restart the security appliance in SafeMode. The SafeMode feature allows you to recover quickly from uncertain configuration states with a simplified management interface. See the SonicOS 6.5 Upgrade Guide for information about using SafeMode.
 to save the file to a location on your computer.
Licensing Services
SonicWall security services, cloud services, and client software products are licensed from SonicOS and synchronized with MySonicWall and the licensing server. These services are a vital part of the SonicWall security solution, preventing malware of all kinds from infecting your network.
Your appliance must be registered before you can activate service licenses.
To license services:
- Log into the appliance as an administrator.
- Navigate to the MANAGE | Updates | Licenses page.
- Under Security Services Summary, click the Manage Services Online link.
- Enter your credentials to log into MySonicWall. The Manage Services Online table is displayed.
- In the Manage Service column:
- Click Try to activate any available free trials.
- Click Enable to activate any free services, then click CONTINUE.
- Click Activate to enter the activation key for purchased services, then click SUBMIT.
- Click Enter Info and select the nearest data center, then click SUBMIT to activate Capture Advanced Threat Protection.
NOTE: If the display does not return to the Manage Services Online table, click the Provide your MySonicWall login and make all changes from here link under Manage Security Services Online to display it again.
- To purchase additional services, click the Go to MySonicWall.com, then come back and synchronize your changes option under Manage Security Services Online to log into MySonicWall directly from your browser.
- Scroll down to the Applicable Services section to select additional service licenses.
- Click the Cart icon to purchase a security service.
- In the Buy Service page, specify the desired quantity of licenses, then click Add to Cart.
- Once the item(s) have been added, click the Checkout button. Follow the instructions to complete your purchase.
- When you return to the SonicOS management interface, click SYNCHRONIZE on the MANAGE | Updates | Licenses page.
Rack Mounting the Appliance
The following illustrations provide rack mounting instructions for 4650/5650/6650 appliances. For safety information related to rack mounting and other aspects of product installation, see Safety and Regulatory Information.
To mount the appliance in a standard 19-inch rack:
- Fasten the four provided screws to the rail to connect inner and outer rail sections.
Assemble the Slide Rail

A - Fasten the two-sided screws to the rail to connect the end pieces.
Assemble the Slide Rail Ends

- Fasten six screws to attach the inner rail channel onto the appliance chassis.
Assemble Inner Rail to Chassis D D

- Slide the inner channel into the outer rails.
Insert Chassis to Frame


Safety and Regulatory Information
Regulatory Model Numbers
| Regulatory Model/Type | Product Name |
| 1RK39-0C9 | NSa 4650 |
| 1RK39-0CA | NSa 5650 |
| 1RK39-0CB | NSa 6650 |
Installation Requirements

The following conditions are required for proper installation.
- The SonicWall appliance is designed to be mounted in a standard 19-inch rack mount cabinet.
- Use the mounting hardware recommended by the rack manufacturer and ensure that the rack is adequate for the application.
- Ensure that no water or excessive moisture can enter the unit.
- Allow unrestricted airflow around the unit and through the vents on the side of the unit. A minimum of 1 inch (26mm) clearance is recommended.
- Route cables away from power lines, fluorescent lighting fixtures, and sources of noise such as radios, transmitters, and broadband amplifiers.
- Mount in a location away from direct sunlight and sources of heat. A maximum ambient temperature of 104º F (40º C) is recommended.
- If installed in a closed or multi-rack assembly, the operating ambient temperature of the rack environment may be greater than the room ambient. Therefore, consideration should be given to installing the equipment in an environment compatible with the maximum recommended ambient temperature.
- Mount the SonicWall appliances evenly in the rack in order to prevent a hazardous condition caused by uneven mechanical loading.
- Four mounting screws, compatible with the rack design, must be used and handtightened to ensure secure installation. Choose a mounting location where all four mounting holes line up with those of the mounting bars of the 19-inch rack mount cabinet.
- A suitably rated and approved branch circuit breaker shall be provided as part of the building installation. Follow local code when purchasing materials or components.
- Consideration must be given to the connection of the equipment to the supply circuit. Appropriate consideration of equipment nameplate ratings must be used when addressing this concern. Do not overload the circuit.
- Reliable grounding of rack-mounted equipment must be maintained. Particular attention must be given to power supply connections other than direct connections to the branch circuits, such as power strips.
- The included power cord is approved for use only in specific countries or regions. Before using a power cord, verify that it is rated and approved for use in your location.
- Minimum power cord rating for European Union (CE): Certified power supply cord not lighter than light PVC sheathed flexible cord according to IEC 60227, designation, or H05 VV-F or H05 VVH2-F2, and rated for at least 3G 0.75 mm².
- The following statement applies only to rack-installed products that are GS-Marked: This equipment is not intended for use at workplaces with visual display units, in accordance with §2 of the German ordinance for workplaces with visual display units.
- This product is not intended to be installed and used in a home or public area accessible to the general population.
- When installed in schools, this equipment must be installed in a secure location accessible only by trained personnel.
- When shipped from the factory, this SonicWall product has a single power supply installed. A second power supply can be ordered and installed for redundant power and added reliability. When the second power supply is installed, both power cords must be removed to disconnect AC or DC power from the unit.
- Never remove or install a power supply with the AC or DC power cord attached to the power supply being removed or installed.
- Always disconnect the power cords from the power supplies when installing or removing the power supply. Never install or remove a power supply with the AC power cord attached.
- Thumbscrews should be tightened with a tool after both installation and subsequent access to the rear of the product.
- When using a Fiber Optic Small-Form Pluggable (SFP) module, ensure it is IEC 60825 certified.
Lithium Battery Warning
The Lithium Battery used in the SonicWall security appliance may not be replaced by the user. Return the SonicWall security appliance to a SonicWall-authorized service center for replacement with the same or equivalent type recommended by the manufacturer. If, for any reason, the battery or SonicWall security appliance must be disposed of, do so following the battery manufacturer's instructions.
Cable Connections
All Ethernet and RS232 (Console) cables are designed for intra-building connection to other equipment. Do not connect these ports directly to communication wiring or other wiring that exits the building where the SonicWall appliance is located.

Documents / Resources
References
Download manual
Here you can download full pdf version of manual, it may contain additional safety instructions, warranty information, FCC rules, etc.
Download SonicWALL NSa 4650/5650/6650 - Network Security appliance Quick Start Guide
Advertisement


Need help?
Do you have a question about the NSa 4650 and is the answer not in the manual?
Questions and answers