Advertisement
Quick Links
NOTICE TO INSTALLER: Instructions must remain with installation.
Product information presented
here re fl
e
s t c
o c
d n
o i t i
s n
a
t t
m i
e
of publication. Consult factory
e r
a g
i d r
g n
d
c s i
e r
a p
c n
s e i
r o
n i
o c
s n
t s i
n e
e i c
. s
Register your
Zoeller Pump Company
Product on our website:
http://reg.zoellerpumps.com/
PREINSTALLATION CHECKLIST - ALL INSTALLATIONS
1.
Inspect your pump. Occasionally, products are damaged during shipment. If the unit is damaged, contact your dealer
before using. Do Not remove the test plug in the cover.
2.
Carefully read the literature provided to familiarize yourself with specific details regarding installation and use. These
materials should be retained for future reference.
SEE BELOW FOR LIST OF WARNINGS
1.
To reduce the risk of electrical shock, a properly grounded receptacle or control box
must be installed in accordance with the governing codes. Never remove ground pin
from plug.
2.
Make certain that the receptacle is within the reach of the pump's power supply cord.
DO NOT USE AN EXTENSION CORD. Extension cords that are too long or too light
do not deliver sufficient voltage to the pump motor. But more important,they could
present a safety hazard if the insulation were to become damaged.
3. Make sure the pump's electrical supply circuit is equipped with fuses or circuit breakers
of proper capacity. A separate branch circuit is recommended, sized according to the
governing electrical codes for the current shown on the pump name plate.
4. Testing for ground. As a safety measure, each electrical outlet should be checked
for ground using a circuit analyzer which will indicate if the power, neutral and ground
electrician.
5. FOR YOUR PROTECTION, ALWAYS DISCONNECT PUMP FROM ITS POWER
SOURCE BEFORE HANDLING. If pump is wired direct, de-energize the circuit at the
control box. DO NOT, UNDER ANY CIRCUMSTANCES, REMOVE THE GROUND
PIN. Wear insulated protective shoes and do not stand in water. Pumps equipped
with a grounded plug are designed to help protect against electrical shock. A properly
grounded receptacle or control box must be installed in accordance with governing
codes.
6. Installation and servicing of the pump's electrical circuits and hardware should only be
7. Installation and maintenance of this appliance is not intended for persons (including
children) with reduced physical, sensory or mental capabilities, or lack of experience
or knowledge, unless they have been given supervision or instruction concerning use
of the appliance by a person responsible for their safety.
8. Risk of electrical shock. Do not remove power supply cord and strain relief or connect
conduit directly to the pump. If the supply cable is damaged, it must be replaced by an
authorized Zoeller Representative.
9. Pump may contain oil which becomes pressurized and hot when operating.
Allow 2-1/2 hours after disconnecting before attempting service.
10. Pump is not intended for potable water due to possible contamination by oil contained
in the pump.
11. Risk of electric shock. These pumps have not been investigated for use in swimming
pools and marine areas.
INSTALLATION INSTRUCTIONS
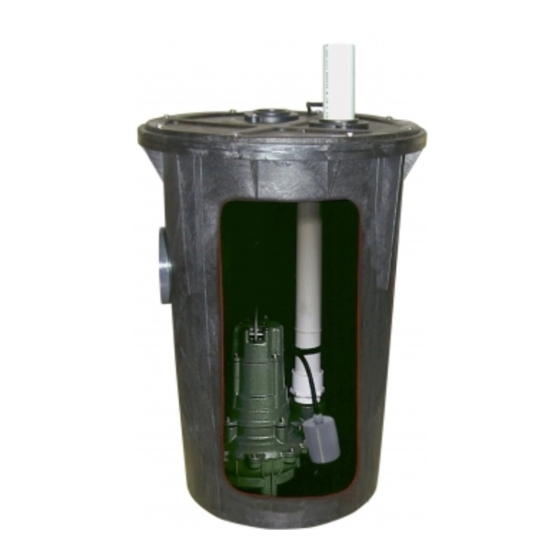
910 Package System
SEWAGE
© Copyright 2023 Zoeller Co. All rights reserved.
222, 422
SEE BELOW FOR LIST OF WARNINGS
1. This unit is not designed to handle any material larger than the pump's solids-passing
ability.
• 422 series pumps are designed to pass 38 mm (1-1/2") spherical solids.
• 222 series sewage pumps are designed to pass 50 mm (2") spherical solids.
2. Check to be sure your power source is capable of handling the voltage requirements
of the motor, as indicated on the pump name plate.
3. All plumbing (discharge and vent lines) must be installed to meet local codes. Unit must
be vented. DO NOT USE AN AUTOMATIC PLUMBING VENT DEVICE SIMILAR TO A
"PROVENT". Some states require this product to be installed by a licensed plumber.
4.
apparatus or pit peculiarities and is secured so that the pump will shut off. It is recommended
5.
capable of handling various sizes of solid waste be of the bottom intake design to
reduce clogging and seal failures. If a check valve is incorporated in the installation,
a 5 mm (3/16") vent hole must be drilled in the discharge pipe below the check
valve and pit cover to purge the unit of trapped air. Vent hole should be checked
periodically for clogging. The vent hole on a High Head application may cause too
much turbulence. You may not want to drill one. If you choose not to drill a vent hole,
be sure the pump case and impeller is covered with liquid before connecting the pipe
to the check valve. NOTE: THE HOLE MUST BE BELOW THE BASIN COVER AND
CLEANED PERIODICALLY. Water stream will be visible when pump is operating.
6. Pump should be checked frequently for debris and/or build up which may interfere
7. Maximum operating temperature for standard model pumps must not exceed 54 °C
(130 °F) for cast iron pumps, or 40 °C (104 °F) for pumps with plastic motor housings.
8. Do not operate a pump in an application where the Total Dynamic Head is less than
the minimum Total Dynamic Head listed on the Pump Performance Curves.
9.
For health reasons, do not unplug, turn off, or disable pump and use pump tank system
10.
CHECK VALVE MUST BE USED TO REDUCE UNNECESSARY CYCLING OF PUMP.
11.
This system must be installed above the water table. Groundwater outside the basin will
cause it to collapse.
REFER TO WARRANTY ON PAGE 2.
®
- 1 -
- 1 -
ZT0505_ECa
60 Hz
Visit our website:
www.zoellerpumps.com
CAUTION
arger in diameter.
0223
Supersedes
new
party,
Advertisement

Related Manuals for Zoeller 910 Package System


Summary of Contents for Zoeller 910 Package System
- Page 1 11. Risk of electric shock. These pumps have not been investigated for use in swimming pools and marine areas. REFER TO WARRANTY ON PAGE 2. ® © Copyright 2023 Zoeller Co. All rights reserved. - 1 - - 1 -...
-
Page 2: Limited Warranty
Carefully tighten pipe joints (use pipe dope) and screws. Check gasket location, tighten lid evenly. Do not over tighten If the above checklist does not reveal the problem, consult the factory. Do not attempt to service or otherwise disassemble pump. Service must be performed by an authorized Zoeller Company representative. ®... -
Page 3: Accessories Description
Keep these instructions with warranty after installation. This product must be installed in accordance with National Electric Code, ANSI/N- FPA 70 so as to prevent moisture from entering or accumulating within boxes, conduit bodies, fittings, float housing, or cable. ® © Copyright 2023 Zoeller Co. All rights reserved. - 3 -... - Page 4 Basin must be in accordance with applicable codes and Install proper Zoeller unicheck (combination union and check valve), preferably just above the basin to allow easy removal of the pump for before starting pump.
- Page 5 Check valve Union 2" Pipe 2" Pipe (Length 200mm) 2" BSPT slip 2" BSPT slip 2" Pipe 2" BSPT slip Inlet hub 4" Pipe For reference only EA0171 ® © Copyright 2023 Zoeller Co. All rights reserved. - 5 -...
-
Page 6: Dimensional Data
If rotation is not correct, switching of any two power leads other than ground, should provide the proper rotation. 006848 ® © Copyright 2023 Zoeller Co. All rights reserved. - 6 -... - Page 7 請 勿 使 用 於 油 類 、 汽 油 、 石 油 產 品 或 含 任 何 化 學 成 分 的 液 體 。 ��. 務必安裝止回閥減少水回流,以免造成不必要的泵浦持續 運轉。 ��. 本套裝系統需安裝在平均地下水位以上,避免損壞箱體。 保修請參閱第�頁。 © 版權所有: ���� Zoeller ® 公司 翻印必究 - � -...
- Page 8 清理進水口附近區域。 進水口周圍有雜物。 排放管堵塞。 必要時卸除排放管,沖走雜物。 由合格電氣技師檢查家庭管線。 電壓太低或不當電壓。 泵浦運轉正常,但抽不到 葉輪受損。 聯絡經銷商。 水或水流量太少。 馬達運轉不當、電容器瑕疵、入水含空氣或造成空氣進入 聯絡經銷商。 水機室。 確保排放管中的通氣孔暢通。 泵浦氣鎖。 安裝揚程超過系統設計的揚程。 更換排放管或聯絡經銷商。 管路或止回閥阻塞。磨蝕性物質及有害的化學物質造成葉 揚程或流量使用一般時間 檢查管路、打開並檢查水機。 輪及水機損壞。 後降低。 小心鎖緊管接頭 (使用管路密封膠) 和螺絲。 如果桶子或接頭漏水。 管配件或螺絲鎖過緊或太鬆,或墊圈沒有平均的鎖緊。 檢查墊圈的位置,均勻地鎖緊蓋子。 不要將管接頭或螺絲鎖的過緊。 如果檢查後仍無法排除問題,請與Zoeller公司授權的經銷商聯絡,切勿自行拆卸泵浦。 © 版權所有: ���� Zoeller ® 公司 翻印必究 - � -...
- Page 9 警 告 安裝或維修前請先切斷電源 。 合格的維修人員必須 請勿將本產品與易燃液體一起使用 。 在安裝或維修產品時依照合適的電機和配管法規 。 不要安裝在危險場所 , 須符合國家電器法規 。 未能遵守這些預防措施 , 可能會導致嚴重的人身傷害或死亡 。 如果開關的電纜損壞或斷裂請立即更換產品 。 安裝後妥善保存說明書 。 請依照國家電器規範安裝本產品 , 防止水分由外殼 , 水管件 , 配件 , 浮球或電纜進入或聚積 。 © 版權所有: ���� Zoeller ® 公司 翻印必究 - � -...
- Page 10 上蓋螺絲組 (出貨時鎖附於上蓋) 出水口滑接 �mm通氣孔 鑽孔範圍 D型泡棉 浮球位置預組配件 出水管固定位置 所有水管接合處皆需上管路密封膠 電纜線密封墊 通氣口滑接 �"水管 (長度依機型不同) 入水孔 �" BSPT 滑接 ���mm 高水位警報器 非自動型馬達 D型泡棉黏貼處 安裝高度 ���mm 馬達浮球開關 安裝高度 交接位置 馬達圖例僅供參考 D型泡棉斜切(��~��°) EA0171 EA0171 © 版權所有: ���� Zoeller ® 公司 翻印必究 - � -...
- Page 11 �" 水管 球閥 所有管路接合處 止回閥 皆需上管路密封膠 活接 �" 水管 �" 水管 (長度 ���mm) �" BSPT 滑接 �" BSPT 滑接 �" 水管 (長度依機型不同) �" BSPT 滑接 �"橡膠連接管 �" 水管 馬達圖例僅供參考 EA0171 © 版權所有: ���� Zoeller ® 公司 翻印必究 - � -...
- Page 12 電器電路及五金配件的安裝與檢查必須由合格專業電工執行。 單相配線注意事項 注 意 要使非自動泵浦運轉,需配置控制箱或 �� 安培的浮球開關 (P/N ��-����) 在電路上。按照面板提供的電路系統說明安裝。 非自動型 三相配線注意事項 三相 三相非自動泵浦自動運轉必須搭配控制櫃。按 白色 紅色 照面板提供的電路系統說明安裝。 綠色 黑色 安裝泵浦之前,請檢查以確保線路已正確連接 到電源,綠色接地線(請參見配線圖)已連接 到有效的接地面。臨時充電,觀察啟動扭矩造 藍色 紅色 黃色 成的旋轉,旋轉方向如果是與水機上的箭頭相 馬達 反即為正確。如果旋轉不是正確的,交換地線 以外的兩條接線安裝,即可成為正確的安裝。 006848 © 版權所有: ���� Zoeller ® 公司 翻印必究 - � -...
Need help?
Do you have a question about the 910 Package System and is the answer not in the manual?
Questions and answers