
Related Manuals for Enovation Controls PowerView PV480


Summary of Contents for Enovation Controls PowerView PV480
- Page 1 PowerView™ Display Model PV480 Kubota Operations Manual 00-02-0830 2013-03-08 Section 78...
- Page 2 In order to consistently bring you the highest quality, full featured products, we reserve the right to change our specifications and designs at any time. The latest version of this manual can be found at www.fwmurphy.com. Please read the following information before installing. BEFORE BEGINNING INSTALLATION OF THIS MURPHY PRODUCT: •...
-
Page 3: Table Of Contents
Table of Contents Introduction ..........................1 Gauge Screens ......................1 Soft Keys (Buttons) ......................2 Status Icons .........................3 Glossary of Terms and Acronyms ................3 Main Menu ........................... 4 Gauges.........................5 Diagnostics ........................5 System Info ........................8 Lamp Info ........................9 User Settings ......................11 Regen ............................15 Parked Ready Regen .................... - Page 4 (THIS PAGE INTENTIONALLY LEFT BLANK)
-
Page 5: Introduction
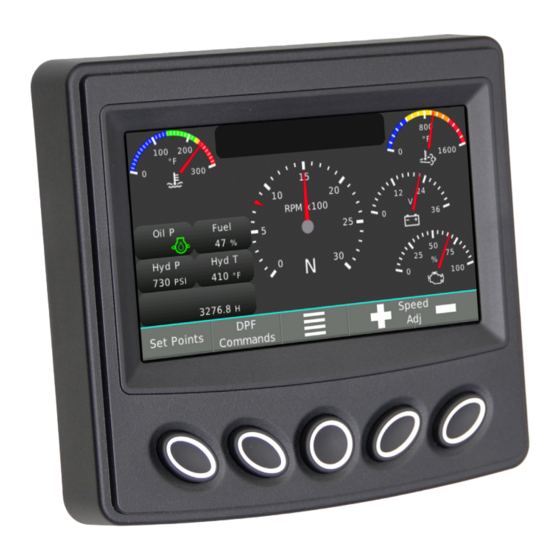
Introduction The PV480 is a rugged CAN-based controller. This manual explains the functions of the unit, describes the display screens and gives details about the Kubota PV480 custom configuration. Gauge Screens When turning the Controller to the ON position, a sequence of screens will display on the controller. -
Page 6: Soft Keys (Buttons)
Soft Keys (Buttons) Your Soft Key choices are associated with the throttle source. Some throttle sources may not be present on your model. Soft Key Description Set Points—Displays the accelerator pedal positions or engine- requested rpm/speed quick set points DPF Commands—Displays the Diesel Particulate Filter (DPF) command to access the Un-inhibit Regen and Inhibit Regen Request Regen—Sends message to Engine Control Unit (ECU) to start regenerating the DPF when prompted by engine ECU. -
Page 7: Status Icons
Status Icons The Status Icons are color-coded and light up when communicating to the operator. Pay close attention to any Status Icon and its color that may appear. Status Icon Description Check Engine—Yellow icon is visible if the controller receives a DM1 (Active Diagnostic Trouble Code) message with an amber lamp command, the yellow Icon displays Check Engine—Red icon is visible if the controller receives a DM1 message... -
Page 8: Main Menu
Main Menu Press the Main Menu ( ) soft keys to view the menu action items. Scroll through the Main Menu list, on two screens, using the UP/DOWN soft keys to maneuver the cursor (. .) to the action item. •... -
Page 9: Gauges
Gauges The Gauge Screen is the Main Menu default screen (home) and you may open it from any screen by pressing the Menu ( ) soft key and then the select ( ) soft key. Diagnostics Scroll through the Main Menu list using the UP/DOWN soft keys and stop the cursor (. .) next to the action item Diagnostics. - Page 10 Active Diagnostics: Use the UP/DOWN soft keys and stop the cursor (. .) next to the action item Active Diagnostics. Press the select ( ) soft key .The screen displays active warnings or faults from the ECU. Each diagnostic is shown with the appropriate Suspect Parameter Number (SPN) and Failure Mode Indicator (FMI), Text Description (if available), and the ID/Name of the device that transmitted the DM1 message.
- Page 11 Logged Diagnostics: Use the UP/DOWN soft keys and stop the cursor (. .) next to the action item Logged Diagnostics. Press the select ( ) soft key. The screen displays the controller requests DM2 (stored trouble codes, not active), warning or faults from the ECU. Each diagnostic is shown with the appropriate information: •...
-
Page 12: System Info
System Info Scroll through the Menu list using the UP/DOWN soft keys and stop the cursor (. .) next to the action item System Info. Press the select ( ) soft key. The screen displays the following items: • Engine Model •... -
Page 13: Lamp Info
Lamp Info Scroll through the Menu list using the UP/DOWN soft keys and stop the cursor (. .) next to the action item Lamp Info. Press the select ( ) soft key This screen shows the Diesel Particulate Filter (DPF) Lamp symbols and provides a description and cautionary information for each symbol. - Page 14 Machine is inhibiting DPF regeneration: Parked Regeneration overview: Section 78 00-02-0830 2013-03-08 - 10 -...
-
Page 15: User Settings
User Settings Scroll through the Menu list using the UP/DOWN soft keys and stop the cursor (. .) next to the action item User Settings. Press the select ( ) soft key. The screen displays the following action items: • Colors •... - Page 16 Screen Brightness: Use the UP/DOWN soft keys and stop the cursor (. .) next to the action item Brightness. Set the brightness of the backlight by using the +/– soft keys. Language: Use the UP/DOWN soft keys and stop the cursor (. .) next to the action item Language.
- Page 17 Units: Use the UP/DOWN soft keys and stop the cursor (. .) next to the action item Units. Set your unit preference using the +/– soft keys. • USA Standard • Metric kPa • Metric Bar Section 78 00-02-0830 2013-03-08 - 13 -...
- Page 18 Date Setting: Use the UP/DOWN soft keys and stop the cursor (. .) next to the action item Date. Press the select ( ) soft key to initiate change to the month value. Use the (+/–) soft keys to increment or decrement the number. Use the DOWN arrow to reach the day value and year value and the +/–...
-
Page 19: Regen
Regen Parked Ready Regen Machine is in an operating condition such that the DPF can regenerate. Parked Ready Regen Action Description Communicates with the engine that Regen is not wanted or is unsafe to Cancel Regen regenerate at this time. Regen Mode Communicates with the engine that Regen is not wanted or is unsafe to Inhibit... - Page 20 The message requires an active response by the operator so it is important that the operator reads the entire popup message. The message explains the situation and may list instructions for the operator. Some messages require using the UP/DOWN soft keys to maneuver through the entire message. If the operator doses not wish to complete a Parked Regeneration at this time—click on soft key.
- Page 21 Once the Parked Regen has started it can be shut down by pressing the Stop Regen soft key. However, do not shut down unless it is absolutely necessary. Parked Regeneration is complete when the controller screen shows the following green popup message.
-
Page 22: Messages, Cautions, Warnings
Messages, Cautions, Warnings Please pay attention to all messages on the controller for the safety of personnel and to prevent engine and property damage if DPF regeneration is needed. Regen Level 1 Regen Level 3 Regen Level 2 Regen Level 4 Regen Complete Regen Level 5 Section 78... - Page 23 NOTES: ___________________________________________________________________________ ___________________________________________________________________________ ___________________________________________________________________________ ___________________________________________________________________________ ___________________________________________________________________________ ___________________________________________________________________________ ___________________________________________________________________________ ___________________________________________________________________________ ___________________________________________________________________________ ___________________________________________________________________________ ___________________________________________________________________________ ___________________________________________________________________________ ___________________________________________________________________________ ___________________________________________________________________________ ___________________________________________________________________________ ___________________________________________________________________________ ___________________________________________________________________________...
- Page 24 Section 78 00-02-0830 2013-03-08 - 20 -...
Need help?
Do you have a question about the PowerView PV480 and is the answer not in the manual?
Questions and answers