Table of Contents
Advertisement
Quick Links
Advertisement
Table of Contents

Related Manuals for sinmag LBC LCR7


Summary of Contents for sinmag LBC LCR7
- Page 1 Models LCR5 and LCR7 5-Spit and 7-Spit Rotisserie Ovens Operator’s Manual LBC Bakery Equipment, Inc. 5901 – 23 Drive West, Suite 105 Everett, WA 98203 Phone: 888-RACKOVN (888-722-5686) Fax: 425-642-8310 Email: service@lbcbakery.com Website: www.lbcbakery.com REV D 8/2013...
-
Page 2: Read First
READ FIRST THIS MANUAL MUST BE RETAINED FOR FUTURE REFERENCE. READ, UNDERSTAND AND FOLLOW THE INSTRUCTIONS AND WARNINGS CONTAINED IN THIS MANUAL. IT IS THE RESPONSIBILITY OF THE OWNER/OPERATORS OF THIS APPLIANCE TO TRAIN, SUPERVISE AND AUTHORIZE ANY PERSON DESIGNATED AS AN OPERATOR. ALL OPERATORS MUST READ AND UNDERSTAND THIS MANUAL. DO NOT STORE OR USE GASOLINE OR OTHER FLAMMABLE VAPORS W A R N I N G... -
Page 3: Table Of Contents
TABLE OF CONTENTS CHAPTER PAGE Read First ..............Safe Operating Rules . -
Page 4: Safe Operating Rules
SAFE OPERATING RULES (Part 1 of 2) YOU MUST READ AND UNDERSTAND THIS SECTION BEFORE YOU OPERATE THIS APPLIANCE. Hot Surfaces The appliance may be hot. Do not contact hot surfaces in the appliance interior without proper protection. Contact with hot surfaces can cause serious burns, loss of skin and hair and the use of limbs. ... - Page 5 SAFE OPERATING RULES (Part 2 of 2) YOU MUST READ AND UNDERSTAND THIS SECTION BEFORE YOU OPERATE THIS APPLIANCE. Smoke or Fire Hazard If you see flames or smoke in or around the appliance: Turn the appliance off and contact your supervisor or an authorized service provider. Call 911 or contact fire safety personnel in accordance with your employer’s emergency plan.
-
Page 6: Equipment Description
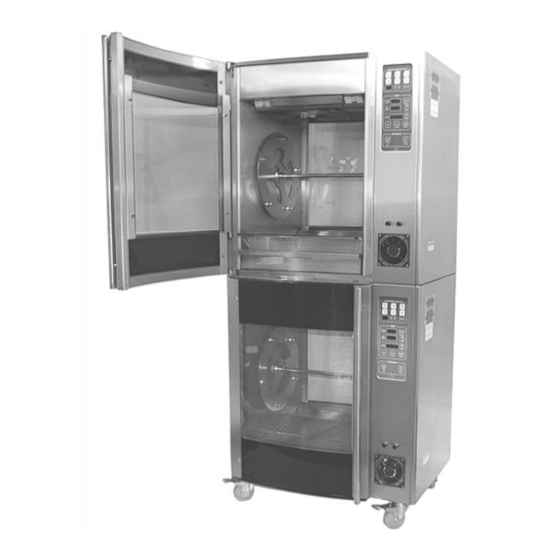
EQUIPMENT DESCRIPTION Exterior Dimensions Model LCR5: 32.5” [826mm] Height 31.5” [800mm] Width 26.3” [668mm] Depth Model LCR7: 38.4” [975mm] Height 38.9” [988mm] Width 32.6” [828mm] Depth NOTE 1: The depths shown are for LCR5-2D and LCR7-2D two-door (pass through) ovens and exclude handles. For LCR5-1D, add 0.8”... -
Page 7: Configurations
CONFIGURATIONS Countertop or Floor Mount Rotisserie Countertop: 4.0” [102mm] Legs Floor: 6.0” [152mm] Legs or 4.5” [114mm] Swivel Casters with Brakes Stand Mount Rotisserie LST5 Stand (for LCR5 Rotisserie) or LST7 Stand (for LCR7 Rotisserie or LHC7 Holding Cabinet) Stacked Appliances Combinations: ... -
Page 8: Control Overview
CONTROL OVERVIEW (Part 1 of 3) See pages 9 and 10 for more thorough descriptions of the features shown below E1. Quick-Select Buttons PROGRAM SELECT Easy access to most-frequently- used recipes E1. Recipe Indicator Light Illuminates to indicate when a E1. - Page 9 CONTROL OVERVIEW (Part 2 of 3)(Con tinu During the first few hours of operation, you may notice a small amount of smoke coming from the N O T I C E rotisserie and/or a faint odor. This is normal in a new oven and will disappear after a few hours of use.
- Page 10 CONTROL OVERVIEW (Part 3 of 3) Creating and Saving Recipes. To create and save a recipe, do the following: Sear. Press the sear event button. The sear button light will flash, indicating the sear event is in programming mode. The temperature and timer values will appear in the adjacent displays.
-
Page 11: How To Program And Save A Recipe
OPERATION (Part 1 of 4) How to Program and Save a Recipe Press the power button to turn the oven on. Select a recipe number. Up to 20 recipes may be saved. Buttons 1 through 6 are Quick-Select buttons intended for your most-used recipes. - Page 12 OPERATION (Part 2 of 4) Setup or deactivate the roast step. To setup, press the roast button and enter a set point and time. If you prefer to deactivate the roast step, enter a roast time of “00:00.” Setup the warm/hold step.
-
Page 13: How To Run A Recipe
OPERATION (Part 3 of 4) How to Run a Recipe Press the power button to turn the oven on. (NOTE: The oven will automatically heat to the set temp of the first recipe step with an active timer value. ... - Page 14 OPERATION (Part 4 of 4) Close the loading door and press the timer start button. The timer light and the timer colon will change to from steady on to flashing to indicate the timer is active and counting down. (NOTE 1: To stop the timer, press the timer start button a second time.
-
Page 15: Maintenance And Cleaning
MAINTENANCE and CLEANING DISABLE ELECTRICAL POWER AT SERVICE W A R N I N G BREAKER BEFORE CLEANING OVEN. KEEP WATER AND SOLUTIONS OUT OF W A R N I N G CONTROLS. NEVER SPRAY OR HOSE CONTROL CONSOLE. ALWAYS KEEP THE AREA NEAR THE APPLIANCE C A U T I O N FREE FROM COMBUSTIBLE MATERIALS. -
Page 16: Parts List
PARTS LIST BOTH HIGH AND LOW VOLTAGES ARE PRESENT INSIDE OF THIS APPLIANCE WHEN THE UNIT IS PLUGGED/WIRED INTO A LIVE W A R N I N G RECEPTACLE. BEFORE REPLACING ANY PARTS, DISCONNECT THE UNIT FROM THE ELECTRIC POWER SUPPLY. USE OF ANY REPLACEMENT PARTS OTHER THAN THOSE SUPPLIED BY LBC OR THEIR AUTHORIZED C A U T I O N... - Page 17 NOTES...
Need help?
Do you have a question about the LBC LCR7 and is the answer not in the manual?
Questions and answers