Table of Contents
Advertisement
Quick Links
MODELS LMO Max-E & LMO Max-G
ROTATING RACK OVEN
INSTALLATION and SERVICE MANUAL
GAS OVENS: POST IN A PROMINENT LOCATION, THE INSTRUCTIONS TO BE
FOLLOWED IN THE EVENT THE SMELL OF GAS IS DETECTED. THIS INFORMATION
SHALL BE OBTAINED FROM THE LOCAL GAS SUPPLIER.
RETAIN THIS MANUAL FOR FUTURE REFERENCE.
LBC BAKERY EQUIPMENT, INC.
6026 31
st
Ave NE
Tulalip, WA 98271, USA
Toll Free: 888-722-5686 (888-RACKOVN)
E-mail:
sales@lbcbakery.com
www.lbcbakery.com
© Copyright 2017-2022 LBC Bakery Equipment, Inc.
1
Rev 6/2022
Advertisement
Table of Contents

Related Manuals for sinmag LBC LMO Max-E


Summary of Contents for sinmag LBC LMO Max-E
- Page 1 MODELS LMO Max-E & LMO Max-G ROTATING RACK OVEN INSTALLATION and SERVICE MANUAL GAS OVENS: POST IN A PROMINENT LOCATION, THE INSTRUCTIONS TO BE FOLLOWED IN THE EVENT THE SMELL OF GAS IS DETECTED. THIS INFORMATION SHALL BE OBTAINED FROM THE LOCAL GAS SUPPLIER. RETAIN THIS MANUAL FOR FUTURE REFERENCE.
-
Page 2: Read First
READ FIRST (Part 1 of 2) ALL OPERATORS OF THIS EQUIPMENT MUST BE OF LEGAL AGE TO OPERATE SUCH EQUIPMENT AND MUST BE FAMILIAR WITH AND UNDERSTAND ALL CAUTION LABELS READ, UNDERSTAND AND FOLLOW THE INSTRUCTIONS AND WARNINGS CONTAINED IN THIS MANUAL. IT IS THE RESPONSIBILITY OF THE OWNER/OPERATOR OF THIS APPLIANCE TO TRAIN, SUPERVISE AND AUTHORIZE ANY PERSON DESIGNATED AS AN OPERATOR. - Page 3 READ FIRST (Part 2 of 2) WARNING THIS APPLIANCE IS EQUIPPED WITH A THREE-PRONG (GROUNDED) PLUG FOR YOUR PROTECTION AGAINST SHOCK HAZARD. PLUG DIRECTLY INTO A THREE-PRONG RECEPTACLE. DO NOT CUT OR REMOVE THE GROUNDING PRONG FROM THIS PLUG. WARNING DISCONNECT FROM POWER SOURCE WHEN CLEANING AND/OR SERVICING THIS MACHINE.
-
Page 4: Table Of Contents
TABLE of CONTENTS Contents READ FIRST ..........................2 GAS OVENS: LIGHTING & SHUTDOWN ..................5 ELECTRIC OVENS: SPECIFICATIONS ..................6 GAS OVENS: SPECIFICATIONS ....................8 SAFETY CONSIDERATIONS ......................9 RECEIVING ........................... 10 INSTALLATION ........................11 GAS OVENS: NATURAL/PROPANE GAS CONVERSION ............15 STARTUP & INSPECTION ....................... 17 PRESSURE PANEL SETTINGS .................... -
Page 5: Gas Ovens: Lighting & Shutdown
GAS OVENS: LIGHTING & SHUTDOWN Lighting Instructions After Long-Term Shutdown Turn on the gas supply to the oven. Open the gas valve access door located above the loading door. Switch the gas valve to “ON.” Keep the gas valve door open until the burner lights the first time. WARNING IF THE BURNER DOES NOT LIGHT, TURN OFF ALL GAS TO THE OVEN FOR 5 MINUTES AND THEN BEGIN AT STEP 1. -
Page 6: Electric Ovens: Specifications
ELECTRIC OVENS: SPECIFICATIONS Installation Requirements • Oven ships fully assembled and will fit through a 36” door opening with removal of the oven door assembly, valence and back panel. Check local codes to determine if the oven needs to be installed under a hood. - Page 7 Total kW Voltage, ph, Hz Water Drain 208V, 3ph, 60Hz 1/2"NPT, 24.0 3/4"NPT, 240V, 3ph, 60Hz cold water, (Heaters) route to 480V, 3ph, 60Hz 3 gpm air gap drain @ 45 psi min 120V, 1ph, 60Hz (Control) © Copyright 2017-2022 LBC Bakery Equipment, Inc. Rev 6/2022...
-
Page 8: Gas Ovens: Specifications
GAS OVENS: SPECIFICATIONS Installation Requirements • Oven ships fully assembled and will fit through a 36” door opening with removal of the oven door assembly, valence and back panel. • Clearance to Combustibles: 1” from back and sides, 18” from top •... -
Page 9: Safety Considerations
SAFETY CONSIDERATIONS Your LBC Bakery Equipment oven was manufactured to rigid standards. The oven is ETL listed as a unit, and meets applicable safety standards. The responsibility of the manufacturer is to supply suitable, comprehensive instructions and recommendations for operation and maintenance of appliance. All operations, maintenance and repair of oven must be performed by properly trained and qualified personnel, and all operations, maintenance and repair must be performed in a diligent manner. -
Page 10: Receiving
RECEIVING CAUTION THIS APPLIANCE WEIGHS MORE THAN 1000 LBS. FOR SAFE HANDLING, INSTALLER SHOULD OBTAIN HELP AS NEEDED OR EMPLOY APPROPRIATE MATERIAL-HANDLING EQUIPMENT (SUCH AS A FORKLIFT, DOLLY OR PALLET JACK) TO REMOVE THE UNIT FROM ITS PACKING MATERIALS AND MOVE IT TO THE PLACE OF INSTALLATION. NOTE: IF REQUIRED, YOU CAN REMOVE THE INNER RIGHT WALL COVER AND REMOVE THE STEAMER MASS IN FOUR SECTIONS. -
Page 11: Installation
(Part 1 of 4) INSTALLATION General Information This appliance, when installed, must be electrically grounded in accordance with state and local codes, or in the absence of local codes, with the National Electrical Code (ANSI/NFPA 70) or the Canadian Electrical Code (CSA C22.2 No. 3, latest edition) as applicable. The appliance requires some assembly by an authorized LBC trained service technician. - Page 12 INSTALLATION (Part 2 of 4) Uncrating and Moving 1. Move oven to area where it is to be installed. NOTE: If the oven is to be moved through a 36” door, see section directly below. 2. Disassemble crate. Use caution to avoid damage to oven with pry bars or nail removers. 3.
- Page 13 INSTALLATION (Part 3 of 4) Setting the Oven in Place Locate the oven in final location. Refer to “Specifications” section of this manual, “Installation Requirements” notes, for clearance to combustibles specifications. Confirm floor is non-combustible and is supported by non-combustible construction. Confirm there are no buried electrical wires or conduit, pipes or other utilities beneath oven.
- Page 14 INSTALLATION (Part 4 of 4) Water Connection This appliance must be installed with adequate backflow prevention in accordance with applicable federal, state and local codes. Confirm availability of cold water near connection point on top of oven. Confirm that there is a water shutoff valve within reach of connection point. If necessary, install and connect a water treatment device at water supply connection downstream from water shutoff valve.
-
Page 15: Gas Ovens: Natural/Propane Gas Conversion
GAS OVENS: NATURAL/PROPANE GAS CONVERSION Part 1 of 2 This oven was shipped configured to operate on either natural gas or propane gas. Consult the data plate to determine which fuel the oven is configured for. The oven can be reconfigured for either natural gas or propane gas. Gas Pressure Manifold pressure adjustment (cap... - Page 16 GAS OVENS: NATURAL/PROPANE GAS CONVERSION Part 2 of 2 Carefully pull burner assembly up and out of top of oven. Use caution to avoid damaging the hot-surface ignitor and flame sensor on the burner. Remove burners from burner assembly. Remove and replace gas orifices.
-
Page 17: Startup & Inspection
STARTUP & INSPECTION LMO-Max START-UP FORM: This form MUST BE SIGNED & RETURNED to LBC via Email to service@lbcbakery.com or FAX 425-642-8310, in order for the Customers Warranty to take effect LMO-Max Rack Oven Inspection Procedure Specifics Serial Number ________________________________________ Model Number ________________________________________ Location Name... - Page 18 Burner test: Set to 125° F. (Temp starts to rise within a minute?Y_____ N_____ _____ (If temp does not start to rise, Call LBC) Supply side gas pressure when burner is running? _____ _____ (If less than 5" and greater than 14", Call LBC) Set to 300°...
- Page 19 Final Inspection: Loading doors open/close freely past 90° without obstructionY_____ N_____ _____ Doors open 1/2" to 1" before motor and rack Stops? Y_____ N_____ _____ Gas is on? Y_____ N_____ _____ Electrical Is on? Y_____ N_____ _____ Water is on? Y_____ N_____ _____ Gaskets: Installed and seated correctly? Y_____ N_____ _____...
-
Page 20: Pressure Panel Settings
PRESSURE PANEL SETTINGS Adjust gap between shutter side of air opening adjacent to adjusting screw. Left Side Right Side 11/32 11/32 0.35 0.35 13/32 10mm 11mm 7/16 0.41 0.44 0.44 13/32 10mm 0.41 11mm 7/16 11/32 11/32 0.35 0.35 5/16 0.32 0.32 5/16... -
Page 21: Control Operation & Setup
(Part 1 of 3) CONTROL OPERATION & SETUP © Copyright 2017-2022 LBC Bakery Equipment, Inc. Rev 6/2022... - Page 22 CONTROL SETUP (Part 2 of 3) The oven control can be tailored to operate differently, depending on the customer. Here is a list of the configurable parameters: • Sb – Temperature Set-back causes the control to reduce the thermostat setting when the oven is running, but not being used for more than a selected time.
- Page 23 • T7 – Maximum total water that will be dispensed in a user set steam cycle set for 60 to 99 seconds is set in seconds. • T8 – Proportional Steam for user settings for 60 up to 99 seconds, in seconds ON for every 10 seconds.
-
Page 24: Default Parameter Settings
CONTROL OPERATION & SETUP (Part 3 of 3) Temperature Calibration Place the sensor of an electronic thermometer in the air distribution slot of the pressure panel. Locate the thermometer outside the oven, preferably with the sensor wire over the top door hinge. Caution: Do not attempt to calibrate the thermostat to a tray thermometer. - Page 25 NOTES © Copyright 2017-2022 LBC Bakery Equipment, Inc. Rev 6/2022...
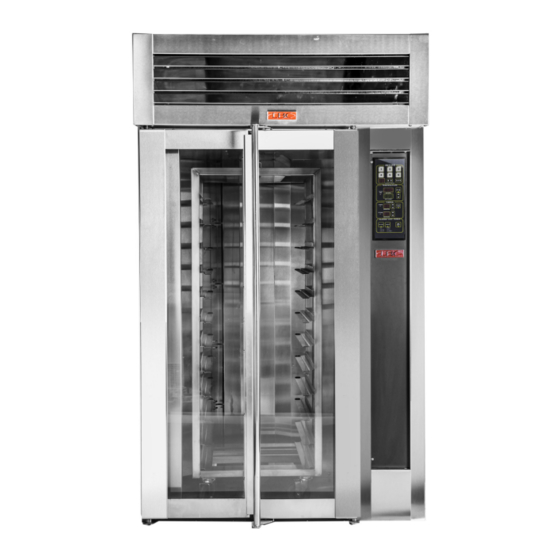
- Page 26 ILLUSTRATED PARTS BREAKDOWN Oven – Front View © Copyright 2017-2022 LBC Bakery Equipment, Inc. Rev 6/2022...
- Page 27 ILLUSTRATED PARTS BREAKDOWN (Part 2 of 10) Top Trim Control Box (Upper Front of Oven) © Copyright 2017-2022 LBC Bakery Equipment, Inc. Rev 6/2022...
-
Page 28: Illustrated Parts Breakdown
(Part 3 of 10) ILLUSTRATED PARTS BREAKDOWN Water Supply Line 66/66A/66B 66/66A/66B Door Closure Parts © Copyright 2017-2022 LBC Bakery Equipment, Inc. Rev 6/2022... - Page 29 ILLUSTRATED PARTS BREAKDOWN (Part 4 of 10) Loading Doors Light Assembly Parts © Copyright 2017-2022 LBC Bakery Equipment, Inc. Rev 6/2022...
- Page 30 ILLUSTRATED PARTS BREAKDOWN (Part 5 of 10) Rotation Assembly Blower Motor / Fan © Copyright 2017-2022 LBC Bakery Equipment, Inc. Rev 6/2022...
- Page 31 ELECTRIC OVENS: ILLUSTRATED PARTS BREAKDOWN (Part 6 of 10) Control Box Control Box (Behind Control Door) Heater Element © Copyright 2017-2022 LBC Bakery Equipment, Inc. Rev 6/2022...
- Page 32 GAS OVENS: ILLUSTRATED PARTS BREAKDOWN (Part 7 of 10). Control Box Heat Exchanger (Behind Control Door) © Copyright 2017-2022 LBC Bakery Equipment, Inc. Rev 6/2022...
- Page 33 GAS OVENS: ILLUSTRATED PARTS BREAKDOWN (Part 8 of 10). Control Box (Behind Control Door) Heat Exchanger Burner, Gas Supply, Exhaust © Copyright 2017-2022 LBC Bakery Equipment, Inc. Rev 6/2022...
- Page 34 ILLUSTRATED PARTS BREAKDOWN (Part 9 of 10) Door Gasket 72602-24-6 Overheat Indicator 31600-19 Main Control 40102-70 Loading Ramp 151-574-1 Bushing, Rack Pin 151-580-3 Shutter, Pressure Panel 151-219M Top Runner, Hood Face 151-507-3 Side, Top Trim 151-260M Rear Panel, Top Trim 151-259-M Cover, Hood End 151-506...
- Page 35 Frame, Light Cover 151-583-1 Glass, Light Cover 151-583-2 Gasket, Light Cover 151-583-4 Light Assembly 31602-31 Xenon Lamp 31602-28 Motor, Rack Rotation 30200-56-1 Rotator Cam 151-523 Bushing 50803-002 Drive Gear 73000-05c Bottom Assembly - Rotator 151-739 Snap Ring 20601-04 Lifting Blade - Rotator 151-579 Bushing, Flange 70200-11...
-
Page 36: Electrical Schematics
Exhaust Restrictor Plate 151-808 Natural Gas ELECTRICAL SCHEMATICS © Copyright 2017-2022 LBC Bakery Equipment, Inc. Rev 6/2022... - Page 37 ELECTRICAL SCHEMATICS (Part 2 of 4) © Copyright 2017-2022 LBC Bakery Equipment, Inc. Rev 6/2022...
- Page 38 © Copyright 2017-2022 LBC Bakery Equipment, Inc. Rev 6/2022...
- Page 39 ELECTRICAL SCHEMATICS (Part 3 of 4) © Copyright 2017-2022 LBC Bakery Equipment, Inc. Rev 6/2022...
- Page 40 ELECTRICAL SCHEMATICS (Part 4 of 4) © Copyright 2017-2022 LBC Bakery Equipment, Inc. Rev 6/2022...
-
Page 41: Lbc Limited Warranty
LBC LIMITED WARRANTY LBC Bakery Equipment (“LBC Equipment”) has been skillfully manufactured, carefully inspected and packaged to meet rigid standards of excellence. LBC Bakery Equipment Company (LBC) warrants products produced and sold by LBC and its duly authorized agents, against defects in materials and workmanship within the following limitations: What is Provided: •... - Page 42 LBC Bakery Equipment, Inc. 6026 31 Ave NE Tulalip, WA 98271 Toll Free: 888-722-5686 Fax: 425-642-8310 E-mail: service@lbcbakery.com Web: www.lbcbakery.com © Copyright 2017-2022 LBC Bakery Equipment, Inc. Rev 6/2022...
Need help?
Do you have a question about the LBC LMO Max-E and is the answer not in the manual?
Questions and answers
can we dismantal it in two or three parts and then take inside the kitchen and again assemble it as door size is not so bit that it go inside.