Advertisement
Quick Links
Advertisement

Related Manuals for store away Winsford


Summary of Contents for store away Winsford
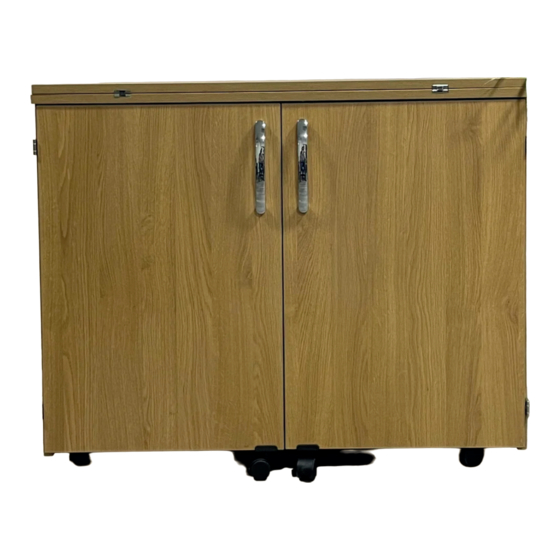
- Page 1 Winsford away Assembly Instructions revised 0221 - 1.0...
- Page 2 Your hardware pack should contain the following: CODE DESCRIPTION QTY PICTURE Connnecting Bolt Connecting Lock Angle Bracket Shelf Peg (lock) HANDLE2 Bow Handle Handle Screw Desk Hinge 35-15S Screw Castor Black Castor Black with Brake 35-17S Caster Screw Leg Caster Axi Hinge Male AXI-HINGE-M Part...
- Page 3 STEP 1 WINS-SD&CD You will need to open box - screw in to this point Insert CL1 Locks into Screw CB1 Bolts into all the holes as indicated the holes marked with with a blue circle a red circle Attach hinges AXI-HINGE-M WINS-LHS WINS-RHS...
- Page 4 STEP 2 WINS-TDB You will need to open box - Insert CL1 Locks into the holes as indicated with a blue circle WINS-BASE Front Edge Attach castors with brakes C3 with screws 35-17S as shown to holes marked with green circles Attach castors C2 with screws 35-17S as shown to holes marked with red circles...
- Page 5 STEP 3 WINS-BACK You will need to open box - Insert CL1 Locks into the holes as indicated with a blue circle WINS-MB1 STEP 4 Attach the Base to the left hand side by slotting the panel onto the connecting bolts and tightening the connecting locks in the base.
- Page 6 STEP 5 Attach the RHS to the section you have already constructed, tighten all of the connecting locks and secure the base to the right hand side with the angle brackets as in step 4.
- Page 7 STEP 6 Attach the WINS-CD to the base of the section you have already constructed. Screw CB1 connecting bolts into the two holes in the base and then secure with CL1 connecting locks in the WINS-CD. It is important to ensure you have the WINS-CD panel the correct way up. You will see a label which states TOP on this panel and this should be at the top when tted.
- Page 8 STEP 7 Attach the WINS-TOP to the the section you have already constructed as shown below. Screw CB1 connecting bolts into the six holes in TOP panel and then secure with CL1 connecting locks in the WINS-CD and the left and right hand sides.
- Page 9 STEP 8 WINS-SH You will need to open box - Below you will see the placement for all for all of the shelves. To t the shelves insert shelf pegs SP3 into the holes for each shelf. Ensure that the at surface of the peg is facing up.
- Page 10 STEP 9 Take your two doors and insert caster C4 into the pre tted bracket on the bottom of each door. Fit the two handles using the screws provided. Then t your doors by inserting the metal bracket which you have already xed to each side into the receiving part which is pre tted to the door and then tighten the locking screw.
- Page 11 STEP 10 Position you doors so that they are open no more than 90 degrees so that they will support you desk panel. Attach hinges H3 using screws 35-15S to the top (WINS-TOP). Then place the desk on top of the doors and attach the hinges to the desk panel.
-
Page 12: Important Safety Information
90 degrees. FAILURE TO FOLLOW THESE INSTRUCTIONS MAY RESULT IN DAMAGE TO YOUR UNIT AND /OR INJURY The Storeaway Winsford unit is designed and manufactured in the UK by: storage C R A F T S...
Need help?
Do you have a question about the Winsford and is the answer not in the manual?
Questions and answers