DIGITAL YACHT WLN10 Installation And Instruction Manual
Smart wireless nmea server
Hide thumbs
Also See for WLN10:
- Product handbook (9 pages) ,
- Technical notes (7 pages) ,
- Technical notes (7 pages)
Advertisement
Quick Links
Advertisement

Subscribe to Our Youtube Channel
Related Manuals for DIGITAL YACHT WLN10


Summary of Contents for DIGITAL YACHT WLN10
- Page 1 WLN10 SMART WIRELESS NMEA SERVER Version 2.00...
-
Page 2: Before You Start
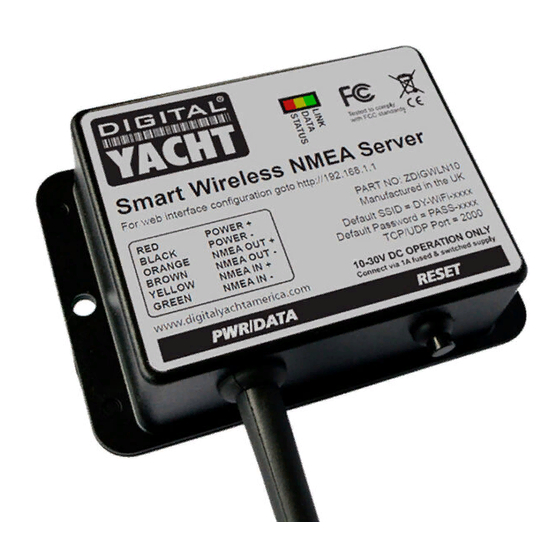
1. Introduction Congratulations on the purchase of your Smart Wireless NMEA Server. This product replaces our original WLN10/WLN10HS products and features a smart web interface that can be displayed and configured using the web browser on your mobile device. It is recommended that your product is installed by a professional installer, particularly when it comes to interfacing with other equipment. -
Page 3: Installation
3. Installation The Smart Server is IP54 rated (water resistant) and should be installed below deck in a dry location. When locating the unit you should consider: • Routing of power and NMEA0183 data cables to the unit. • Sufficient space around the unit for cable connections. •... - Page 4 Wireless No Data No Connection Connection • Turn off the WLN10 and continue with the NMEA, USB and Wireless installation. Installation Step 4 – Interfacing (NMEA) • The Smart Server allows full bi-directional, wireless NMEA0183 data communication, but in some installations, you only need communication in one direction i.e.
- Page 5 • By default the Smart Server is set to 38400 baud, but this can be changed to 4800 baud via its built-in web interface Installation Step 5 – Wireless Interfacing • By default, the Smart Server’s 802.11 b/g/n wireless adaptor, creates a wireless Access Point (hotspot) on-board your boat.
-
Page 6: Normal Operation
PASS-xxxx which is “ ”, where xxxx is the same, unique four digit code in the hotspot name. • Consult the user manual for your wireless device to understand how to connect to a wireless network. • The Smart Server can transmit wireless NMEA data using two different network modes;... - Page 7 Smart Server’s wireless network, the red Status LED will turn OFF and the Green Link LED will start to flash. Alternatively, if the boat already has a Wireless Router onboard, you can make the Smart Server connect to that network, rather than create its own.
- Page 8 By clicking on the View Data button on the home page. This will display the Data Monitor page, where you should see a stream of data sentences scrolling down the page (Fig 2). Figure 2 At the bottom of this page are three buttons, Pause to freeze the scrolling data, Start/Stop Log to log the data and Save Log to download the log file to your wireless device.
- Page 9 Figure 3 Figure 4 If you wish to change the wireless network name and password that the WLN10SM uses, then change it in this section. Click the “Eye” icon to display the wireless password – useful to double check your typing. You can also change the Wi-Fi channel it uses if you are in a busy Wi-Fi area.
- Page 10 If you wish to make the WLN10SM join an existing wireless network on the boat, then click the STA button and the display will change to that in Fig5. Figure 5 From here you can scan for and select the wireless network you want the wLN10SM to connect to and enter the wireless password of this network –...
- Page 11 Alternatively, you can press and hold the Reset button for 10 secs or more, to reset the WLN10SM to factory defaults. Assuming that the WLN10SM has successfully joined the other network, it will now have a different IP address and you will have to access its web interface by going http://wln10sm.local Now in the Settings page you can see the wireless network and password boxes outlined in Green, to indicate that the connection has been successful.
- Page 12 Figure 7 If you continue to scroll down to the bottom of the page, you will see the Firmware update and About sections – see Fig8. Figure 8...
- Page 13 Firmware updates are fairly infrequent but if Digital Yacht publish any critical or useful updates, you can upload the update file via the web interface. Click on the Choose File button and browse for the binary update file. Once selected, click the Upload Firmware button and the WLN10SM will display a percentage progress bar as the update is being done.
Need help?
Do you have a question about the WLN10 and is the answer not in the manual?
Questions and answers