Marport M3 Service Manual
Hide thumbs
Also See for M3:
- Service manual (88 pages) ,
- User manual (50 pages) ,
- Service manual (89 pages)
Table of Contents
Advertisement
Quick Links
Advertisement
Table of Contents
Troubleshooting

Subscribe to Our Youtube Channel
Related Manuals for Marport M3


Summary of Contents for Marport M3
-
Page 2: Table Of Contents
Configuring Mac Mini Network Changing the Users & Groups Settings Changing Mx computer IP Address Disabling Automatic Updates Installing a New Ethernet Cable Disabling Sleeping Mode Upgrading from M3 PRO to M5 PRO Changing Security & Privacy Settings System Updating the Receiver Firmware... - Page 3 Contents | iii Installing Hydrophones Appendix List of Marport Hydrophones Frequency Plan Connecting the Hydrophone to the Receiver Adding Temperature Data from the Hydrophones to the System Index Understanding Receiver LEDs Exporting/Importing the Receiver Configuration Maintenance and Troubleshooting Checking Noise Interference...
-
Page 4: Legal
Marport. “Marport”, the Marport logo and Software Defined Sonar are registered trademarks of Marport. All other brands, products and company names mentioned are the trademark and property of its respective owners only. Marport is a division of Airmar Technology Corporation. -
Page 6: Introduction And Presentation
Introduction and Presentation Introduction The M3 PRO or M5 PRO system works with an Apple Mac mini, an Mx computer and one Mx receiver. The Mx computer processes the signal and displays the data on a screen connected to the Mac. You can configure the sensors and display data to suit your needs. -
Page 7: Safety Guidelines
Install and use this product in accordance with this user manual. Incorrect use of the product may cause damage to the components or void the warranty. Only qualified Marport dealers can do installation and maintenance interventions. M3 & M5 PRO | V1 | Introduction and Presentation... -
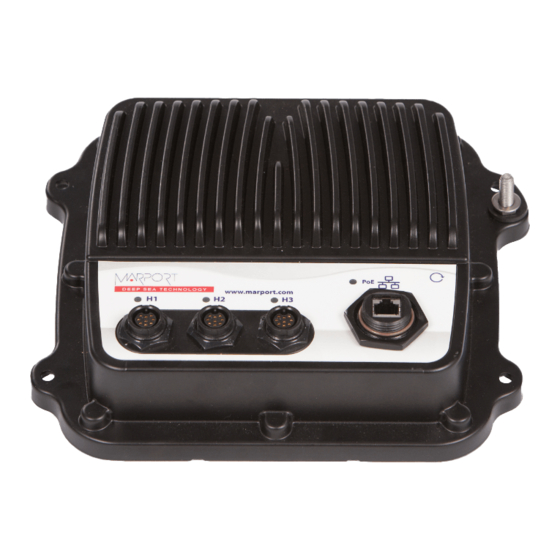
Page 8: Description
Mx computer 10 Power supply USB hub 11 Mx receiver Scala2 software dongle (if necessary) 12 Junction boxes (x2) Wireless trackball mouse 13 Thru-hull penetration Ethernet switch 14 Hydrophones Internet M3 & M5 PRO | V1 | Introduction and Presentation... -
Page 9: Equipment List
• 1 CAT5e network cables • 1 Ethernet connector kit • 1 Mx hardware kit (mounting screws and ground strap) Mx computer • 1 Mx computer fanless Marport V2 • 1 power supply M3 & M5 PRO | V1 | Introduction and Presentation... -
Page 10: Technical Specifications
TeamViewer To give remote access of your computer to support service Technical Specifications Receiver Frequency range 30-60 kHz Active bandwidth 24 kHz Number of Rx/Tx channels Hydrophones M3 & M5 PRO | V1 | Introduction and Presentation... -
Page 11: Systems
5~95% @ 40°C, non-condensing Power supply 9 – 36V with 3-pin terminal block Compatibility with Apple Operating Systems This topic lists the supported Apple operating systems for Scala2 and Mosa2. M3 & M5 PRO | V1 | Introduction and Presentation... - Page 12 10.10 Mavericks OS X 10.9 Mosa2 Mosa OS name OS release Mosa 2.0.x Mosa 2.3.x Mosa 2.5.x Mosa 2.7.x Mosa 2.9.x 2.11.x Ventura macOS 13 Monterey mac Yes* OS 12.4 M3 & M5 PRO | V1 | Introduction and Presentation...
- Page 13 Yosemite OS X 10.10 Mavericks OS X 10.9 *Mosa 2.11 compatibility with Monterey and Ventura: A1 sensors cannot connect by short range wireless signal. You must use a Configuration Cable. M3 & M5 PRO | V1 | Introduction and Presentation...
-
Page 15: Computer Configuration
Note: Do not select options such as Enable Location Services or Share Mac Analytics with Apple. 2. From Create a Computer Account, you can use marport for full name, account name and password. 3. When asked to sign in with an Apple ID, click Set Up Later. -
Page 16: Disabling Automatic Updates
3. Enter the password when prompted. Disabling Automatic Updates You need to disable automatic updates because some applications installed on the computer may not be compatible with the latest versions of OS. M3 & M5 PRO | V1 | Computer Configuration... -
Page 17: Disabling Sleeping Mode
Disabling Sleeping Mode You need to change Energy Saver settings. 1. From the top left corner of the screen, click Apple Menu > System Settings. 2. Click Energy Saver in the sidebar, then: M3 & M5 PRO | V1 | Computer Configuration... - Page 18 Turn off Put hard disks to sleep when possible. b. Turn on Start up automatically after a power failure. M3 & M5 PRO | V1 | Computer Configuration...
-
Page 19: Changing Security & Privacy Settings
1. From the top left corner of the screen, click Apple Menu > System Settings and click Security & Privacy in the sidebar. 2. Go to the following options and for each, add these applications to the lists: M3 & M5 PRO | V1 | Computer Configuration... - Page 20 Full Disk Access Scala2, ScalaReplay2, TeamViewer Accessibility Scala2, ScalaReplay2, TeamViewer Screen Recording TeamViewer 3. You need to add the option Anywhere in the list under Allow applications downloaded from. To do so: M3 & M5 PRO | V1 | Computer Configuration...
-
Page 21: Saver
Anywhere option is now displayed in Security & Privacy > Security settings (you may need to scroll down). Select it. Changing Desktop Wallpaper and Screen Saver You need to disable the screen saver and put a Marport wallpaper. M3 & M5 PRO | V1 | Computer Configuration... - Page 22 1. From the top left corner of the screen, click Apple Menu > System Settings. 2. Click Wallpaper in the sidebar, then check that Marport wallpaper is set. If not, click Add Folder, then add the Downloads folder and select the image.
-
Page 23: Adding A Virtual Keyboard
1. From the top left corner of the screen, click Apple Menu > System Settings. 2. Click Keyboard in the sidebar, then go to Text Input and click Edit. M3 & M5 PRO | V1 | Computer Configuration... - Page 24 3. Turn on Show Input in menu bar. 4. From the top right corner of the screen, click the icon corresponding to the keyboard language preferences, then select Show Keyboard Viewer. M3 & M5 PRO | V1 | Computer Configuration...
-
Page 25: Removing Time Machine Destination
Removing Time Machine Destination If you used a Time Machine backup to set up the computer, you need to remove it from the saved backup destinations in the computer settings. M3 & M5 PRO | V1 | Computer Configuration... -
Page 26: Installing Software Applications
Several applications must be installed on the computer. Downloading Software Applications If you configure the computer from scratch, software applications are available for download from Marport Authorized Service Provider (MASP). Marport offices only. M3 & M5 PRO | V1 | Computer Configuration... -
Page 27: Installing Scala2 And Scalareplay2
1. From a web browser, go to Marport Authorized Service Provider (MASP) website: https://asp.marport.fr/. 2. To download Scala2 and Mosa2: a. Once the system has been created in MASP, go to the system page (see Adding the System Components on MASP (on page 32)). -
Page 28: Installing Mosa2
Mosa2 allows you to configure Marport sensors and receivers. 1. Double-click the installation zip file. 2. Click the *.dmg file. 3. From the installation window that appears, drag Mosa2 icon to the Applications icon. M3 & M5 PRO | V1 | Computer Configuration... -
Page 29: Automatically Opening Scala2 And Teamviewer
You can now open Mosa2 by clicking its icon on the Dock. Automatically Opening Scala2 and TeamViewer at Start Up Scala2 and TeamViewer must open automatically when the computer is turned on. M3 & M5 PRO | V1 | Computer Configuration... -
Page 30: Creating Scala2 License File
3D views or activating NMEA inputs. Important: License files are compatible only with Scala2 version 02.12.x or later. For previous versions, the software dongle must be used. M3 & M5 PRO | V1 | Computer Configuration... - Page 31 MASP from which you downloaded the file. The computer reference is written in the license file name. 1. From a web browser, go to Marport Authorized Service Provider (MASP) website: https://asp.marport.fr/. 2. Go to the system page and click the computer name in the tree view.
-
Page 32: Adding The System Components On Masp
> About, then click Options. Adding the System Components on MASP Marport offices only: You need to share details about the system so that Marport can keep record of systems installed. The following guidelines are given as an example of process. - Page 33 Go to Sensors, then search for the sensor in the search field using its serial number. b. In Identity, select the sensor part number. Check that the status is Pass. M3 & M5 PRO | V1 | Computer Configuration...
- Page 34 Click Save Changes. d. In the tree view, click the A1 board to download the sensor firmware. e. In Features, select the application (latest version is automatically selected) then click Download MOSA App. M3 & M5 PRO | V1 | Computer Configuration...
- Page 35 Enter TeamViewer details if you already have them, otherwise fill this information later on. f. If applicable, enter the VMWare license that is written on a sticker under the computer. g. Click Create. M3 & M5 PRO | V1 | Computer Configuration...
- Page 36 In the tree view, click Add next to the system name. The list of devices that you can add to the system is displayed. b. Select the computer and sensor(s) previously created, and if applicable, other devices such as chargers or hydrophones, using their serial numbers. M3 & M5 PRO | V1 | Computer Configuration...
- Page 37 Go to My vessels, then search for the vessel in the search field. b. In the tree view, click Add then select the system. Tip: You can also link the vessel to the system directly from the system properties: M3 & M5 PRO | V1 | Computer Configuration...
-
Page 38: Creating Computer Backups With Time Machine
30 minutes (when using the recommended hard drive). For more details, read Creating Computer Backups with Time Machine user guide, available on pdf on Marport website, and watch the video tutorials. M3 & M5 PRO | V1 | Computer Configuration... -
Page 40: Installation
• You need an empty USB key. Minimum requirements: 32GB, USB 3.0, FAT32 format. 1. Download the system file: a. From a web browser, go to Marport Authorized Service Provider (MASP) website: https://asp.marport.fr/. b. Go to Systems, then search for the name of your system. - Page 41 Download. 3. Install and open balenaEtcher application. 4. Click Flash from file, then select the system file from your computer. 5. Connect the USB key that will contain the installation file. M3 & M5 PRO | V1 | Installation...
- Page 42 6. Click Select target, then select the USB key from the list. M3 & M5 PRO | V1 | Installation...
- Page 43 Installing the System from the USB Key The Mx system is automatically installed on the computer when connecting the installation USB key. You need a screen with VGA or HDMI cable and a mouse. M3 & M5 PRO | V1 | Installation...
- Page 44 Important: Do not disconnect the USB key before powering off or the USB key may be damaged and will need to be reformatted. 6. Remove the USB key when the computer is powered off. 7. To check if the installation is correctly done: M3 & M5 PRO | V1 | Installation...
- Page 45 If you format an Mx computer that already has a system installed (e.g. changing from an M4 to an M6 system), you need to use the system USB key the same way as explained in the previous topics. M3 & M5 PRO | V1 | Installation...
-
Page 46: Installing The System
4. Follow the same guidelines as the previous topic. Installing the System Marport technicians or dealers need to connect the different components of the system. 1. Check that you have all the items needed for the installation (See Equipment List (on page 9)) 2. - Page 47 Refer to Hydrophone installation manual for detailed guidelines. 12. When adding sensors to the system, refer to the Frequency Plan (on page 82) to help you allocating frequencies. M3 & M5 PRO | V1 | Installation...
-
Page 48: System Cabling
Connect the components of the system according to the following cabling. Power cable, connected to 100-240V AC power supply* Up to 3 screens (HDMI or thunderbolt cable) Loudspeakers (if applicable) USB hub M3 & M5 PRO | V1 | Installation... -
Page 49: Powering The Mx Computer
By default, the IP address of the Mx computer is 192.168.1.170. You need to change the IP address of the Ethernet port connected to the Mx computer so the Mac computer can communicate with it. M3 & M5 PRO | V1 | Installation... - Page 50 Set Service Order. 3. In the network list, click Ethernet, then Details: a. In Configure IPv4 menu select Manually. b. In IP Address, enter 192.168.1.100 c. In Router, enter 192.168.1.1 M3 & M5 PRO | V1 | Installation...
-
Page 51: Changing Mx Computer Ip Address
(192.168.1.XXX), you need to put a different subnet to the Mx computer, such as 192.168.11.170. 1. Open Mosa2 and click the receiver icon on the discovery page. in Receiver information. 2. Click M3 & M5 PRO | V1 | Installation... -
Page 52: Installing A New Ethernet Cable
If the Ethernet cable that connects the Mx computer to the receiver is too short, you can replace it by a longer Ethernet cable. The new Ethernet cable must have the following specifications: • Category: cat. 5e minimum • Length: 100 meters maximum • Shielding: U/FTP M3 & M5 PRO | V1 | Installation... -
Page 53: System
Ethernet connector kit. Upgrading from M3 PRO to M5 PRO System You can upload a license file to upgrade your M3 PRO system to an M5 PRO to be able to add more sensors. For this task, you need one license file (*.zob). Refer to Marport sales offices to get them. -
Page 54: Updating The Receiver Firmware
The message on the top of the page indicates the number of PRP (50) and NBTE (10) sensors that can be added to the system and if a TE SC sensor can be added. The M3 PRO system is now an M5 PRO system. - Page 55 1. From a web browser, go to Marport Authorized Service Provider (MASP) website: https://asp.marport.fr/. 2. Go to the system page, then in the tree view click M3 or M5. 3. Go to Firmware and features, then select the latest version and click Download selected App.
- Page 56 5. Open Mosa2 and click the receiver's icon displayed in the discovery page. The receiver information page is displayed. > Advanced , then > Manage. 6. Click M3 & M5 PRO | V1 | Installation...
- Page 57 , then select the *.bz2 file in the firmware folder you downloaded and unzipped. The firmware file is added to the list. 8. Click the firmware name, then click to upload the firmware into the receiver. M3 & M5 PRO | V1 | Installation...
-
Page 58: Installing Hydrophones
Installing Hydrophones You need to connect hydrophones to the system. List of Marport Hydrophones These are technical specifications for hydrophones currently sold by Marport. For information about obsolete hydrophones, please contact Marport support. M3 & M5 PRO | V1 | Installation... - Page 59 • Use at great depths (> 500 m). • Gain configurable (Low or High) • Filters configurable (38 and/or 50kHz). • Low noise environ ment between pas sive hydrophone and wideband pre amplifier box M3 & M5 PRO | V1 | Installation...
- Page 60 (below grated preamplifi -100 dBV). • Large number of sensors.† • Use at great depths (> 500 m). • Gain configurable (Low or High) • Filters configurable (38 and/or 50kHz) M3 & M5 PRO | V1 | Installation...
-
Page 61: Receiver
‡ Add as NC-1-07 in the receiver configuration page. Connecting the Hydrophone to the Receiver You need to connect the hydrophone to the receiver to be able to display sensor data received by the hydrophones. M3 & M5 PRO | V1 | Installation... -
Page 62: Adding Temperature Data From The
Note: H3 hydrophone input allows to receive water temperature from an NMEA connection (Scanmar hydrophone or NMEA converter junction box). If you connect a Marport hydrophone to H3 without NMEA converter, you will not have temperature data from the hydrophone. - Page 63 In Hydrophone Location, select the number of the receiver's port on which the hydrophone is connected. d. Click Add Sensor. The water temperature is displayed in Scala2, in the control panels, under Mx. M3 & M5 PRO | V1 | Installation...
-
Page 64: Understanding Receiver Leds
• Blinking blue: the receiver is connected to a power source but it is disconnected from the computer. Check that the computer is connected to the Mx computer. • Blinking red: Ethernet is resetting. M3 & M5 PRO | V1 | Installation... -
Page 65: Exporting/Importing The Receiver Configuration
Monterey, the import and export of these files is no longer possible because older versions of Firefox and Java version 7 are not supported anymore. Use MxF files with Mosa2 instead. M3 & M5 PRO | V1 | Installation... - Page 66 Click Browse to select the configuration file. c. Choose if you want to apply the same hydrophone configuration as it was saved in the configuration file. If no, the file is directly uploaded into the receiver. M3 & M5 PRO | V1 | Installation...
- Page 67 The configuration file is uploaded into the receiver. The receiver now has the configuration corresponding to the contents of the MxF file. If you chose to apply the hydrophone configuration, the receiver reboots. M3 & M5 PRO | V1 | Installation...
-
Page 69: Maintenance And Troubleshooting
3. Open the control panels and go to the Mx panel. 4. Go to Hydrophone data, then drag and drop Spectrum data to a page. These data appear only when the spectrum has been started. M3 & M5 PRO | V1 | Maintenance and Troubleshooting... - Page 70 ◦ Active narrowband: NC-1-04 below -80 dBV / NC-1-07 below -100 dBv ◦ Passive hydrophone: below -110 dBV 6. Scroll on the frequency or dBV scales to zoom in and out. 7. Under Peak, you can check: M3 & M5 PRO | V1 | Maintenance and Troubleshooting...
- Page 71 11. Right-click the spectrum and click Pause if needed. 12. To save data recorded by the spectrum in a *.txt file, right-click the FFT plot and click Save FFT. M3 & M5 PRO | V1 | Maintenance and Troubleshooting...
-
Page 72: Estimating The Efficiency Of Hydrophones
Receiver version 08.02.11 or below • SNR is correct above 20 for PRP sensors, above 10 for NBTE sensors. • Below these levels, SNR is low, causing a discontinuous signal M3 & M5 PRO | V1 | Maintenance and Troubleshooting... - Page 73 Received data are used in Scala2. • DELETED: Data are received but they are not used in Scala2. Type of mes Select Console to display the hydrophone diagnostic data. sages Filter Use to filter messages. M3 & M5 PRO | V1 | Maintenance and Troubleshooting...
- Page 74 • SNR is correct above 20 for PRP sensors, above 10 for NBTE sensors. • Below these levels, SNR is low, causing a discontinuous signal Noise Level You will have better performance with the following levels: M3 & M5 PRO | V1 | Maintenance and Troubleshooting...
-
Page 75: Troubleshooting
See Configuring Mac Mini Network (on page 49) to know how to change the Mac mini network settings. The system installation on the Mx computer was not done or not properly completed. M3 & M5 PRO | V1 | Maintenance and Troubleshooting... -
Page 76: The Receiver Configuration Page Is Empty
You do not receive sensor data anymore on Scala2 and the receiver configuration page is empty or with red crosses. If the receiver configuration page looks like the picture below, it means the Mx computer is disconnected. M3 & M5 PRO | V1 | Maintenance and Troubleshooting... -
Page 77: No Internet Access
System Cabling (on page 48). No Internet Access You cannot connect to the internet or see the system control panel page on Firefox web browser. The order of the computer networks might be wrong. M3 & M5 PRO | V1 | Maintenance and Troubleshooting... - Page 78 Service Order. I cannot click on some items in the system web page When you open the system web page on Firefox web browser, you cannot click on Open Import/Export Application. M3 & M5 PRO | V1 | Maintenance and Troubleshooting...
-
Page 79: Antifouling System Causes Interferences
Giving Remote Access to the Computer If you have an issue with the system, you may need to give remote access to the computer to the support team with TeamViewer application. M3 & M5 PRO | V1 | Maintenance and Troubleshooting... -
Page 80: Recording Audio Files
2. When the recording is finished, click OK to download it. The audio file is saved in: Documents/Marport/ScalaLive/(ReceiverIPAddress- Date)/Output. 3. Send the recording to Marport support service for a diagnosis. M3 & M5 PRO | V1 | Maintenance and Troubleshooting... -
Page 81: Support Contact
Support Contact You can contact your local dealer if you need maintenance on your Marport products. You can also ask us at the following contact details: FRANCE ICELAND Marport France SAS Marport EHF 8, rue Maurice Le Léon Tónahvarf 7... -
Page 82: Appendix
You can create a table with a list of frequencies and complete it when you add sensors. Frequencies and intervals The diagrams below show the bandwidth of the different types of Marport sensors and intervals you must respect when adding other sensors. Figure 1. PRP sensors (e.g. Catch sensor, Trawl Speed, Spread sensor...) Example: If the frequency of the sensor is 40kHz, there should be no sensors between 39.9-40kHz and 40-40.1kHz. - Page 83 Example: If the frequency of the sensor is 40kHz, there should be no sensors between 39.8-40kHz and 40-42.6kHz. Recommended distance Bandwidth Mandatory distance with oth Frequency with other sensors er sensors of the sensor M3 & M5 PRO | V1 | Appendix...
- Page 84 • We recommend to allocate frequencies between 34 and 56 kHz for wideband hydrophones and between 41 kHz and 44 kHz for narrowband hydrophones. • Echosounders are usually placed around 38 kHz, make sure to allow enough distance with them. M3 & M5 PRO | V1 | Appendix...
- Page 85 Example of a system with Spread, Catch, Trawl Speed sensors and Speed Explorer, Catch Explorer, HDTE and Door Sounder. Example of a system with Spread sensors with positioning, Catch sensors, Trawl Explorer and Catch Explorer. M3 & M5 PRO | V1 | Appendix...
- Page 86 Example of a system for purse seining, with a Seine Explorer and depth Seine sensors. Bandwidth Mandatory distance with other sensors Avoid allocating frequencies between 37 and 39 kHz because this range is generally used by echosounders. M3 & M5 PRO | V1 | Appendix...
- Page 87 Index Mx computer Application 54 Mx computer System 54 Boat code 82 Receiver 54 Frequency plan 82 Channel code 82 Cloning Disks 38 Hydrophone Compatibility Types 58 macOS 11 Computer account 15 Interference Checking 69 Data recording Internet Audio recording 80 No access 77 IP address 49 Changing Mx Computer's 51 Troubleshooting 75 Ethernet Cable specifications 52 Connector kit 52 New cable 52 Java...
- Page 88 Mozilla Firefox Downgrade 78 Keyboard Version 78 Virtual 23 Mx Limitation 53 Mx System Changing 40 Downloading 40 Installation USB key 40 License file Installing 40 Creating 30 Options 30 Storage folder 30 Updating 30 Network Mac mini 49 NMEA converter junction box 61 M5 system Upgrade to 53 Mac mini Installation 46 Password 15 MASP Power off Adding Troubleshooting 79 Computers 32...
- Page 89 Updating 54 Restart TE SC 53 Troubleshooting 79 TeamViewer 79 Technical specifications 10 Scala Automatic opening 29 Updating Download 26 Mx computer 54 Installing 27 Receiver 54 Scala Replay 27 Upgrade Scala2 To M5 system 53 Downloading 32 Sensor firmware Downloading 32 Settings Allow apps downloaded from 19 ZOB file 53 Automatic updates 16 Desktop wallpaper 21 Energy saver 17 Screen saver 21 Security &...
Need help?
Do you have a question about the M3 and is the answer not in the manual?
Questions and answers