Yamaha STAGEPAS 500 Owner's Manual
Portable pa system
Hide thumbs
Also See for STAGEPAS 500:
- User manual ,
- Service manual (72 pages) ,
- Owner's manual (2 pages)
Table of Contents
Advertisement
Quick Links
Introduction
Thank you for your purchase of the Yamaha PORTABLE PA SYSTEM STAGEPAS 500. The STAGEPAS 500 is a
versatile, compact PA system consisting of two speakers and a mixer.
In order to get the most out of your new STAGEPAS 500 and its sophisticated functions, we suggest you read
through this manual thoroughly. Also keep it in a safe place for future reference.
Features
•
Two-way, 10-inch (25 cm) speaker system
The built-in speakers deliver high-quality powerful sound from an exceptionally compact cabinet.
The scratch-resistant speakers are rugged enough for outdoor use.
•
Powered mixer
The powered mixer is a convenient, high-performance all-in-one unit that includes EQ and reverb. With four
monaural inputs and three stereo inputs, the STAGEPAS 500 can be connected to a wide range of
instruments and devices.
•
Convenient storage
The STAGEPAS 500 can be used in even the most cramped quarters, inside or outside, since the mixer is
built into one of the speaker cabinets. The other speaker has a special compartment for storing speaker
cables and microphones, letting you put all you need for your performance in one convenient place.
Package Contents
Two speakers (500S), mixer, panel, power cord, two speaker cables, Owner's Manual (this booklet)
NOTE:
The mixer and the panel are installed in the speakers when the STAGEPAS 500 leaves the factory.
Before turning on the mixer
Before turning on the mixer
Before turning on the mixer
Remove the mixer
1
Be sure that the mixer's power switch is turned off.
2
Use a screwdriver or coin to turn each screw on the mixer from LOCK to
OPEN until it clicks.
3
Securely hold the mixer's handles to remove it from the speaker.
Use only the mixer's handles when removing the mixer from the speaker and when carrying the mixer
separate from the speaker.
Caution
NOTE:
The mixer can also be used when installed in the speaker.
When you install the mixer into the speaker, make sure to match the indentations on the speaker cabinet to
the corresponding parts on the mixer, and then turn each screw from OPEN to LOCK until it clicks.
Turning the power on/off
1
Be sure that the mixer's power switch is turned off.
2
Connect the included power cord to the [AC IN] jack, and plug the power
cord into a power outlet.
• To avoid any loud, unexpected noise from the speakers, first turn on the power to those connected devices
that are closest to the sound source.
Caution
Example: Sound source (CD player or instrument) → STAGEPAS 500
When turning off the power to the system, reverse the order described above.
• Before turning on the power, set the LEVEL controls and MASTER LEVEL control to their minimum setting (zero).
3
Press the mixer's power switch to the ON position.
The POWER indicator lights.
To turn the power off, press the power switch to the OFF position.
The POWER indicator turns off.
500
O wn e r's Ma nu a l
LOCK
LOCK
LOCK
OPEN
OPEN
OPEN
LOCK
LOCK
OPEN
OPEN
EN
Troubleshooting
Troubleshooting
Troubleshooting
Power does not turn on
• Is the included power cord correctly connected to a power outlet?
Power shuts down suddenly
• Is the vent on the top panel of the mixer blocked? Since inadequate ventilation can result in overheating the
mixer, the power may be turned off automatically and the mixer may reset itself.
• Is the LIMITER flashes continuously? If the internal power amplifier section is excessively overloaded, the
power may be turned off automatically and the mixer may reset itself.
No sound is heard
• Are external instruments (including a microphone) or speakers correctly connected to the mixer?
• Are the LEVEL controls of all relevant channels and/or the MASTER LEVEL control set to appropriate levels?
• Are the SPEAKERS L/R jacks connected to the included speakers (500S)?
• Are the included speaker cables used?
If the connector of a speaker cable other than the included speaker cable touches any metal parts such as
the mixer's handle, no sound may result because of a short circuit.
Use only the speaker cables included with the device.
• Is the POWER indicator flashing? There may be a short in the speaker cable or the connection may be
faulty. Check that the speaker cable is correctly connected to the mixer and reapply the power.
• If sound is not still output, contact your Yamaha dealer.
Sound is distorted or noise is produced
• Are the LEVEL controls of all relevant channels and/or the MASTER LEVEL control set to appropriate levels?
• Are the MIC/LINE switches of each channels set appropriately?
• Are both XLR type and phone type jacks on channels 1–4 being used (connected) at the same time?
Please connect to only one of these jacks on each channel.
• Is the input signal from the connected device set to an appropriate level?
• Use channels 1 or 2, and set the LIMIT/COMP switches to COMP (
preventing distortion.
Sound is not loud enough
• Are the LEVEL controls of all relevant channels and/or the MASTER LEVEL control set to appropriate levels?
• Are the MIC/LINE switches of each channels set appropriately?
• Are both XLR type and phone type jacks on channels 1–4 being used (connected) at the same time?
Please connect to only one of these jacks on each channel.
• Is the input signal from the connected device set to an appropriate level?
• Is the PHANTOM switch set to ON when using a condenser microphone?
Reverb is not applied to the sound
• Are the REVERB switches of each channels set to ON (
• Is the REVERB control set to an appropriate level?
Changing the sound quality
• Are the Equalizer controls (HIGH/LOW) set to appropriate levels?
• If you want to get a more powerful sound from the speakers, set the SPEECH/MUSIC switch to MUSIC (
• If you want to get a clearer sound for announcements, set the SPEECH/MUSIC switch to SPEECH (
Using a single speaker
• You can use a single speaker. If you use a single speaker, the mixer outputs just one channel of the stereo
signal, left or right.
Outputting the signal for monitoring
• Connect a powered speaker to the MONITOR OUT jack. The MONITOR OUT jack outputs the signal prior
to routing through the MASTER LEVEL control. Adjust the level of output signal from the MONITOR OUT
jack with the MONITOR OUT control. The MONITOR OUT control does not affect the MASTER LEVEL
control. If only the L (left) MONITOR OUT jack is used, the mixer mixes the left and right signals and sends
them to the jack.
Convenient built-in storage compartment
Convenient built-in storage compartment
Convenient built-in storage compartment
The STAGEPAS 500 features a convenient storage compartment in the speaker box for packing the included
power cable, speaker cable, Owner's Manual (this booklet), and an optional microphone and the cable, as
shown above. Remove the rear panel of the speaker and put in the things you need. Carry the STAGEPAS
500 with you, and you've got all you need to set up and perform—anywhere, anytime.
). Compression may be effective in
)?
).
).
Advertisement
Table of Contents

Related Manuals for Yamaha STAGEPAS 500


Summary of Contents for Yamaha STAGEPAS 500
- Page 1 In order to get the most out of your new STAGEPAS 500 and its sophisticated functions, we suggest you read • Is the LIMITER flashes continuously? If the internal power amplifier section is excessively overloaded, the through this manual thoroughly.
- Page 2 Connection Example Connection Example Connection Example The STAGEPAS 500 can be used in a wide variety of sound reinforcement applications, from a full-band Getting sound out of the system performance onstage to solo street performance—providing a powerful, high-performance system in an exceptionally compact and portable package.
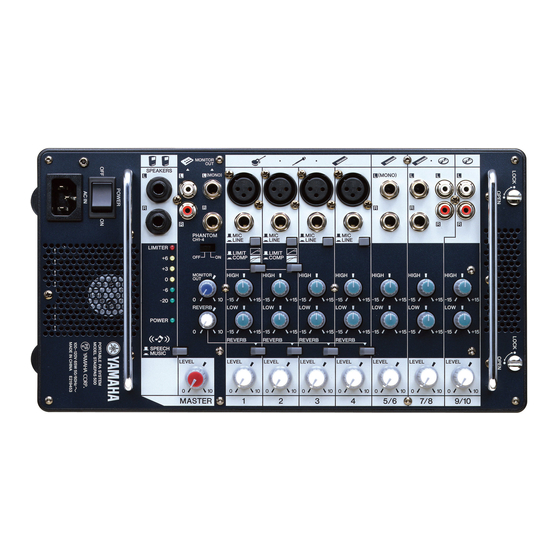
- Page 3 Controls and Functions Controls and Functions Controls and Functions Channel input jacks (CH 1 to 4) For connecting a guitar, microphone, keyboard or other instrument/device. Set the MIC/LINE switch to MIC or LINE for channels 1 to 4, depending on the level of the input signal. XLR-type connectors are wired as follows (IEC60268 standard): pin 1: ground, pin 2: hot (+), and pin 3: cold (-).
- Page 4 2-M8 x 25 WARNING Specifications and descriptions in this owner's manual are for information purposes only. Yamaha Corp. reserves the right to change or modify products or specifications at Specifications TO REDUCE THE RISK OF FIRE OR ELECTRIC SHOCK, DO NOT EXPOSE THIS APPARATUS TO RAIN OR MOISTURE.
Need help?
Do you have a question about the STAGEPAS 500 and is the answer not in the manual?
Questions and answers