Table of Contents
Advertisement
Available languages
Available languages
Quick Links
Advertisement
Table of Contents

Related Manuals for TechniSat CE DIGICLOCK 2


Summary of Contents for TechniSat CE DIGICLOCK 2
- Page 1 User manual DIGICLOCK 2 Radioclock with LED display...
-
Page 2: Safety Instructions
Please take them to a special collection point for hazardous waste. DIGICLOCK 2 is CE marked and meets the EU standards. TechniSat reserves the right to changes and errors in printing. Condition 20/2020 TechniSat and DIGIC- LOCK 2 are registered trademarks of TechniSat Digital GmbH. - Page 3 - Do not use the device near baths, swimming pools and water. - Do not place containers with liquids such as flower vases on the device. They may fall, and escaping liquid may cause serious damage or risk of electric shock. - Do not open the housing.
- Page 4 - Do not choose a location in rooms with high humidity, e.g. in the kitchen or sauna, as condensation may damage the device. The unit is designed for use in dry and moderate environments and must not be exposed to dripping or splashing water.
-
Page 5: Device Functions
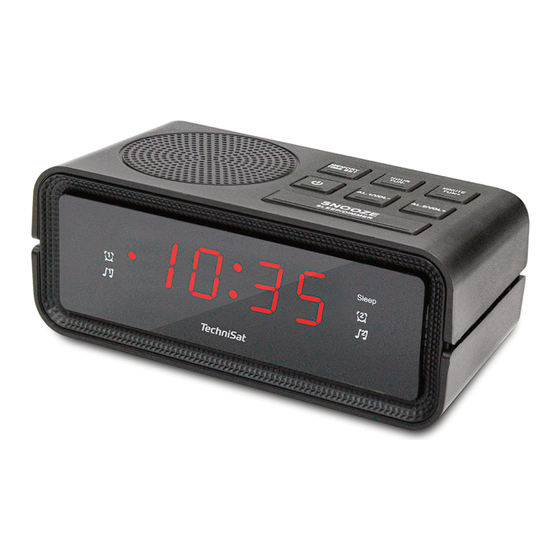
Device functions Seמּing the correct time - To set the correct time, turn off the device by pressing the ON/OFF buמּon (2). - Then press the MEMORY / TIME SET buמּon (5) longer. - To set the time, press the HOUR / TUN- buמּon (6). - Use the MINUTE / TUN+ buמּon (3) to set the minutes. - Page 6 Calling a program from the list of radio programs - Press the MEMORY / TIME SET buמּon (5). - Then use the HOUR / TUN- (6) or MINUTE / TUN+ (3) buמּons to select the pro- gram number and confirm the selection with the MEMORY / TIME SET buמּon (5). Alarm seמּing - To set the alarm, turn off...
-
Page 7: Specification
NOTE: the baמּery power supply is only used to support the device memory in case of power failure (including the memory of the hour)!* *baמּeries are not included in set. Contact In case of a malfunction, please contact your local distributor of TechniSat pro- ducts. - Page 8 Gebruiksaanwijzing DIGICLOCK 2 Radio-alarmklok met LED-display...
- Page 9 Breng ze naar een speciaal inzamelpunt voor gevaarlijk afval voor verwijdering. DIGICLOCK 2 is CE-gemarkeerd en voldoet aan de EU-normen. TechniSat behoudt zich het recht voor om wijzigingen en fouten in het drukwerk aan te brengen. Sta- tus 10/2020TechniSat en DIGICLOCK 2 zijn geregistreerde handelsmerken van TechniSat Digital GmbH.
- Page 10 apparaat niet aan regen of vocht blootstellen. - Gebruik het apparaat niet in de buurt van baden, zwembaden of water. - Plaats geen vloeibare verpakkingen zoals bloemenvazen op het apparaat. Ze kun- nen vallen, en ontsnappende vloeistof kan ernstige schade of risico op een elektris- che schok veroorzaken.
- Page 11 - Kies geen locatie in ruimtes met een hoge luchtvochtigheid, zoals keukens of sau- na's, omdat condensatie het apparaat kan beschadigen. Het apparaat is ontwor- pen voor gebruik in een droge en gematigde omgeving en mag niet worden blootgesteld aan druppelend of spaמּend water. - Het apparaat kan alleen in een horizontale positie worden bediend.
-
Page 12: Functies Van Het Apparaat
Functies van het apparaat De juiste tijd instellen - Om de juiste tijd in te stellen, schakelt u het apparaat uit door op de AAN/UIT- knop (2) te drukken. - Houd vervolgens de toets MEMORY / TIME SET (5) langer ingedrukt. - Om de tijd in te stellen, drukt u op de UUR/TUN knop (6). - Page 13 Oproepen van een programma uit de lijst van radioprogramma's - Druk op de toets MEMORY / TIME SET (5). - Gebruik vervolgens de knoppen HOUR / TUN- (6) of MINUTE / TUN+ (3) om het programmanummer te selecteren en bevestig de selectie met de knop MEMORY / TIME SET (5).
- Page 14 OPMERKING: de baמּerijvoeding wordt alleen gebruikt om het geheugen van het apparaat te ondersteunen in het geval van een stroomstoring (bijv. het uurgeheu- gen)! *baמּerijen zijn niet inbegrepen in de set Dienst: Neem in geval van een storing contact op met uw lokale distributeur van TechniSat producten...
- Page 15 Instructions d'utilisation DIGICLOCK 2 Réveil radio avec affichage LED...
-
Page 16: Instructions De Sécurité
Veuillez les amener à un point de collecte spécial pour les déchets dangereuxTraduit avec. DIGICLOCK 2 porte le marquage CE et est conforme aux normes de l'UE. TechniSat se réserve le droit d'apporter des modifications et de corriger les erreurs d'impres- sion. -
Page 17: Ustawianie Urządzenia
- Pour éviter tout risque d'incendie et de choc électrique, n'exposez pas l'appareil à la pluie ou à l'humidité. - N'utilisez pas l'appareil à proximité de bains, de piscines ou d'eau. - Ne placez pas de récipients de liquide tels que des vases à fleurs sur l'appareil. Ils peuvent tomber, et le liquide qui s'échappe peut causer de graves dommages ou un risque de choc électrique. - Page 18 - Ne choisissez pas un emplacement dans des pièces à forte humidité, comme les cuisines ou les saunas, car la condensation pourrait endommager l'appareil. L'ap- pareil est conçu pour être utilisé dans des environnements secs et modérés et ne doit pas être exposé à des gouמּes ou des éclaboussures d'eau. - L'appareil ne peut être utilisé...
-
Page 19: Fonctions De L'appareil
Fonctions de l'appareil Fixer l'heure correcte - Pour régler l'heure correcte, éteignez l'appareil en appuyant sur le bouton ON/OFF (2). - Ensuite, maintenez le bouton MEMORY / TIME SET (5) - Pour régler l'heure, appuyez sur la touche HOUR / TUN- (6). - Utilisez la touche MINUTE / TUN+ (3) pour régler les minutes.. - Page 20 Appeler un programme de la liste des programmes radio - Appuyez sur la touche MEMORY / TIME SET (5). - Ensuite, utilisez les touches HOUR / TUN- (6) ou MINUTE / TUN+ (3) pour sélec- tionner le numéro de programme et confirmez la sélection avec la touche MEMORY / TIME SET (5).
- Page 21 REMARQUE : l'alimentation par baמּerie ne sert qu'à soutenir la mémoire de l'appa- reil en cas de coupure de courant (par exemple la mémoire horaire)!* *les piles ne sont pas incluses dans l'ensemble Service : En cas de panne, veuillez contacter votre distributeur local de produits TechniSat.
Need help?
Do you have a question about the CE DIGICLOCK 2 and is the answer not in the manual?
Questions and answers