Table of Contents
Advertisement
Quick Links
Advertisement
Table of Contents

Related Manuals for LDG FTL-Meter


Summary of Contents for LDG FTL-Meter
- Page 1 FTL-METER OPERATIONS MANUAL MANUAL REV A LDG FTL-Meter External Meter for Yaesu FT-857 and FT-897 LDG Electronics, Inc. 1445 Parran Road St. Leonard MD 20685-2903 USA Phone: 410-586-2177 Fax: 410-586-8475 ldg@ldgelectronics.com www.ldgelectronics.com PAGE 1...
-
Page 2: Table Of Contents
Table Of Contents Introduction Jumpstart, or “Real hams don’t read manuals!” Specifications Getting to know your FTL-Meter Front Panel: Back Panel: Installation FT-857 Installation: FT-897 Installation: Setup Initial Calibration Receive Parameter Selection Transmit Parameter Selection Finish Setup Operation Application Notes... -
Page 3: Introduction
Configure the FT-857 or FT-897 for normal operation. Plug the FTL-Meter into the radio’s meter jack using the right angle plug. The meter jack is on the bottom of the front panel, under the FUNC button on the FT-857, and just to the right of the main tuning knob on the FT-897. -
Page 4: Getting To Know Your Ftl-Meter
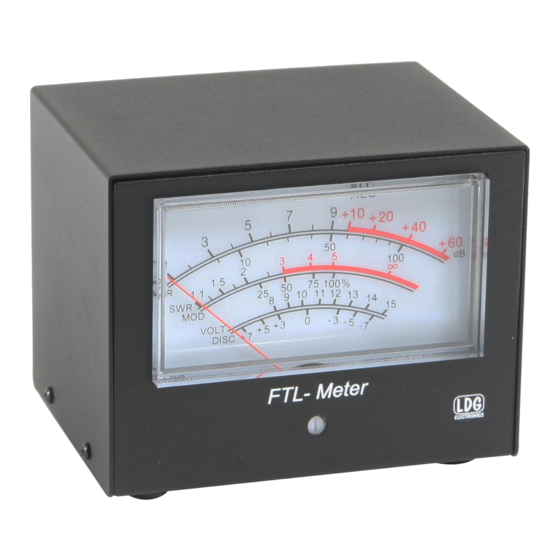
GETTING TO KNOW YOUR FTL-METER Your FTL-Meter is a quality, precision instrument that will give you many years of outstanding service; take a few minutes to get to know it. Front Panel: The front panel of the FTL-Meter shows seven calibrated scales: S: Received signal strength ALC: Automatic Level Control voltage, on transmit. -
Page 5: Back Panel
Back Panel: The rear panel of the FTL-Meter has two jacks, a rocker switch, and two access holes for adjustments. The DC Coax jack accepts a 2.5 x 5.5mm coaxial DC power cable, 12V, 250mA, center positive. External power is only required if use of the internal backlight is desired. The meter functions correctly otherwise without it. -
Page 6: Ft-857 Installation
If desired, connect a suitable power supply (12VDC @ 250mA) to the DC Power jack on the rear of the FTL-Meter, using the supplied 2.5 x 5.5mm center-positive power cable. This power connection supplies power to the backlight only. If the backlight feature is not desired, simply leave the DC power unconnected, and the meter will still function normally. -
Page 7: Ft-897 Installation
As shipped from the factory, the FTL-Meter is calibrated, but may require some adjustment due to shipping or other factors. When the radio is off, the needle on the FTL-Meter should rest at the “1:1” line on the SWR scale. If it does not, insert a flat blade screwdriver into the plastic screwhead under the meter face on the front panel of the FTL-Meter. -
Page 8: Receive Parameter Selection
If the full scale reading requires adjustment, insert a small flat blade screwdriver into the hole marked “FS” on the rear of the FTL-Meter, and turn the potentiometer gently left or right until the needle is exactly in the correct position on the meter. -
Page 9: Transmit Parameter Selection
Transmit Parameter Selection With the transceiver still in menu mode, turn the SELECT knob until menu item #61, “MTR ATX SEL” is displayed. This menu selects what value is displayed on the meter during transmit operation. Rotate the main tuning knob to select one of the following 6 options: Menu #61 MTR ATX Meaning No meter display when receiving... -
Page 10: Operation
Mobile Use The FTL-Meter is ideal for mobile operation. As the FTL-Meter is a bit larger than its smaller cousin, use of Velcro to mount the meter to the dashboard is not recommended. -
Page 11: Care And Maintenance
OUT OF WARRANTY SERVICE Any time a product fails after the warranty, LDG wants to help you get it fixed. Send the product to us for repair. We will determine what needs to be done, and based on your prior instruction, either contact you with an estimate or fix it and contact you with a request to pay any repair charges. -
Page 12: Product Feedback
Ask your shipper for a tracking number or a delivery verification receipt. This way you know the product arrived safely at LDG. Be sure to give us your email address so our shipper can alert you online when your product is en-route back to you. We regret that we are not staffed to provide periodic updates on the status of repairs.
Need help?
Do you have a question about the FTL-Meter and is the answer not in the manual?
Questions and answers