Advertisement
Quick Links
Advertisement

Related Manuals for Astrel Instruments AST492


Summary of Contents for Astrel Instruments AST492
- Page 1 Astrel Instruments AST492 AST492 GETTING STARTED rev A Getting Started 1/11 rev A...
-
Page 2: Table Of Contents
Astrel Instruments AST492 Table of contents • Getting started with the Astrel Instruments camera………………………. pag 3 • Camera connections…………………………………………………………. pag 4 • Powering up the camera for the first time………………………………….. pag 5 • Powering down the camera………………………………………………….. pag 7 •... -
Page 3: Getting Started With The Astrel Instruments Camera
AST492 Getting started with the Astrel Instruments camera Thank you for purchasing an Astrel Instruments CMOS camera. Your new camera is a leading edge scientific instruments: please take your time to read carefully the following User's Manual to learn how to get the best out of your equipment. -
Page 4: Camera Connections
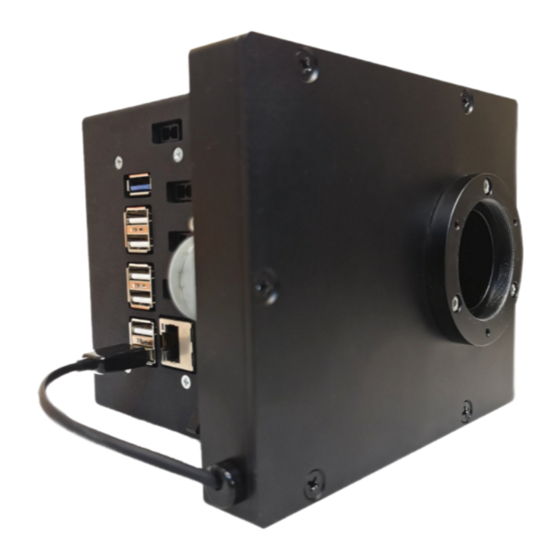
12V power in USB3 USB2 x6 Figure 1: AST492 connectors The following connectors are available on the camera: • 12V power in: the camera needs a 12V 5A power supply • 12V power out: 3x 12V power out connections for powering external equipment •... -
Page 5: Powering Up The Camera For The First Time
In the Remote Desktop application, insert 10.42.0.11 as address, astro as username and astronomy as password, then click connect to access the camera. After the connection is established, you will be presented the AST492 desktop, which is a standard Windows 10 desktop, exactly like any other PC. - Page 6 Astrel Instruments AST492 start, automatically connect to the AST492 camera and ask for setting the local coordinates: say no, you could set it later, then click the ‘shoot’ button to take a picture. The camera exposes for 1 second and downloads the image: depending on the light entering the camera, you could need to stretch it using the histogram tool on the lower left.
-
Page 7: Powering Down The Camera
Astrel Instruments AST492 Of course you can install whatever software you prefer on the AST492: the camera and the filter wheel have ASCOM drivers that can be used to interact from a different astrophotography tool. Powering down the camera WARNING: avoid powering down the camera by simply disconnecting power supply: your camera has a true PC inside running Windows and, as any other PC, you should shut it down in the correct way. -
Page 8: Using The Vacuum Pump
Astrel Instruments AST492 Using the vacuum pump The camera adopts a low vacuum approach to avoid frosting on the CMOS glass. Using the included vacuum pump, you can remove the air from inside the camera, so that there's no more water vapor to freeze. -
Page 9: Filters Mounting Procedure
The wheel uses standard 1.25” mounted filters or 31mm unmounted filters. The AST492 is equipped with a 7 positions filter wheel. Position number 1 is referenced by a small white arrow near the hole, which points to the direction where position 2 is located. - Page 10 Astrel Instruments AST492 Figure 5: filterwheel box external 2. Locate the small white arrow to find position 1 filter 3. Screw filters in the wheel holes in this (non mandatory) order: ◦ Luminance ◦ Red ◦ Green ◦ Blue ◦ H-alpha ◦...
- Page 11 Astrel Instruments AST492 ◦ OIII This is the order that is preset in the APT application: if you need a different order, remember to change it also in the ATP application. WARNING: do not push the wheel down while screwing to avoid any tilt of the...
Need help?
Do you have a question about the AST492 and is the answer not in the manual?
Questions and answers