Table of Contents
Advertisement
Available languages
Available languages
Quick Links
BCR690E
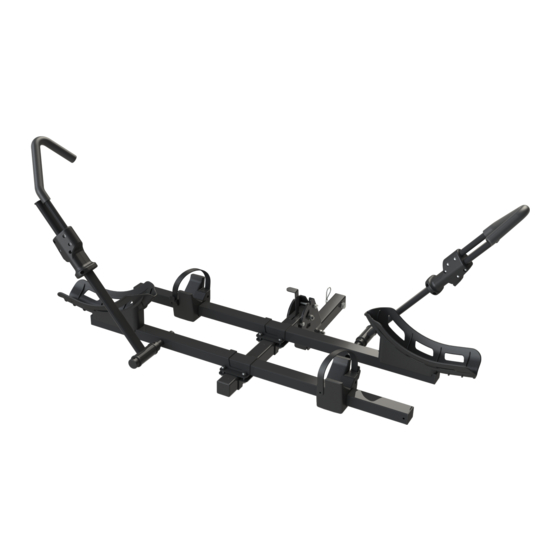
HITCH-MOUNTED E-BIKE PLATFORM
CARRIER
USER MANUAL
IMPORTANT, RETAIN FOR FUTURE REFERENCE: READ CAREFULLY
DK2 USA WEST
DK2 CORPORATE HEAD OFFICE
DK2 USA EAST
3311 MEADE AVENUE STE
5330 MAINWAY
3750 SOUTH AVENUE
E DOCK 13, LAS VEGAS, NEVADA
BURLINGTON, ONTARIO
NORTH UNIT, TOLEDO, OHIO
89102 USA
L7L6A4 CANADA
43615 USA
CUSTOMER SERVICE 1 (888) 277-6960 | MONDAY - FRIDAY 8AM - 4PM EST | WWW.DK2.COM
Advertisement
Chapters
Table of Contents

Subscribe to Our Youtube Channel
Related Manuals for DK2 BCR690E


Summary of Contents for DK2 BCR690E
- Page 1 3311 MEADE AVENUE STE 5330 MAINWAY 3750 SOUTH AVENUE E DOCK 13, LAS VEGAS, NEVADA BURLINGTON, ONTARIO NORTH UNIT, TOLEDO, OHIO 89102 USA L7L6A4 CANADA 43615 USA CUSTOMER SERVICE 1 (888) 277-6960 | MONDAY - FRIDAY 8AM - 4PM EST | WWW.DK2.COM...
-
Page 2: Warranty
Any damage in transit will be the responsibility of the carrier or at the risk of the purchaser. REGISTERING YOUR PRODUCT Please take a minute and visit our website to register your product at www.detailk2.com 2 | BCR690E man. -
Page 3: Online Resources
LEARN MORE ABOUT YOUR PRODUCT Visit your product’s web page by visiting www.detailk2.com/ bcr690e-info where you can find all sorts of information specific to your product, from description, to photos/videos, specifications, and support. You can also visit this page on your mobile device by scanning the PRODUCT PAGE QR Code on the left. -
Page 4: Table Of Contents
PARTS LIST ............... . . 21 4 | BCR690E man. -
Page 5: Technical Specifications
TECHNICAL SPECIFICATIONS CONSTRUCTION Powder-coated steel COMPATIBILITY Most E-Bikes TIRE SIZE COMPATIBILITY 15.9” >> 28.9” (40.6cm >> 73.6cm) MAX TIRE WIDTH 4.7” (12.1cm) 61.8” (L) x 42.5” (W) x 16.5” (H) >> 33.4” (depth from vehicle hitch) FOLDED DIMENSIONS 157cm (L) x 108cm (W) x 42cm (H) >> 85cm (depth from vehicle hitch) 61.8”... -
Page 6: Section I • Safety
SECTION I • SAFETY... -
Page 7: Safety Conventions
We recommend a rack strap with a cambuckle for added support and security. NOTE: Failure to use a support strap with a DK2 bike rack will void the warranty of the product. Gen.3 - v.221109 | 7... -
Page 8: General Remarks
(toolbars, baby carriers, pumps, etc.). These items have a chance of falling off of the bikes during transport. CAUTION! Always position the biggest/heaviest bike first and closest to the vehicle, and then position the smaller bike after. 8 | BCR690E man. -
Page 9: Road Safety
NOTE: The user is responsible for periodically verifying that all hardware, straps, knobs, and hubs are securely tightened for safety purposes. ROAD SAFETY NOTE: Check before departure that the light board of the carrier is properly functioning. NOTE: The bicycle rack increases the vehicle’s length, and the bicycles may increase its width and height. -
Page 10: Section Ii • Assembly
SECTION II • ASSEMBLY... -
Page 11: Package Contents
PACKAGE CONTENTS Gen.3 - v.221109 | 11... -
Page 12: Step 1: Rear Wheel Cradle
STEP 1: REAR WHEEL CRADLE 12 | BCR690E man. -
Page 13: Step 2: Front Wheel Cradle
STEP 2: FRONT WHEEL CRADLE Gen.3 - v.221109 | 13... -
Page 14: Step 3: Crossbars & Mainframe
STEP 3: CROSSBARS & MAINFRAME 1/2 L 1/2 L >18cm / 7 in ≈23cm / 9 in 14 | BCR690E man. -
Page 15: Step 4: Installation
STEP 4: INSTALLATION DANGER! DO NOT mount any 2-inch hitch-mounted carrier to RVs, travel trailers, or any mid-axle vehicles. The torque from the mid-axle tires on RVs, travel trailers, etc. can cause too much strain on the carrier, causing damage to your bicycle carrier and/or possibly creating loss of stability or swaying of the carrier, leading bicycles to fall out of place entirely during transportation. -
Page 16: Step 5: Safety Cradles & Straps
Fasten the rear wheel to the wheel cradle. Fasten the front wheel to the wheel cradle using the safety strap (R). Fasten the bike frame(s) to the carrier crossbar using the 8.2ft (2.5m) safety strap (S). 16 | BCR690E man. -
Page 17: How To Use Your Safety Straps
HOW TO USE YOUR SAFETY STRAPS Wrap support strap through cradle and around bike wheel. Take strap fastener on one end, and loose strap on the other end to prepare for fastening. Push down on the strap fastener to feed the loose end through the opening of the strap fastener. -
Page 18: Step 6: Safe Holding Procedure
STEP 6: SAFE HOLDING PROCEDURE Carrier can fold when not in use. 18 | BCR690E man. -
Page 19: Section Iii • Parts & Schematics
SECTION III • PARTS & SCHEMATICS... -
Page 20: Schematics
SCHEMATICS 20 | BCR690E man. -
Page 21: Parts List
PARTS LIST PART NO. DESCRIPTION PART NO. DESCRIPTION BCR690E-1 Bike hook BCR690E-41 Tilting tube BCR690E-2 Front wheel BCR690E-42 Hook round tube ending cap BCR690E-3 Tube cap BCR690E-43 Front wheel strap BCR690E-4 M5 x 25 half thread hexagon round head BCR690E-44... - Page 22 5330 MAINWAY 3750 AVENUE SUD QUAI E 13, LAS VEGAS, NEVADA BURLINGTON, ONTARIO UNITÉ NORD, TOLEDO, OHIO 89102 ÉTATS-UNIS L7L6A4 CANADA 43615 ÉTATS-UNIS SERVICE À LA CLIENTÈLE 1 (888) 277-6960 | LUNDI - VENDREDI 8H00 - 16H00 HNE | WWW.DK2.COM...
- Page 23 GARANTIE CE QUI EST COUVERT Detail K2 Inc. garanti à l’acheteur initial d’un article Detail K2 que le produit sera garanti pendant une période d’un (1) an à compter de la date d’achat d’origine. Si dans un délai d’un (1) an à compter de la date d’achat d’origine, ce produit tombe en panne en raison d’un défaut de matériau ou de fabrication, Detail K2 Inc.
- Page 24 EN SAVOIR PLUS SUR VOTRE PRODUIT Visitez la page Web de votre produit en visitant www.detailk2.com/ bcr690e-info où vous pouvez trouver toutes sortes d’informations spécifiques à votre produit, de la description, aux photos/vidéos, spécifications, et soutien. Vous pouvez également visiter cette page sur votre appareil mobile en en numéralisant le code QR de...
- Page 25 TABLE DES MATIÈRES GARANTIE ................2 RESSOURCES EN LIGNE .
-
Page 26: Garantie
157cm (L) x 108cm (L) x 110cm (H) >> 85cm (profondeur depuis l’attelage du véhicule) POIDS 44lb (20kg) CAPACITÉ DE POIDS 72,3lb (32,8kg) DU SUPPORT CAPACITÉ POIDS 144.8lb (65.7kg) TOTALE RÉCEPTEUR S’adapte sur un récepteur d’attelage de 2po (5,08cm) GARANTIE 1 an limité 26 | BCR690E man. -
Page 27: Section I • Sécurité
SECTION I • SÉCURITÉ... -
Page 28: Conventions De Sécurité
à tomber complètement hors de leur place pendant le transport. Le non-respect de cet avertissement peut entraîner des blessures graves ou même la mort. 28 | BCR690E man. -
Page 29: Remarques Générales
Nous recommandons une sangle de porte-bagages avec une sangle à boucle à came pour un support et une sécurité additionnel. REMARQUE : La non-utilisation d’une sangle de support avec un porte-vélos DK2 annulera la garantie du produit. -
Page 30: Sécurité Routière
Si vous remarquez quelque chose d’anormal, retirez les vélos et n’utilisez pas le porte-vélos. MISE EN GARDE! Assurez-vous qu’il y a une distance de sécurité entre les vélos et le sol, en particulier en entrant dans l’allée. 30 | BCR690E man. -
Page 31: Entretien De Votre Porte-Vélos
ENTRETIEN DE VOTRE PORTE-VÉLOS • Inspectez le produit pour des signes d’usure, de corrosion et de fatigue avant chaque utilisation. • N’utilisez pas le porte-vélos avec des pièces défectueuses ; contactez le revendeur pour les remplacer avant l’utiliser à nouveau. •... -
Page 32: Section Ii • Assemblage
SECTION II • ASSEMBLAGE... -
Page 33: Contenu De L'emballage
CONTENU DE L’EMBALLAGE Gen.3 - v.221109 | 33... -
Page 34: Étape 1 : Berceau De Roue Arrière
ÉTAPE 1 : BERCEAU DE ROUE ARRIÈRE 34 | BCR690E man. -
Page 35: Étape 2 : Berceau De Roue Avant
ÉTAPE 2 : BERCEAU DE ROUE AVANT Gen.3 - v.221109 | 35... -
Page 36: Étape 3 : Barres Transversales Et Cadre Principal
ÉTAPE 3 : BARRES TRANSVERSALES ET CADRE PRINCIPAL 1/2 L 1/2 L >18cm / 7 in ≈23cm / 9 in 36 | BCR690E man. -
Page 37: Étape 4 : Installation
ÉTAPE 4 : INSTALLATION DANGER! NE montez PAS de porte-vélos avec une attache de 2 pouces sur des véhicules récréatifs, roulottes ou tout véhicule à essieu central. Le stress engendré à essieu central sur les véhicules récréatifs et roulottes peut causer trop de pression sur le support, causant des dommages à votre porte-vélos et/ou pouvant créer une perte de stabilité... -
Page 38: Étape 5 : Berceau Et Sangles De Sécurité
Fixez la roue avant au berceau de roue à l’aide de la sangle de sécurité (R). Fixez le(s) cadre(s) du vélo à la barre transversale du porte-vélos à l’aide de la sangle de sécurité de 8,2pi (2,5m) (S). 38 | BCR690E man. -
Page 39: Comment Utiliser Vos Sangles De Sécurité
COMMENT UTILISER VOS SANGLES DE SÉCURITÉ Passez la sangle à travers le berceau de roue et autour de la roue du vélo. Prenez l’attache de la sangle d’une main et l’autre extrémité de l’autre. Appuyez sur le levier de fixation de la sangle pour alimenter l’extrémité... -
Page 40: Étape 6 : Procédure De Maintien En Toute Sécurité
ÉTAPE 6 : PROCÉDURE DE MAINTIEN EN TOUTE SÉCURITÉ Le support peut se plier lorsqu'il n'est pas utilisé. 40 | BCR690E man. -
Page 41: Section Iii • Pièces Et Schémas
SECTION III • PIÈCES ET SCHÉMAS... -
Page 42: Schémas
SCHÉMAS 42 | BCR690E man. -
Page 43: Liste De Pièces
LISTE DE PIÈCES N° N° DE PIÈCE DESCRIPTION QTÉ N° N° DE PIÈCE DESCRIPTION QTÉ BCR690E-1 Crochet pour vélo BCR690E-41 Tube basculant BCR690E-2 Berceau de roue avant BCR690E-42 Embout de tube crochet BCR690E-3 Capuchon de tube BCR690E-43 Sangle de roue avant...
Need help?
Do you have a question about the BCR690E and is the answer not in the manual?
Questions and answers