Table of Contents
Advertisement
Quick Links
Advertisement
Table of Contents

Related Manuals for Sigma Metalytics Precious Metal Verifier


Summary of Contents for Sigma Metalytics Precious Metal Verifier
- Page 1 User Manual...
- Page 2 You can find more information on our website at www.sigmametalytics.com Sigma Metalytics and the Precious Metal Verifier make no claim, guarantee, or promise that measurements made by the Precious Metal Verifier indicate any sample is or is not the selected metal or alloy, whether the reading is within or is not within the bounds consistent with the selected metal or alloy.
-
Page 3: Table Of Contents
CONTENTS Device Diagram ........2 Instructions . -
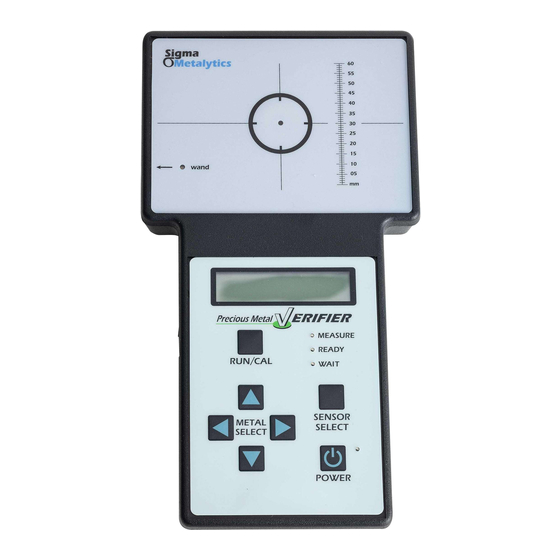
Page 4: Device Diagram
DEVICE DIAGRAM NOTE The sample must entirely cover the black circle on the face of the device for reliable onboard readings. When using a Wand, the sample must entirely cover the face of the Wand. -
Page 5: Instructions
Instructions 1. Press POWER to turn on the device. Wait until the display reads: Remove Sample Push RUN/CAL → Start If you are using a Wand, connect it now. The green LED on the testing platform will illuminate to indicate which sensor is in use. Press SENSOR SELECT to switch between the Wand and the Onboard Sensor. -
Page 6: Alloy Explanations
Alloy Explanations Gold Gold-Pure .999+ Gold samples that are 99.9% or higher purity. This includes 99.99% and 99.999%. These purities are sometimes written as .999, .9999, and .99999. Gold-91.7% 22K balCu Gold samples that are 91.7% gold with balance copper. These samples are sometimes advertised as 91.67% gold or 22k gold. -
Page 7: Silver
Alloy Explanations Silver Silver-99.99% Pure Silver samples that are 99.99% purity. This includes 99.99% and 99.999%. These purities are sometimes written as .9999 and .99999. Silver-99.9% Pure Silver samples that are 99.9% purity. This is only 99.9%, and higher purity samples should be read on the higher purity setting. This purity is sometimes written as .999. -
Page 8: Other & Bullion
Alloy Explanations Other & Bullion Other-Platinum Platinum samples that are 99.9% or higher purity. This includes 99.99% and 99.999%. These purities are sometimes written as .999, .9999, and .99999. Other-Palladium Palladium samples that are 99.9% or higher purity. This includes 99.99% and 99.999%. -
Page 9: Results Interpretations
Results Interpretation When testing a sample, brackets will be displayed. The location of the box cursor relative to the brackets indicate the results of the test. Sample is consistent with the selected alloy type The box cursor will fall anywhere inside of the brackets if the sample’s characteristic resistivity is consistent with the selected alloy type. -
Page 10: Sensor Selection
Sensor Selection Samples must be tested using the appropriate sensor to get reliable results. Using an incorrect sensor can lead to false negatives and false positives. Use the specifications below to choose the correct sensor for your sample. Placing the included calibration disk behind the sample during testing can enhance the reliability and allows the sensor to test thinner samples. - Page 11 Sensor Selection, Continued If a sample is providing odd or unreliable test results with a certain sensor, trying testing with one sensor smaller. This can sometimes provide more reliable results. Small samples can warm up very quickly with handling which may interfere with testing results.
-
Page 12: Important Notes For Testing
Important Notes for Testing Density Testing It is critically important to confirm a sample’s density in addition to testing its resistivity. Every precious metal alloy has a unique combination of density and resistivity; by only testing one aspect, the sample is only partially confirmed to be consistent with the genuine alloy. - Page 13 Conditions that Affect Readings Thin Samples The sensor’s signal may over-penetrate very thin samples and cause inaccurate readings. Refer to the minimum thicknesses information to make sure the sample meets the minimums for the sensor in use. Place the calibration disk behind the sample and/or switch to a smaller sensor if necessary.
-
Page 14: Battery Charging & Power Management
Battery Charging The PMV contains a rechargeable lithium-ion battery. The battery is high-capacity and the devices uses a battery management system to protect the health of the battery and the device. When the battery is low, the green LED next to the POWER button will blink slowly. -
Page 15: Measurement Mode
Measurement Mode The PMV Measurement Mode allows the user to see the mathematical result of the resistivity test for a sample rather than the box and bracket result. The result is close to the resistivity value of metal being tested, but slightly different. -
Page 16: Usage Considerations
Use Considerations USE WITH CAUTION It is not our recommendation or intention for the Precious Metal Verifier (PMV) to be the sole means for identification of counterfeit coins and bars. Our measurement of a material’s electrical characteristic (resistivity or conductivity) is necessary, but not by itself sufficient for such a purpose.
Need help?
Do you have a question about the Precious Metal Verifier and is the answer not in the manual?
Questions and answers
I've not used my model SM1501 for a couple of years and when you hit the power button the green light came on and then it turned right back off I then charged it over night and it did the same thing again why is this happening and how do I fix this problem