Table of Contents
Advertisement
Quick Links
Advertisement
Table of Contents

Related Manuals for Sigma Metalytics VERIFIER PMV PRO Mini


Summary of Contents for Sigma Metalytics VERIFIER PMV PRO Mini
- Page 1 Quick Guide Manual PMV PRO Mini MODEL #3001 Sigma Metalytics...
-
Page 2: Pro Mini Manual
PRO Mini Manual Find enclosed: • PMV PRO Mini model #3001 • Wand (optional) • USB-C cable for charging and use with Windows Tablet or PC This instrument is used to assist in the determination of validity of precious metals. The use of this instrument and its results are for informational purposes only. -
Page 3: Table Of Contents
Contents PRO Mini Manual Getting Started Charging the PRO Mini Powering ON/OFF Calibrating the PRO Mini Hands Free Use The Wedge Screen Calibration Calibration The Measurement Screen Entering Information Resistance and Conductance Sample Alloy Sample Weight Taking a Measurement Place Sample Basic Reading Sample Dimensions Errors... -
Page 4: Getting Started
Getting Started Charging the PRO Mini • Plug in USB-C Cable Charging is much more rapid if the instrument is off. Charging light will remain dimly lit while the battery is being charged, even while instrument is off. Powering ON/OFF •... -
Page 5: Calibrating The Pro Mini
Getting Started Calibrating the PRO Mini • Calibrating The PRO Mini will automatically calibrate when powering on. If calibration is needed during use, press the power button briefly and the yellow light will blink rapidly a few times, during which the instrument is calibrating. -
Page 6: Hands Free Use
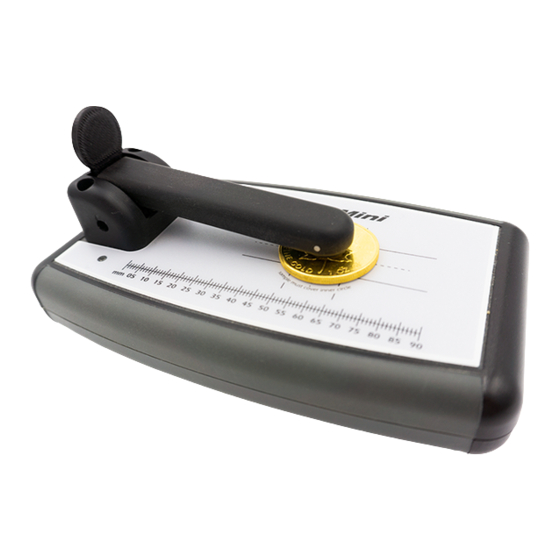
Hands Free Use The Wedge Hands Free Use The wedge, provided with the instrument, allows for hands free use of the PRO Mini. Place the wedge into the slot at the base of the sensor bar to hold the arm in place. The Wedge Place into slot for hands free use Slot for wedge... -
Page 7: Screen Calibration
Screen Calibration Calibration Open the menu at the top left of the screen Press “Calibrate Screen”... - Page 8 Screen Calibration A box will appear on the screen. Place the Calibration Disc on the screen so that the edge of the disc aligns with the top and left edges of the box, see below: Top side must touch edge Left side must touch edge...
-
Page 9: The Measurement Screen
The Measurement Screen The Measurement Screen The PRO Mini Measurement Screen Once connected, the PRO Mini will display the measurement screen on the host device. NOTE: A blinking green indicator will display in the upper right hand corner of the measurement screen to indicate the PRO Mini is connected. Green light shows host is connected Thickness = sample thickness... -
Page 10: Entering Information
Entering Information Resistance and Conductance Open the menu at the top left of the screen Press “Resistance” or “Conductance”... -
Page 11: Sample Alloy
Entering Information Sample Alloy Press the “Metals” button at the bottom of the Measurement Screen Select the expected alloy of your sample NOTE: Select the alloy type based on the main element of your sample, or select “Coins” if it is a specific coin type. -
Page 12: Sample Weight
Entering Information Sample Weight Press the “Weight” button at the bottom of the Measurement Screen Enter the weight in either grams or troy ounces, then select if weight entered is total sample weight or PM weight... -
Page 13: Taking A Measurement
Taking a Measurement Place Sample Place sample on target under bridge arm NOTE: The sample must entirely cover the inner circle of the target to be accurately measured. Press the sensor bar down to make contact with sample or sample holder NOTE: Press the sensor bar gently but firmly so the sensor in the arm rotates to be in flat... -
Page 14: Basic Reading
Taking a Measurement Basic Reading Within 4 seconds the reading will stabilize. The thickness, diameter, and sample area will also be displayed If the arrow is in the green area of the graph display, then the sample is reading is within expected range for the selected alloy type The yellow area of the graph indicates caution. -
Page 15: Sample Dimensions
Taking a Measurement Sample Dimensions When the reading has stabilized, the instrument is ready to display the expected sample dimensions... - Page 16 Taking a Measurement If the sample is round, 2 lines will appear on the screen. Place the sample on the screen so that the left edge of the sample is aligned with the left line The right edge of the sample sould be aligned Total Weight 1.00 Ozt with the right line, close enough so that the Diameter: 37.53 mm...
-
Page 17: Errors
Errors Example Error Messages Sample case is too thick: Case Thick Sample is too thin: sample reading will go from yellow to red Sample diameter is too small: diameter reading goes from yellow to... -
Page 18: Wand Use
Wand Use... - Page 20 PMV PRO Mini MODEL #3001 Sigma Metalytics www.sigmametalytics.com info@sigmametalytics.com...
Need help?
Do you have a question about the VERIFIER PMV PRO Mini and is the answer not in the manual?
Questions and answers