
Subscribe to Our Youtube Channel
Related Manuals for WARRIOR W0700R


Summary of Contents for WARRIOR W0700R
- Page 1 INSTRUCTION MANUAL Heavy-Duty Cabinet Table Saw 30" Rip Capacity Model 50" Rip Capacity Model...
-
Page 2: Table Of Contents
Contents Machine Description .........................2 1.1 Technical Parameters ......................2 1.2 Feature Identification ......................3 1.3 Intended Use ........................... 3 Safety Regulations ........................4 2.1. General Safety Instructions ....................4 2.2. Table Saw Safety Instructions ....................4 2.3. Residual Risks ........................5 2.4. -
Page 3: Machine Description
1. Machine Description 1.1 Technical Parameters... -
Page 4: Feature Identification
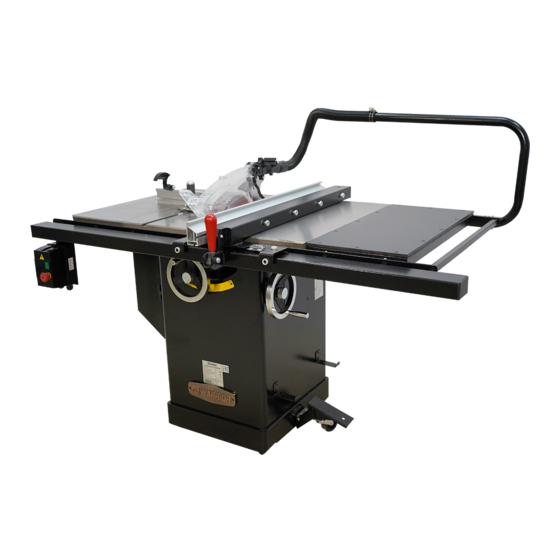
1.3 Intended Use 1.2 Feature Identification This table saw and the workpiece guide equipment 50" Model Refer to Fig. 1. supplied with it are intended to be used exclusively for the following purposes: Laminated and unlaminated board materials (e.g. ● chipboard, coreboard, MDF board, ...) Solid wood ●... -
Page 5: Safety Regulations
2. Safety Regulations 14. DISCONNECT MACHINES. Before servicing, when changing accessories or attachments; 2.1 General Safety Instructions 15. AVOID ACCIDENTAL STARTING. 1. KNOW YOUR MACHINE. Make sure the switch is in the “OFF” position Read and understand the owner’s manual and before plugging in;... -
Page 6: Residual Risks
5. STAND TO THE SIDE WHEN FEEDING 2.3 Residual Risks MATERIAL. Take precautions to reduce the hazard of Never stand or have any part of your body in line inhalation of harmful dust (e.g. wearing a dust with the path of the saw blade; mask);... -
Page 7: Installation Of The Machine
3. Installation of the Machine 3.2 Unpacking Your machine was carefully packaged for safe transportation. Remove the packaging materials 3.1 Transportation of Machines from around your machine and inspect it. If you 5.1.1 Transportation and store discover that the machine is damaged, please This machine has been well packaged and rust immediately call Customer Service for advice. -
Page 8: Contents
3.3 Contents Main machine box contents: (Fig. 5-1 ---- Fig. 5-5) Main table saw unit ........ 1 Motor cover ..........1 C. Left extension wing ........ 1 D. Right extension wing ......1 Extension table........1 (for 50" Rip Capacity model only) Fig. - Page 9 Fence box contents: (Fig. 5-6) Over arm box contents: (Fig. 5-8) A. Fence body ..........1 A. Over arm ........... 1 B. Fence .......... 1 B. Flexible hose (length 0.6 m) ....1 C. Flexible hose(length 1 m) ......1 D.
-
Page 10: Installation
3.4 Installation 3.4.2 Hand-wheel handle installation Before beginning assembly, take note of the Install the handle into the Blade Tilt hand-wheel as following precautions and suggestions: shown in Fig. 7. FLOOR: This tool distributes a large amount of weight over a small area. Make certain that the floor is capable of supporting both the weight of the machine and the operator. - Page 11 fence and the blade, at the rear of the blade, to 3.4.4 Install the rail & extension table reduce the risk of workpiece binding or burning as 1. Install the rail and extension table as breakdown it is fed through the cut. shows.
- Page 12 3.4.5. Post the tape scale use the pointer 3.4.6 Install the switch Fig.14 ( ) The switch is mounted on the lower right side of the window (Fig.13) guide tube by using two sets of bolts which are pre- The machine features a Hi-Low fence with two installed on the guide tube.
- Page 13 3.4.9 Extraction system 3.4.8 Install the blade guard 1. Remove the table insert; A dust collection device should be used by the Unlockthe handle. Fig. 16 customer the dust extraction equipment must , be switched on before commencing machining. 1. Installation of the Dust Outlet (Fig.18) The dust outlet is pre-connected with the flex pipe and placed in the cabinet.
- Page 14 3.4.10 Motor cover installation 3.4.11 Electrical installation Install the motor cover by inserting the door pins into the hinge sockets on the cabinet as shown in Wiring should only be done by professional Fig. 20. electricians. Always make sure the machine is properly grounded.
- Page 15 ELECTRICAL DIAGRAM 3HP/230V/50Hz/1PH Remark: 1. The colour of single core may differ with the illustration above in different areas. 2. Single-phase power supply range: 200-240 V.
-
Page 16: Adjustment
4. Adjustment Before operation, Please make adjustments as followings: 4.1 Adjusting the Rip Fence Before using the rip fence, the parallelism and perpendicularity must be aligned correctly. Please refer to chapter 5.4.4 Install the rail & fence. Fig. 22 4.2 Aligning the Table T-slot Parallel with 4.3 Adjusting the 45°... -
Page 17: Aligning Riving Knife With The Blade
4.4 Aligning the Riving Knife with Blade The riving knife must be aligned with the blade. If 1. Riving knives shall have a thickness less than not properly aligned, the riving knife will force the the width of a cut (kerf) and at least 0.2mm greater than the saw blade plate. -
Page 18: Operations
5. Operations 6. Maintenance This table saw has TEFC motor and sealed 5.1 Electrical Operation lubricated bearings, which requires very little Two types of the switches are alternative for maintenance other than minor lubrication and your machine, the actual object shall prevail. cleaning. -
Page 19: Trouble Shooting
7. Trouble Shooting PROBLEM SOLUTION SAW WILL NOT START 1. Plug in saw. 1. Saw not plugged in. 2. Fuse blown or circuit breaker tripped. 2. Replace fuse or reset circuit breaker. 3. Cord damaged. 3. Have cord replaced by a certified electrician. OVERLOAD KICKS OUT FREQUENTLY 1. -
Page 20: Exploded View And Parts List
Table Diagram and Part List... - Page 21 ITEM DESCRIPTION Q'TY Zero Gap Cover Plate Tenon Cover Plate Set Screw M6 x 6 Set Screw M6 x 12 Standard Cover Plate Magnet Cap Screw M8 x 35 Angle Iron Of Rear Guide Rail Workbench Extended Wing Front Rail Angle Iron Guide Square Tube Square Plug 76.2*50.8 Switch Board(Magnetic Starter)
- Page 22 Trunnion Diagram 84 83 61 60 100 99 25 26 15 14 32 33 11 12 38 39 40 41 42 43 44 45 48 49 50...
- Page 23 Trunnion Part List ITEM DESCRIPTION Q'TY ITEM DESCRIPTION Q'TY ITEM DESCRIPTION Q'TY Handwheel Handle M10*100 Lock Nut M8 F-Trunnion Hanging Plate Handwheel Locking Gasket Plate Square Nut M16*2 Handwheel E-Retaining Ring φ52 Saw Gland Cap Screw M6*30 C-Plate Fixing Plate Saw Shaft Lock Washer 6 Cap Screw M6*8...
- Page 24 Cabinet Diagram and Part List 401 402 ITEM DESCRIPTION ITEM DESCRIPTION Q'TY Q'TY T-Handle Button Head Screw M6*12 Hexagon Flange Nut M8 P-Head Screw M4*8 Washer 8 Pull Handle Compression Spring Dust Suction Port Hex Bolt M8*80 Button Head Screw M6*16 Motor Guard Integration Side Baffle Of Box Flat Washer 4...
- Page 26 High-Low Fence Diagram and Part List 305 310 ITEM DESCRIPTION ITEM DESCRIPTION Q'TY Q'TY Square Hex Bolt M10*50 L-Asjusting Wire Hex Bolt M6*45 Pull Nut S-Asjusting Wire Set Screw M8*8 Compound Nut Lock Nut M6 Button Head Screw M5*10 Lock Nut M10 Bracket Assembly Transverse Plate 2 Lock Handle...
- Page 27 T-Glide Fence Diagram and Part List 314 315 316 317 ITEM DESCRIPTION ITEM DESCRIPTION Q'TY Q'TY Square Tension Pin 4*32 Hex Bolt M6*12 Spacer Backing Plate Plug Locking Block L-Asjusting Wire Cam Block Pull Nut Locking Handle M10 Nut M6 Compression Spring Backing Board Hex Bolt M10*50...
Need help?
Do you have a question about the W0700R and is the answer not in the manual?
Questions and answers