Table of Contents
Advertisement
Quick Links
EM7162 - Evaluation Module for CDM7162
4-3) Installing Framework 3.5 SP1
5. Using EM7160 with the Measurement Data Management Software
5-1) Initial setting of the measurement data management software and measurement data collection
Instruction Manual
Table of Contents
Advertisement
Table of Contents

Related Manuals for Figaro EM7162

Summary of Contents for Figaro EM7162
-
Page 1: Table Of Contents
EM7162 - Evaluation Module for CDM7162 Instruction Manual Table of Contents 1. Overview 2. Parts and Specifications 3. Setting the Method of Serial Communication 3-1) Switch settings for I2C bus mode 3-2) Switch settings for UART interface 3-3) Attaching CDM7160 4. -
Page 2: Overview
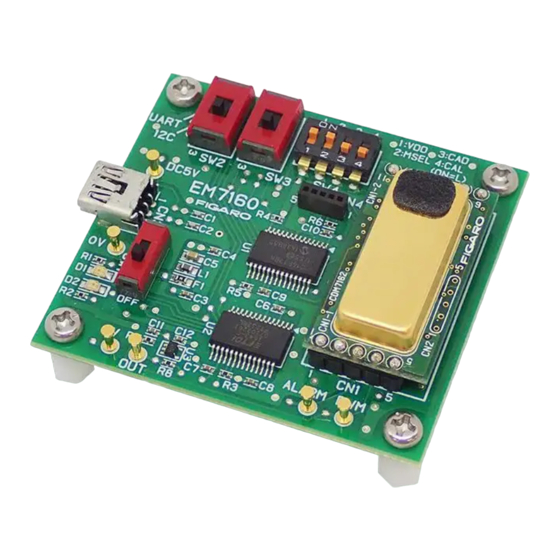
1. Overview The EM7162 is an evaluation module that permits easy evaluation of the characteristics of the CDM7162 carbon dioxide (CO ) sensor module. The module is equipped with a USB connector to output CO2 concentration measurement data, a terminal for output of the concentration signal in PWM format, and a terminal for output of a voltage signal converted from PWM output. -
Page 3: Setting The Method Of Serial Communication
Set the serial communication method by using the communication mode selection switches on the EM7162 module before connecting the USB cable or the power supply. Caution‼ Before changing the serial communication setting, be sure to turn off the power switch (SW1) by setting it to the lower position as shown in Fig. -
Page 4: 3-2) Switch Settings For Uart Interface
CDM7162 sensor. 3-3) Attaching CDM7162 The included CDM7162 sensor module is attached to the EM7162 evaluation module at the factory. When replacing the CDM7162 or removing and remounting it, match the pin # of connectors CN1 and CN2 on EM7162 with the corresponding pin # of the CDM7162 (Figure 4). -
Page 5: Installing The Measurement Data Management Software And Usb Driver
(4) Connect the USB terminal on the evaluation module to the USB port on the computer using a USB cable (included). (5) Turn on the power switch SW1 of EM7162 and confirm that the USB driver is recognized on the computer screen. -
Page 6: 4-2) Installing The Measurement Data Management Software
(7) Right-click the "FT232R USB UART" USB driver icon and select "Properties" (Figure 5). Figure 5 - USB Driver Icon on the “View devices and printers” screen (8) Click the "Hardware" tab on the "Properties" screen and check the displayed COM port number (Figure 6). -
Page 7: 4-4) Uninstalling The Measurement Data Management Software
5. Using EM7162 with the Measurement Data Management Software After installing the measurement data management software and USB driver (FT232R-USB) on the computer, connect EM7162 to the computer using a mini B-USB cable. In this way, CO concentration and measurement data can easily be collected by the CDM7162 CO sensor module. - Page 8 (5) Setting the COM port number [COM No.] Set the number of the COM port to which the EM7162 is connected in "COM No." at the top right of the screen. (for how to check the COM port no., see steps 6~8 in Sec. 4-1).
-
Page 9: 5-2) Saved Data Files
- The screen displays data from the most recent 10 minutes of measurement data for a measurement session (see Figure 9). - Measurement data is saved in CSV format on the computer at recording interval specified in Step 6 above. Figure 9 - Measurement Data Display Example (To change the destination folder to save or saved file name, see Sec. - Page 10 - Folder name: Click the [Change] button at the right of the Save Folder field. - File name: Directly enter the new file name in the File Name field. (The default file name is "Result.") The actual saved file name and its directory are displayed in the Save File Name field. "_YYYYMMDD-N.csv"...
-
Page 11: 5-3) Air Adjustment
- Column B: Measured CO concentration (in ppm) is recorded in order. (4) CO concentration chart created in Excel Figure 11 shows an example where the change in CO concentration is displayed in chart form using the CSV file to which data is saved at a 30 second interval. - Column D: The elapsed time (in seconds) is calculated by multiplying the sampling numbers in Column A by 30. - Page 12 Figure 12 - Display example during Air Adjustment Procedures for Air Adjustment: (1) Change the Air Adjustment setting value to assumed CO2 concentration in ambient air (420ppm in the example shown in Figure 12) on the PC display. Then click [Set] button. (2) Confirm that the CDM7162 CO2 sensor output has been sufficiently stable under this ambient conditions, and click [Calibration] button.
-
Page 13: How To Use Em7160 Without Connecting To A Computer
6. How to Use EM7162 without Connecting to a Computer When using the EM7162 without connecting to a computer, connect the 5-VDC power supply between the power supply input terminal and the ground terminal (see Figure 1). - The PWM output terminal outputs the PWM output signal from CDM7162 with a cycle of 1 kHz. - Page 14 *The EM7162 evaluation module is an evaluation tool for the CDM7162. This module is not designed to be embedded in other devices. These specifications are subject to change without notice for functional improvement. REV. 03.23...
Need help?
Do you have a question about the EM7162 and is the answer not in the manual?
Questions and answers