Advertisement
Quick Links
Advertisement

Related Manuals for Amped Wireless RTA1750


Summary of Contents for Amped Wireless RTA1750
- Page 1 User’s Guide RTA1750 HIGHPOWER AC1750 ROUTER WI-FI ®...
- Page 2 RTA1750 USER’S GUIDE CONTENTS INTRODUCTION ............3 Wireless Coverage Controls (2.4GHz) ......32 GETTING STARTED ............4 Access Schedule (2.4GHz) ..........33 Package Contents ............4 NETWORK SETTINGS ..........34 LED Indicators ..............5 Local Network (LAN) ............. 34 Back Panel Description ........... 6 Internet Network (WAN) ..........
- Page 3 RTA1750 USER’S GUIDE ROUTING SETUP ............56 Password Settings ............66 MANAGEMENT FEATURES ......... 57 TECHNICAL SPECIFICATION .........67 System Status..............58 DEFAULT SETTINGS ............68 Network Statistics ............59 TROUBLESHOOTING AND SUPPORT INFORMATION ...69 WARRANTY AND REGULATORY INFORMATION ..86 Dynamic DNS Settings ........... 60 LEGAL NOTICES AND DISCLAIMERS…………………………..97...
- Page 4 USER’S GUIDE INTRODUCTION Thank you for purchasing this Amped Wireless product. At Amped Wireless we strive to provide you with the highest quality products through innovation and advanced technology. We pride ourselves on delivering products that outperform the competition and go beyond your expectations. If you have any questions please feel free to contact us.
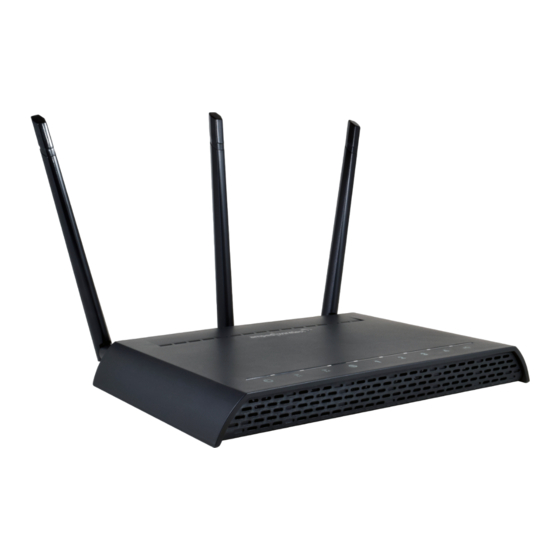
- Page 5 RTA1750 USER’S GUIDE GETTING STARTED Package Contents Check to make sure you have all the contents within your package: High Power AC1750 Wi-Fi Router Three Detachable High Gain Antennas RJ-45 Ethernet Cable Power Adapter Setup Guide ...
- Page 6 RTA1750 USER’S GUIDE LED Indicators Power: Indicates when the Router is powered on. The LED will remain on. WPS: Blinks when Wi-Fi Protected Setup (WPS) is activated and the Router awaits a connection. 5.0GHz Wireless Activity: Blinks rapidly when wireless data traffic is transmitted or received over the 5GHz wireless network.
- Page 7 RTA1750 USER’S GUIDE Back Panel Description Antenna Connectors: RJ-SMA antenna connectors. Attach the included high gain antennas to these connectors. Reset: Push down once to reboot the Router. Hold down for 5-10 seconds to reset the router back to factory settings.
- Page 8 RTA1750 USER’S GUIDE BASIC SETUP GUIDE Setup Preparations Disconnect and power off your existing router. Disconnect your existing router from your computer, your broadband modem and its power outlet. If you do not have an existing router please continue to the next step.
- Page 9 RTA1750 USER’S GUIDE Connect the Router to your Modem Do NOT connect the power adapter to the Router at this time. a) Use the included blue Ethernet cable and connect one end of the cable to your modem. Connect the other end of the cable to...
- Page 10 RTA1750 USER’S GUIDE Power on your Modem Plug in your modem’s power adapter and backup battery (if available):...
- Page 11 RTA1750 USER’S GUIDE Attach Antennas, Power On & Connect to your Computer a) Attach the antennas to the antenna connectors on the Router. b) Connect the included grey Ethernet cable to an available port on your computer or connect to the Router’s Wi-Fi Network: Amped_RTA1750_2.4 or Amped_RTA1750_5.0.
- Page 12 RTA1750 USER’S GUIDE Open your Web Browser to Access the Setup Wizard a) Open your web browser. b) Type http://setup.ampedwireless.com into the web address bar. If the web menu fails to open, type the following IP address into your web address bar:...
- Page 13 RTA1750 USER’S GUIDE Welcome to the Setup Wizard If this is your first time setting up the Router, the Setup Wizard should automatically load. If you wish to manually configure your router you can also choose to skip the Setup Wizard.
- Page 14 RTA1750 USER’S GUIDE Internet Connection Detection The Wizard will try to detect your Internet settings and configure the router. Please be patient. If there is a problem with the Automatic Configuration, the wizard will notify you of the issue. If you continue to have problems, contact our Elite Support department at 888- 573-8820.
- Page 15 RTA1750 USER’S GUIDE Personalize your Wi-Fi Settings The default ID of your 5GHz Wi-Fi network and 2.4GHz Wi-Fi network is: Amped_RTA1750_5.0 Amped_RTA1750_2.4 To change it, enter a new name in the SSID field. Users connecting wirelessly to the Router will use these IDs to identify your wireless network.
- Page 16 RTA1750 USER’S GUIDE Create a Password for your Router This password is NOT your Wi-Fi network password. This password is to access the web menu of the Router to access additional router settings. Leave this blank if you do not wish to have a password.
- Page 17 At this time, you may disconnect from the Router and start a wireless connection. If you have any wired devices that you would like to attach to the Router you may do so now as well. Enjoy your new Amped Wireless network!
- Page 18 RTA1750 USER’S GUIDE WEB MENU DASHBOARD Welcome to the Dashboard Once you have completed the Router Setup Wizard, going to http://setup.ampedwireless.com will now bring you to the Router’s Dashboard. The Dashboard provides you with information regarding your internet connection and basic router settings. From here you...
- Page 19 RTA1750 USER’S GUIDE 5GHz WI-FI SETTINGS 5GHz Wi-Fi Settings: Basic Settings (5.0GHz) The Basic Settings page allows you to adjust settings for your 5GHz local wireless network. Disable 5.0GHz Wireless Connections: Disabling will turn off all 5GHz Wi-Fi activity. Users will no longer be able to connect wirelessly to your 5GHz network.
- Page 20 RTA1750 USER’S GUIDE Wireless Network ID (SSID): The name of your 5GHz wireless network. Channel Number: Wi-Fi networks operate on specific wireless channels. Some network channels may have more interference than others. If your performance is unstable, try a different channel number. If you are using a repeater with this network, it is recommended you set a static channel, instead of using "Auto".
Need help?
Do you have a question about the RTA1750 and is the answer not in the manual?
Questions and answers