Advertisement
Introduction
The D-05 is a sound module that can be used in conjunction with the K-25m keyboard unit (sold separately). The sound can be heard through the built-in speakers.
- The D-05 can operate on batteries or on USB bus power. If you are using batteries, insert four AA batteries, making sure that the batteries are oriented correctly.
- If you handle batteries improperly, you risk explosion and fluid leakage. Make sure that you carefully observe all of the items related to batteries that are listed in "USING THE UNIT SAFELY" and "IMPORTANT NOTES" (leaflet "USING THE UNIT SAFELY").
- When turning the unit over, be careful so as to protect the buttons and knobs from damage. Also, handle the unit carefully; do not drop it.
- When the battery runs low, the display indicates "Battery Low." Replace the battery as soon as possible.
Using the D-05 in conjunction with the DK-01 Boutique Dock (sold separately)
 For installation / removal / angle adjustment, refer to the DK-01's Owner's Manual.
Using the D-05 in conjunction with the K-25m keyboard unit (sold separately)
For installation / removal / angle adjustment, refer to the K-25m's Owner's Manual.
Playing the D-05 via MIDI or USB
You can also play the D-05 via MIDI or USB. For details, refer to "Connecting Your Equipment."
Connecting Your Equipment
- To prevent malfunction and equipment failure, always turn down the volume, and turn off all the units before making any connections.


- Micro USB (
![]() ) port
) port
Use a commercially available USB 2.0 cable (A-micro B) to connect this port to your computer.
![]()
It can be used to transfer USB MIDI and USB audio data. You must install the USB driver when connecting the D-05 to your computer. Download the USB driver from the Roland website.


- Do not use a micro USB cable that is designed only for charging a device. Charge-only cables cannot transmit data.
- [VOLUME] knob
Adjusts the volume. - PHONES jack
Connect headphones (sold separately) here. - OUTPUT jack
Connect this jack to your amp or monitor speakers. - MIX IN jack
This is the audio input jack. Sound from the connected device is output from the OUTPUT jack and PHONES jack. - MIDI jack
You can play the D-05 by connecting a MIDI device via a commercially available MIDI cable.
![]()

Turning On
- [POWER] switch
This turns the power on/off.
- After you've made connections correctly, be sure to turn on the power in the order of the D-05 first, and then the connected system. Powering-on in the incorrect order may cause malfunctions or damage. When turning the power off, power-off the connected system first, and then the D-05.
- Before turning the unit on/off, always be sure to turn the volume down. Even with the volume turned down, you might hear some sound when switching the unit on/off. However, this is normal and does not indicate a malfunction.
- The D-05 automatically powers-off when a specified length of time has elapsed since it was last played or operated (the Auto Off function). If you don't want the power to turn off automatically, disable the Auto Off function.
- When the power is turned off, any settings you were editing will be lost. You must save settings that you want to keep.
- To restore power, turn the power on again.
Returning to the Factory Settings (Factory Reset)
Here's how to return the D-05 to its factory-set state.
- While holding down the PATCH BANK [2] button, turn on the power.
If you decide to cancel the factory reset, turn off the power. - Press the [ENTER] button to execute the factory reset.
- When all buttons blink, turn the D-05's power off, then on again.
Data Backup/Restore
Backup
- Connect your computer to the D-05's USB port via USB cable.
- While holding down the [FUNCTION] button, turn on the power.
- Open the "D-05" drive on your computer.
The backup files are located in the "BACKUP" folder of the "D-05" drive. - Copy the backup files into your computer.
- After copying is completed, eject the USB drive.
Windows 10/8/7
Right-click on the "D-05" icon and execute "Eject."
Mac OS
Drag the "D-05" icon to the Trash icon in the Dock.
- Turn the D-05 power off.
Restore
- As described in the procedure for "Backup" Step 1–3, open the "D-05" drive on your computer.
- Copy the D-05 backup files into the "RESTORE" folder of the "D-05" drive.
- After copying is completed, eject the USB drive and then press the [ENTER] button.
- After the LEDs have completely stopped blinking, turn off the power.
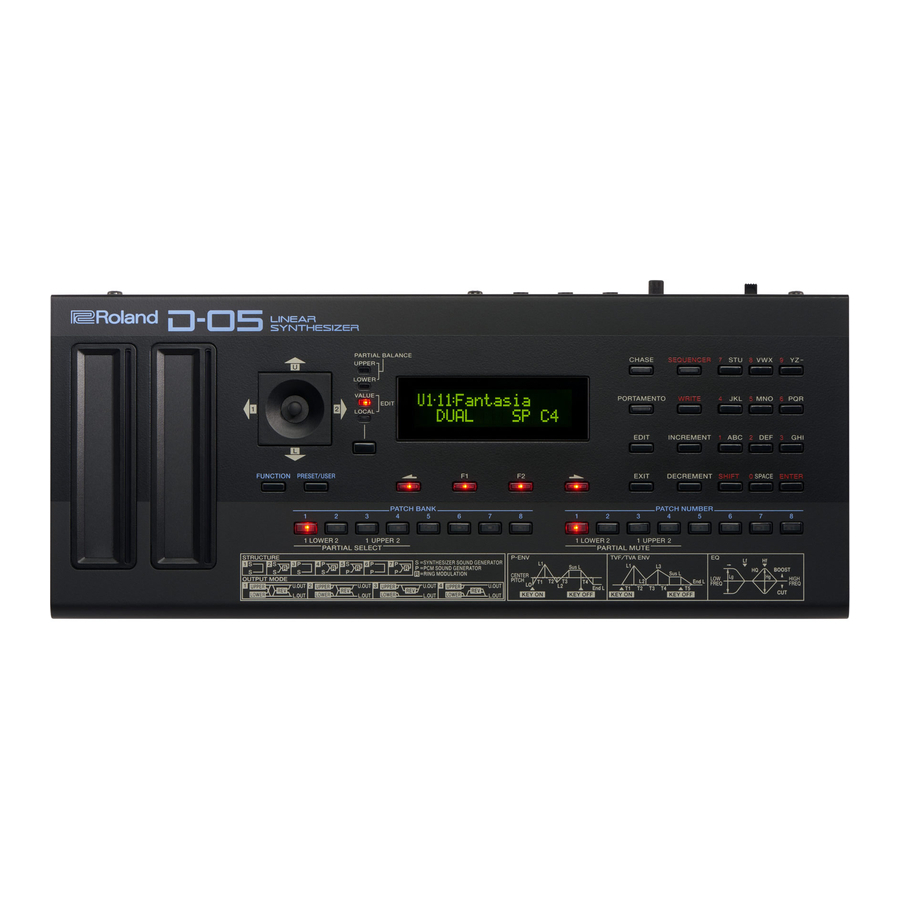
Panel Descriptions

- Ribbon controller (C1/C2)
These are touch-type ribbon controllers. C1 (left) is pitch bend, and C2 (right) is modulation.
- If a K-25m keyboard unit, USB, or MIDI are not connected, touching the C1 controller plays a preview sound.
- Joystick
- UPPER / LOWER / VALUE / LOCAL
These buttons switch the function of the joystick.
| Indicator / Button | Explanation |
| UPPER | The up/down direction changes the part balance, and the left/right direction changes the partial balance of the selected part. |
| LOWER | |
| VALUE | Enters values, such as during editing. |
| LOCAL | Enables local editing (a function that lets you use the joystick to simultaneously edit adjacent items in the display). |
| Select button | Switches in the order of UPPER  LOWER VALUE LOCAL. LOWER VALUE LOCAL. |
- Display/ [
![]() ] / [F1] / [F2] / [
] / [F1] / [F2] / [ ![]() ] buttons
] buttons
From the left, these are indicated as [![]() ] / [F1] / [F2] / [
] / [F1] / [F2] / [ ![]() ].
].
Enabled buttons (i.e., buttons that do something when pressed) are lit; disabled buttons are unlit.
Use [![]() ] [
] [ ![]() ] to switch pages. These are lit if an adjacent PAGE exists.
] to switch pages. These are lit if an adjacent PAGE exists.
- Never strike or apply strong pressure to the display.
- [FUNCTION] [PRESET/USER] buttons
| Button | Explanation |
| FUNCTION | Accesses the function menu screen. |
| PRESET/USER | Change the patch group. Press this button, and then use [INCREMENT] [DECREMENT] to change. Choose from P-1–6 and U-1–8. After making the change, specify the patch bank and patch number to confirm. |
- [CHASE] [PORTAMENTO] [EDIT] [EXIT] buttons
| Button | Explanation |
| CHASE | Turns the Chase function on/off. Chase is a function that sounds the upper tone when you press a key, and then sounds a delayed note on the lower (or upper) part; it works when the key mode is Whole or Dual. Depending on the patch, it can produce effects similar to delay or sound-on-sound. |
| PORTAMENTO | Turns the portamento function on/off. |
| EDIT | Accesses the edit menu screen. |
| EXIT | Returns you to the previous screen. In some screens, this button cancels the operation that's being executed. |
- [SEQUENCER] [WRITE] [INCREMENT] [DECREMENT] buttons
| Button | Explanation |
| SEQUENCER | Accesses the sequencer screen. Hold down the [SHIFT] button and press the [SEQUENCER] button to access the arpeggiator screen. |
| WRITE | Saves the sound or sequencer settings. |
| INCREMENT | Used to increment or decrement the value. |
| DECREMENT |
- Ten keys/ [SHIFT] [ENTER] buttons
| Button | Explanation |
| Ten keys | Use these buttons to edit the patch name or tone name. For some items, these buttons can also enter a numeric value. |
| SHIFT | Use this button in conjunction with other buttons to access parameters or to operate other parameters. |
| ENTER | Press this to confirm a value or execute an operation. |
- PATCH BANK [1]–[8]/NUMBER [1]–[8] buttons
| Button | Explanation |
| PATCH BANK [1]– [8] | Select patch banks. When editing, you can use these buttons to select partials. |
| NUMBER [1]–[8] | Select the patch number. When editing, you can use these buttons to turn partials on/off. |
By simultaneously pressing two of the [1]–[16] buttons, you can connect those two steps with a tie.
How the Sound Engine Is Structured

Patch
A "patch" contains sound data and data for the performance functions.
Multiple patches can be saved in patch memory, and freely recalled while you perform.
On D-05, a patch consists of two sounds (the upper tone and lower tone), settings that specify how they are played, and settings such as keyboard mode, output mode, and reverb.
Tone
The upper and lower tones each consist of two "partials" (sound sources) and common settings that specify how the partials are controlled.
The common settings include the type selections for the two partials, how the two partials are combined (the "structure"), and settings such as LFO, pitch envelope, equalizer, and chorus.
Partial
A "partial" is the most basic unit of sound on D-05. There are two types of partial: a synthesizer sound generator and a PCM sound generator. Synthesizer type partials provide a TVF (Time Variant Filter) and a TVA, and PCM type partials provide a TVA (Time Variant Amplifier).
Basic Operation
[  ] / [F1] [F2] / [
  ] Buttons
Enabled buttons (i.e., buttons that do something when pressed) are lit; disabled buttons are unlit.
Use [ ] [ ] to switch pages.
| ":" (lit) | Indicates that parameters have not been edited. |
| ":" (blink) | Indicates that parameters have been edited. |
When a parameter value is shown in the lower line of the display, you can use the [F1] [F2] buttons to select an item.
The selected value and button are blinking.
You can edit the selected value by using [INCREMENT], [DECREMENT], numeric keys, and the joystick.
Pressing a blinking button makes it change back from blinking to lit.
Press the [EXIT] button to return to the next higher level.
PATCH BANK /NUMBER Buttons

These indicate the bank and number of the patch or pattern.
Press a button to change the bank and number.
PARTIAL SELECT/PARTIAL MUTE (during editing)

These indications appear during editing.
Press the corresponding button to select or mute partials.
| PARTIAL SELECT: | Buttons corresponding to the selected partials are lit; other buttons are |
| PARTIAL MUTE: | unlit. Partials that produce sound are lit; muted partials are unlit. |
SEQUENCER
These indications appear when the [SEQUENCER] button is lit.
Press to turn a step on/off.
Steps that produce sound are lit; muted steps are unlit.
By simultaneously pressing two of the [1]–[16] buttons, you can connect the region between those two buttons with a tie.
SEQUENCER

The PATCH BANK [1]–[8] buttons and NUMBER [1]–[8] buttons indicate the status of each step in the step display area that's selected (STEP: 1–16, 17–32, 33–48, 49–64).

You can change the tempo when the tempo is displayed and no item is selected by the [F1][F2] buttons.
SEQ MAIN
| Play | Plays/stops the selected pattern. |
| (PtnSel) Pattern Select | Accesses the pattern select screen. |
Use the [ ] [ ] buttons to change the range of steps that are shown.
Press a [1]–[16] button to enable step input. The screen shows step information.

SEQ PRM
In the SEQ MAIN screen, hold down the [SHIFT] button and press the [F2] button to access the SEQ PRM screen.
| Len (Length) | Specifies the pattern length (number of steps). |
| Scal (Scale) | Specifies the note value of one step. |
| Shfl (Shuffle) | Specifies the amount of rhythm "bounce" (shuffle). |
| Gate (Gate) | Specifies the note duration for one step. |
| Off (Off Step Mode) | Off step mode REST (default setting), SKIP |
| Ord (Step Order) | Specifies the playback order of the steps. Play forward from the first step. Play forward from the first step. Play backward from the last step. Play backward from the last step. Play forward from the first step, and then play backward from the last step. Play forward from the first step, and then play backward from the last step. Play with even-numbered and odd-numbered steps inverted. Play with even-numbered and odd-numbered steps inverted.RND Play steps randomly. |
| S.Stp (Start Step) | By specifying the start step, you can make playback start from a step that's mid-way through the pattern. Steps earlier than this step are not played. |
| E.STP (End Step) | By specifying the last step, you can make a step that's mid-way through the pattern be treated as though it were the last step. Steps later than this step are not played. |
| Clear | Clears the pattern. |
During STEP REC (step recording screen)
In the SEQ MAIN screen, hold down the [SHIFT] button and press the [F1] button to access the STEP REC screen.
| Rest | Inputs a rest. |
| Tie | Inputs a tie (the note value is added to the preceding step). |
Use the [ ] [ ] buttons to change the range of steps that are shown.
When you press a key, a note is input at the current step. The screen shows step information.

Press a [1]–[16] button to enable step input. The screen shows step information.

[SHIFT]+[SEQUENCER] (arpeggiator)
| Sw (Switch) | Turns the arpeggiator on/off. |
| Typ (Type) | Selects the type of arpeggio. |
| Scal (Scale) | Specifies the note value of one step. |
| Hold | If this is on, the arpeggio continues playing according to the chord you had been playing even after you release your hand. If you play a different chord while the arpeggio is being held, the arpeggio also changes. |
Other Operations
[WRITE]
| Patch Write ([WRITE]) | ||
| To: (select the write-destination) |  | Use the Patch Bank and Patch Number buttons |
| Confirm or cancel writing |  | [ENTER] button: Confirm [EXIT] button: Cancel |
| Reverb Write ([SHIFT] + [WRITE]) | ||
| To: (select the write-destination) |  | [F1] button: U1–U8 [F2] button: 17–32 |
| Confirm or cancel writing |  | [ENTER] button: Confirm [EXIT] button: Cancel |
| Pattern Write ([WRITE] in a sequencer-related screen) | ||
| Pattern name |  | [F1] [F2] buttons: Move the cursor |
| Tempo/Shuffle |  | [F1] button (Tempo): OFF: Not stored 40–300: Tempo value is stored [F2] button (Shuffle): OFF: Not stored -90–90: Shuffle value is stored |
| Pattern Patch |  | [F1] button: Pattern Patch OFF: Not stored U1-11–P6-88: Patch is stored [INCREMENT]/[DECREMENT]/Use the Patch Bank and Patch Number buttons |
| To: (select the write-destination) |  | Use the Patch Bank and Patch Number buttons |
| Confirm or cancel writing |  | [ENTER] button: Confirm [EXIT] button: Cancel |
Function Menu
| (Func) Function | Accesses the function screen. |
| (MIDI) | Accesses the MIDI screen. |
| (Copy) | Copies a parameter. |
| (B. Dump) Bulk Dump | Transmits the data of the D-05 to an external device as an exclusive message. |
| (B. Load) Bulk Load | Receives D-50 data saved on an external device as an exclusive message. |
Function (Function screen)
| MastTune (Master Tune) | Specifies the reference pitch. |
| Protect | Turns memory protect on/off. |
| AutoOff | Enables automatic power-off when a certain length of time has elapsed since the unit was last played or operated. |
| Demo | Specifies the time (minutes) until the LED demo begins. If this is OFF, the demo is disabled. |
| LCDCont (LCD Contrast) | Adjusts the contrast of the display. |
| SndMode (Sound Mode) | Original This mode simulates the sound engine of the D-50. Clear This mode uses digital processing that is more accurate than on the D-50, delivering clear sound. |
| C1Scale | Specifies a note scale type for the ribbon controller (C1). |
| C2Hold | Turns on/off the hold function of the ribbon controller (C2). |
MIDI (MIDI screen)
| CH (MIDI CH) | 1–16 Specifies the MIDI channel (basic channel) on which the D-05 can be used with an external device, in the range 1–16. |
| Control | Specifies how channel messages are received when controlling the D-05 from an external MIDI device. B.CH (basic channel) When controlling the D-05 in mono mode, voice messages (except for note events and pitch bend) are received on the basic channel. G.CH (global channel) When controlling the D-05 in mono mode, if the external device has a global channel (one channel lower than the basic channel), voice messages (except for note events and pitch bend) can be received together on the global channel. MdeOFF (mode message off ) Mode messages from the external device are not received; the key mode specified for each patch determines the assignment. |
| SepCH (Separate Mode Receive CH) | 1–16 If you select separate (solo) mode as the key mode, the upper and lower tones can be controlled on separate channels. The basic channel controls the lower tone and the receive channel you specify here controls the upper tone. |
| Local | If this is "OFF, " this unit's keyboard section is disconnected from its sound engine. Performance data from this unit is transmitted from MIDI OUT, but is not sounded by the unit. Performance data received at MIDI IN can control this unit's synthesizer section. |
| After (After Touch) | Turn this "ON" if you want aftertouch messages to be received. |
| Bender | Turn this "ON" if you want pitch bend messages to be transmitted and received. |
| Mod (Modulation) | Turn this "ON" if you want modulation messages to be transmitted and received. |
| Volume | Turn this "ON" if you want volume messages to be received. |
| Hold | Turn this "ON" if you want hold messages to be received. |
| Porta (Portamento) | Turn this "ON" if you want portamento messages to be transmitted and received. |
| Prog. C (Program Change) | Turn this "ON" if you want program change messages to be transmitted and received. |
| Excl (Exclusive) | If you want exclusive messages (only with Roland's ID number) to be transmitted, set this to either "ON" or "P-Dump. " Normally you will turn this "ON"; however, if you want to store data of the selected patch on a device that is able to store exclusive messages, choose the "P-Dump" (patch dump) setting. With the "P-Dump" setting, operating this unit's front panel to select a patch causes the data of the selected patch to be transmitted. |
| Sync | AUTO If MIDI clock is being input to the MIDI IN connector or the USB port, the D-05's tempo will automatically synchronize to MIDI clock (default). INTERNAL The D-05 operates at the tempo specified on the unit itself. Choose the "INTERNAL" setting if you don't want to synchronize to an external device. |
| Thru | Specifies the MIDI Thru on/off setting. |
Edit Menu
| (TnTune) Tone Detune | Accesses the tone detune screen. |
| (PtEdit) Patch Edit | Accesses the patch edit menu screen. |
| (L-Tone) Lower Tone | Accesses the lower tone menu screen. |
| (U-Tone) Upper Tone | Accesses the upper tone menu screen. |
Tone Detune
| LKey (Lower Key) | Shifts the pitch of the lower tone in semitone steps, in the range of -24–+24 (±2 octaves). |
| UKey (Upper Key) | Shifts the pitch of the upper tone in semitone steps, in the range of -24–+24 (±2 octaves). |
| LTun (Lower Tune) | Finely adjusts the pitch of the lower tone in the range of -50–+50 (approximately ±50 cents). |
| UTun (Upper Tune) | Finely adjusts the pitch of the upper tone in the range of -50–+50 (approximately ±50 cents). |
Patch Edit Menu
 For details, refer to the "Parameter Guide (English)" (PDF).
Upper/Lower Tone Menu
For details, refer to the "Parameter Guide (English)" (PDF).
Fixed Battery Operation Mode
This mode prevents the unit from switching to bus power even if it is connected to a USB port.
This allows the unit to be used even with a USB port that does not supply power.
- While holding down the PATCH NUMBER [1] button, turn on the power.
Main Specifications
Roland D-05: Synthesizer
| Maximum Polyphony | 16 voices |
| Power Supply | Rechargeable Ni-MH battery (AA, HR6) x 4, Alkaline battery (AA, LR6) x 4, USB bus power |
| Current Draw | 500 mA (USB bus power) |
| Dimensions | 300 (W) x 128 (D) x 46 (H) mm 11-13/16 (W) x 5-1/16 (D) x 1-13/16 (H) inches |
| Weight | 900 g (including batteries) 2 lbs |
| Accessories | Owner's Manual, Leaflet "USING THE UNIT SAFELY, " Alkaline battery (AA, LR6) x 4 |
| Options (sold separately) | Keyboard unit: K-25m Boutique Dock: DK-01 |
- This document explains the specifications of the product at the time that the document was issued. For the latest information, refer to the Roland website.
Intellectual Property Right
The copyright of content in this product (the sound waveform data, style data, accompaniment patterns, phrase data, audio loops and image data) is reserved by Roland Corporation.
Purchasers of this product are permitted to utilize said content (except song data such as Demo Songs) for the creating, performing, recording and distributing original musical works.
Purchasers of this product are NOT permitted to extract said content in original or modified form, for the purpose of distributing recorded medium of said content or making them available on a computer network.

Documents / ResourcesDownload manual
Here you can download full pdf version of manual, it may contain additional safety instructions, warranty information, FCC rules, etc.
Advertisement


Need help?
Do you have a question about the D-05 and is the answer not in the manual?
Questions and answers