Table of Contents
Advertisement
Quick Links
w w w . o p t i - s o l a r . c o m
OPTI-Solar SC Lighting Control Series
Installation and Operation Manual
SC-10LC/ SC-20LC/ SC-30LC
w w w . o p t i - s o l a r . c o m
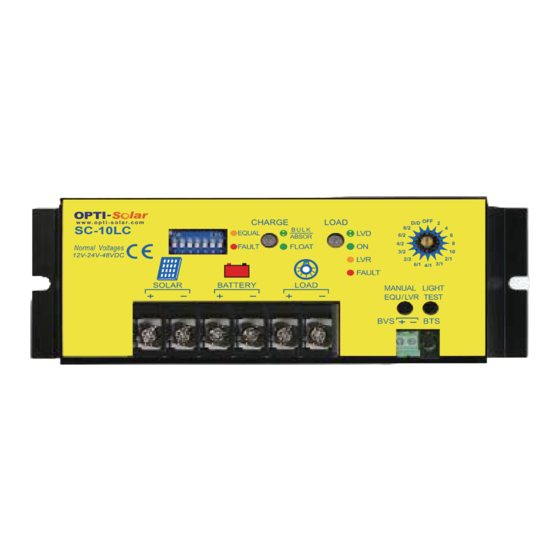
SC-10LC
12V-24V-48VDC
w w w . o p t i - s o l a r . c o m
SC-20LC
12V-24V-48VDC
w w w . o p t i - s o l a r . c o m
SC-30LC
12V-24V-48VDC
Remote
Panel
Advertisement
Table of Contents

Summary of Contents for opti-solar SC Series
- Page 1 . o p t i - s o l a r . c o m OPTI-Solar SC Lighting Control Series Installation and Operation Manual SC-10LC/ SC-20LC/ SC-30LC w w w . o p t i - s o l a r . c o m...
-
Page 2: Safety Instruction
1-1 Introduction The SC Lighting Control Series is an advanced design using a microcontroller for digital accuracy and fully automatic operation. Each model unit can be used for 12V, 24V and 48V system and can be operated at three major functions including solar charging, load control and lighting control. The PWM battery charging has been optimized for longer battery life and the state-of-the-art auto detector of day and night has been precisely applied to log the different length of night hours for lighting control no matter where and when (the North or the South, winter or summer) - Page 3 1-3 Specifications MODEL SC-10LC SC-20LC SC-30LC ELECTRICAL Current ratings-Battery Charge Control Current ratings-Load Control/ Lighting Control 12/24V: 0.1 % ± 50 mV Accuracy 48V: 0.1 % ± 100 mV . n i a t l i t a a t l Total current consumption While operating -25mA, at idle -3mA 90ºC disconnect solar...
- Page 4 1-4 SC-10LC, SC-20LC, SC-30LC Mounting Dimension Unit: mm OFF 2 CHARGE LOAD w w w . o p t i - s o l a r . c o m SC-30LC 12V-24V-48VDC BULK ABSOR FLOAT LIGHTING EQUAL CONTROL FAULT FAULT SOLAR BATTERY LOAD...
-
Page 5: Installation Overview
1-6 Installation Overview The installation is straight forward but it is important that each step is done correctly and safely. A mistake can lead to dangerous voltage and current levels. Be sure to carefully follow the following instructions for all the terminal connection. Charge Load Lighting... - Page 6 ON: Lighting control Dip Switch 7 OFF: Load Control Lights remain turned off. OFF: 2,4,6,8,10: Hours light is turned on after sunset. Light is turned on after sunset, turned off after the selected 2/1, 3/1, 4/1, Lighting control lasting hours, and turned on again before sunrise. 6/1, 2/2, 3/2, Switch 2/1: Light is turned on for two hours after sunset, turned off...
- Page 7 Push Buttons Press the Light Test Push Button to enter the testing mode to check if the Lighting Control Switch has been correctly set in order to control the lights based on desired timer. Procedure: 1. Select Dip Switch 7 to be ON 2.
-
Page 8: Installation Steps
1-7 Installation Steps: This section provides a brief overview of how to get started using the SC Lighting Control Series controller. However, please review the entire manual to ensure best performance and years of trouble-free service. NOTES: ● The SC Lighting Control Series prevents reverse current leakage at night, so a blocking diode is not required in the system. - Page 9 connected during the daytime and the array is wired correctly. ※ If the SOLAR is disconnected during installation, the controller will see this as the first night and the length of night will be too short. This will only affect ON/OFF/ON settings, and will automatically be corrected over 4 days.
-
Page 10: Operating Modes
2-1 Operating Modes There are three distinct operating modes programmed into each SC Lighting Control Series. Different from SC MPPT Series, only one mode of operation being selected for an individual unit, SC Lighting Control Series can be operated at Solar Battery Charging mode and DC Load Control or Lighting control mode at the same time. - Page 11 Four Stages of Solar Charging Solar Charging Stages 1. Bulk Charging: In this stage, the battery will accept all the current provided by the solar system. 2. PWM Absorption: When the battery reaches the regulation voltage, the PWM begins to hold the voltage constant. This is to avoid over-heating and over-gassing the battery. The current will taper off to safe levels as the battery becomes more fully charged.
- Page 12 Battery Types: The SC Lighting Control Series’s standard battery charging programs are suitable for a wide range of lead-acid battery types. These standard programs are select by DIP Switch 3~5. Standard Battery Charging Programs The SC Lighting Control Series provides 8 standard battery charging algorithms (programs) that are selected with the DIP switches.
- Page 13 F. Equalization Interval–Equalizations are typically done once a month. Most of the cycles are 28 days so the equalization will begin on the same day of the month. It can be set by Dip Switch 3~5 for different interval days. Each new cycle will be reset as the equalization starts so that a setting day period will be maintained.
- Page 14 10ºC / 50ºF + 0.45 V + 0.90 V + 1.80 V 5ºC / 41ºF + 0.60 V + 1.20 V + 2.40 V 0ºC / 32ºF + 0.75 V + 1.50 V + 3.00 V Temperature Compensation Equalization Routine equalization cycles are often vital to the performance and life of a battery — particularly in a solar system.
-
Page 15: Manual Equalization
Standard Equalization Programs Both automatic and manual equalizations can be performed using the standard charging programs. Manual Equalization The SC Lighting Control Series is shipped with the DIP switch set for manual equalization only. This is to void an unexpected or unwanted automatic equalization. In the manual mode, the pushbutton is used to both start or stop a manual equalization. - Page 16 The battery manufacturer can recommend the specific gravity or voltage values for your particular battery. Float When a battery becomes fully charged, dropping down to the float stage will provide a very low rate of maintenance charging while reducing the heating and gassing of a fully charged battery.
-
Page 17: Charge Led
2-3 Adjustability of Load Control When setting in the load control mode, DIP Switch 7 should be placed at OFF. The LVD (low voltage disconnect) and LVR (low voltage reconnect) are important setpoints to protect the system battery from deep discharges that could damage the battery. The Procedure of LVD/LVR Selection Step 1: Press MANUAL EQU/LVR push button and LIGHT TEST push button at the same time until the CHARGE LED turns red and LOAD LED turns green in... - Page 18 The specifications for the diode follow: • a power diode • rated equal or greater than 80 volts • rated equal or greater than 10 amps (SC-10LC) or 20 amps (SC-20LC) or 30 amps (SC-30LC) For large inductive loads, a heat sink for the diode may be necessary. General Load Control Notes In addition to the inductive loads discussed above, there are a few other load issues that require attention:...
- Page 19 2-4 Adjustability of Lighting Control When setting in the lighting control mode, DIP Switch 7 should be placed at ON. After completing the system connections, select the desired LIGHTING CONTROL switch option. The brief description of the options follows below: Lights remain turned off.
- Page 20 LIGHT TEST Button Press the LIGHT TEST button to enter the testing mode to check if the Lighting Control Switch has been correctly set in order to control the lights based on desired timer. The procedure is listed as below. STEPS: 1.
-
Page 21: Troubleshooting
2-5 Troubleshooting The SC Lighting Control Series is very rugged and designed for the most extreme operating conditions. Most PV system problems will be caused by connections, voltage drops, and loads. Troubleshooting the SC Lighting Control Series controller is simple. Some basic troubleshooting procedures are listed below. - Page 22 troubleshooting the problem. ● Check that the load is turned on. Check that no system fuses are defective. Check that no system circuit breakers are tripped. Remember that there are no fuses or circuit breakers inside the SC Lighting Control Series. ●...
Need help?
Do you have a question about the SC Series and is the answer not in the manual?
Questions and answers