Table of Contents
Advertisement
Quick Links
1 Color Glacier Bay Logo (Corrugate packaging and some FLBs)
Item # 000-000
Model # 24BV35083
USE AND CARE GUIDE
2-Color Glacier Bay Logo (FSMs)
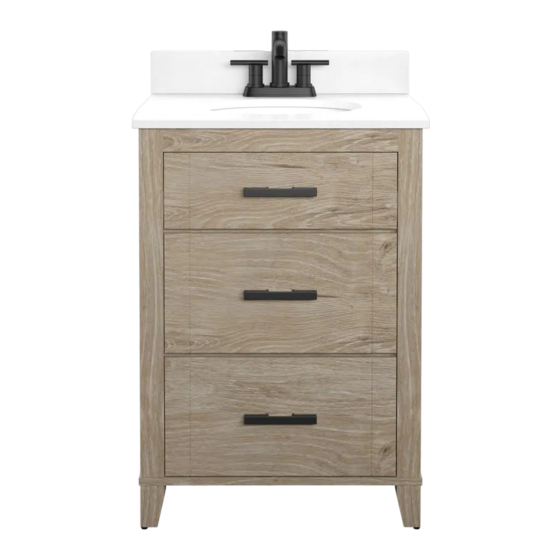
24 INCH FARMHOUSE BATH VANITY
Questions, problems, missing parts? Before returning to the store,
call Glacier Bay Customer Service
8 a.m. – 7 a.m., EST, Monday - Friday, 9 a.m. – 6 p.m., EST, Saturday
1-855-HD-GLACIER
HOMEDEPOT.COM/GLACIERBAY
THANK YOU
We appreciate the trust and confidence you have placed in Glacier Bay through the purchase of this vanity. We strive to continually create
quality products designed to enhance your home. Visit us online to see our full line of products available for your home improvement needs.
Thank you for choosing Glacier Bay!
Advertisement
Table of Contents

Subscribe to Our Youtube Channel
Related Manuals for Glacier bay 24BV35083


Summary of Contents for Glacier bay 24BV35083
- Page 1 THANK YOU We appreciate the trust and confidence you have placed in Glacier Bay through the purchase of this vanity. We strive to continually create quality products designed to enhance your home. Visit us online to see our full line of products available for your home improvement needs.
-
Page 2: Table Of Contents
Table of Contents Safety Information ............. 2 Assembly ..............6 Warranty ..............3 Operation..............10 Pre-Assembly ............. 4 Maintenance ...............11 Planning Assembly ............. 4 Care and Cleaning ............11 Tools Required ..............4 Service Parts ...............12 Hardware Included .............4 Package Concents ..............5 Safety Information Please read and understand this entire manual before attempting to assemble, operate or install the product. -
Page 3: Warranty
Warranty 1 Year Limited Warranty: The manufacturer warrants this product to be free from manufacturing and material defects for a period of one year from date of purchase, subject to the following conditions and limitations: Install and operate this Bathroom Vanity in accordance with the installation and operating instructions furnished with the product at all times. -
Page 4: Pre-Assembly
Pre-Assembly PLANNING ASSEMBLY Before beginning assembly of product, make sure all parts are present. Compare parts with Hardware Included and Package Contents lists. If any part is missing or damaged, do not attempt to assemble, install or operate the product. Contact customer service for replacement parts. -
Page 5: Package Concents
Pre-Assembly (continued) PACKAGE CONTENTS Part Description Quantity Foot Vanity Backsplash HOMEDEPOT.COM/GLACIERBAY Please contact 1-855-HD-GLACIER for further assistance. -
Page 6: Assembly
Assembly Attaching the Feet to the Vanity Attach the feet (A) to the vanity’s bottom using washers (AA) and bolts (BB). Adjusting the Levelers Turn the levelers on the bottom of the feet (A) until the vanity (B) is sitting even on the ground. NOTE: It is very important that your unit is level in order for your doors and drawers to function properly. - Page 7 Assembly (continued) Removing the Drawers For better access to the pre-installed lights, remove the drawers by simultaneously pushing down on the latch on the right-hand drawer slide, and pulling up on the latch on the left-hand drawer slide. Inserting the Batteries into the Pre-installed Lights Slide the plastic housing for the light off toward the front of the drawer, gently pushing up as you slide the...
- Page 8 Assembly (continued) Securing the Vanity to a Wall Re-inserting the Drawers With the help of another adult, place the vanity (B) Extend the slides from the drawer side rails on the against the wall in desired permanent location. Be sure vanity and slide the drawers back into place.
- Page 9 Assembly (continued) Installing the Optional Backsplash NOTE: The included backsplash is optional for installation. If you do not wish to install, skip this step. To install the included optional backsplash (C), apply silicone adhesive (not included) to the top edges of the vanity's countertop (B). Clean any excess adhesive before allowing to dry.
-
Page 10: Operation
Operation NOTE: Each light requires two AAA batteries. Replacing the Batteries Disposing of Used Batteries The battery may contain hazardous substances that When the light stops operating or its range seems reduced, it is time to replace the batteries with new could endanger the enviroment and human health. -
Page 11: Maintenance
Maintenance Shade variations and patterns are an inherent characteristic of stone (e.g. granite, cultured marble). Stone tops will vary from product to product. Use caution when placing items on the stone surface such as soap or any fragranced material. Use a soap dish, coaster or similar item to protect the surface if placing any soap or fragranced products on the stone. -
Page 12: Service Parts
Service Parts For replacement parts, call our Customer Service Team at 1-855-HD-GLACIER or visit www.HOMEDEPOT.COM/GLACIERBAY. NOTE: Parts not shown to actual size. Part Description Part Number Threaded Insert PH-THRZNC001 Leveler PH-LVRBLK001 Magnetic Catch PH-MCHBRW001 Metal Plate PH-PLTBLK001 Handle (with screw) VNA10477L Drawer Slide PH-DSLPCDS3516... - Page 16 4-Color Glacier Bay Logo (FLBs, Blister Cards, Labels) MOST COMMONLY USED 1 Color Glacier Bay Logo (Corrugate packaging and some FLBs) 2-Color Glacier Bay Logo (FSMs) Questions, problems, missing parts? Before returning to the store, call Glacier Bay Customer Service 8 a.m.
Need help?
Do you have a question about the 24BV35083 and is the answer not in the manual?
Questions and answers