Advertisement
Table of Contents
- 1 Table of Contents
- 2 Important! before Riding, You Should
- 3 Package Contents
- 4 Product Overview
- 5 Assembly and Set up
- 6 Start-Up Procedure
- 7 Battery Key Positions
- 8 Remove the Battery
- 9 Charging
- 10 Daily Care and Maintenance
- 11 Specifications
- 12 Limited Warranty Statement
- 13 Contact Us
- Download this manual
Advertisement
Table of Contents

Subscribe to Our Youtube Channel
Related Manuals for Hiboy EX6


Summary of Contents for Hiboy EX6
- Page 1 Electric Bike The manufacturer reserves the right to make changes to the product USER MANUAL and update this manual at any time.
-
Page 2: Table Of Contents
8. Daily Care And Maintenance • After riding on a rainy day, please clean up the rainwater and sediment immediately 9. Specifications If you have any trouble with the installation, please contact Hiboy customer service 10. Limited Warranty Statement for support: support hiboy.com 11. -
Page 3: Package Contents
Pedals (R and L) x 2 Hexagon wrench x 3 Rear Derailleur electric bike x 1 Crank Set Pedal User manual x 1 Please check package contents carefully, if anything is missing or damaged, please contact Hiboy customer service for support:support hiboy.com... -
Page 4: Assembly And Set Up
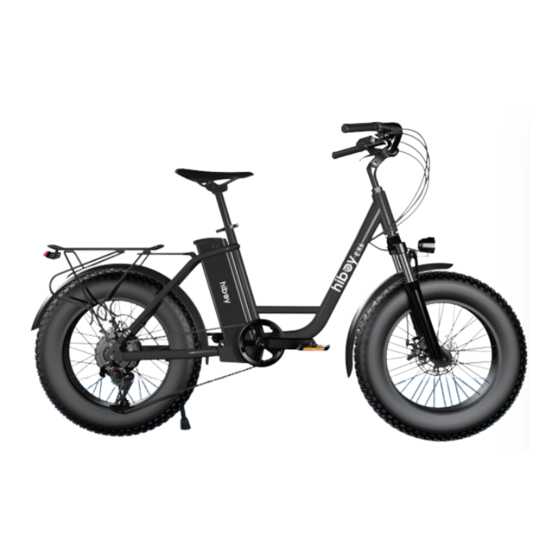
Assembly And Set up Charge Port Display Battery Lock Disc Brake Motor Disc Brake Sensor Kickstand Battery Installing The Handlebars 1.Shown in figure 1, according to the direction of the arrow, rotate the handle stem towards the front of the bike. 2. - Page 5 Installing The Front Wheel Installing The Pedals Spring Spring Skewer End nut Disc brake slot Spring Skewer Left - Riding direction End nut Spring Brake disc Right - Riding direction 1. Identify the Left and Right labels on the pedals. They can only be installed in their own side. INCORRECT INSTALLATION WILL CAUSE DAMAGE.
- Page 6 Installing The Headlight Adjusting The Handlebar Height Installing tool Headlight hole Hexagon wrench Headlight Hexagon wrench Operation steps 1. Loosen the [1] screw with a hexagonal wrench as shown in the figure. 1. Shown in Figure 1, insert the screw of the headlight into the headlight hole. 2.
- Page 7 Display Introduction Installing The Saddle Brake Motor failure Voltage protection Controller failure Battery indicator Cruise mark Speed display Assist level Multi-function display area VOL:voltage ODO:total mileage TRIP:single meleage TIME:working time 1. Install the saddle according to the picture. 2. Push the saddle down, pull up or push down to adjust the height. 3.
-
Page 8: Start-Up Procedure
. Start-up procedure How to Use The Display, Headlight & Horn After the bike has been properly assembled according to the assembly video, all components are secured correctly, a certified, reputable mechanic has checked the assembly, and you have read this entire manual, turn on the bike and select a pedal assist level following the steps below: 1. -
Page 9: Battery Key Positions
5. Battery key positions 6. Remove the battery Familiarize yourself with the keyport and key positions before riding the bike. Always remove the key before getting on your bike to ride it. handle 1. Any time the battery is in key position A, (power on, battery locked pull to the frame) the power button on the LED display will turn the bike on and off, and the battery cannot be removed. -
Page 10: Charging
7. How to Charge The Battery Notes of Charging 1. Charging time : 4 hours 80% full charge , full charge in 6-7 hours. 2. The small light on the charger in RED indicates it is in charging; GREEN indicates it is fully charged. 3. -
Page 11: Daily Care And Maintenance
9. Specifications 8. Daily Care And Maintenance Cleaning and storage Items Specifications If you see stains on the electric bike's body, wipe them off with a damp cloth. If the stains won't scrub off, put on some toothpaste, and brush them with a toothbrush, Package Size 56.7*12.2*29.5 inch(144*31*75 cm) Dimensions... -
Page 12: Limited Warranty Statement
If you are unsatisfied with your purchase, Hiboy's return policy allows you to return your undamaged Hiboy product purchased on the Authorization channel within 30 days counting If a hardware defect is found and a valid claim is received by Hiboy within the Warranty Period, Hiboy will, at its option and to the extent permitted by law, either (1) repair the from the date of receipt of shipment, and request a refund from the Authorization channel for any reason. - Page 13 6. I have written several emails to support@hiboy.com, but no responses received, why? A: Our Hiboy Support Team will reply to you within 1 working day, if you didn’t receive any reply from us, please also kindly check your spam box, and add support hi- boy.com...
-
Page 14: Contact Us
Trouble Shooting 12. CONTACT US Contact us if you experience issues relating to riding, maintenance and safety , or errors/faults with your Hiboy electric bike EX6. Error code Error description Solution E-mail Service: support hiboy.com Brake handle error Need to replace the brake handle...
Need help?
Do you have a question about the EX6 and is the answer not in the manual?
Questions and answers