Cherry MW 8 ADVANCED, JW-8000 - Wireless Mouse Manual
- Operation manual (28 pages)
Advertisement
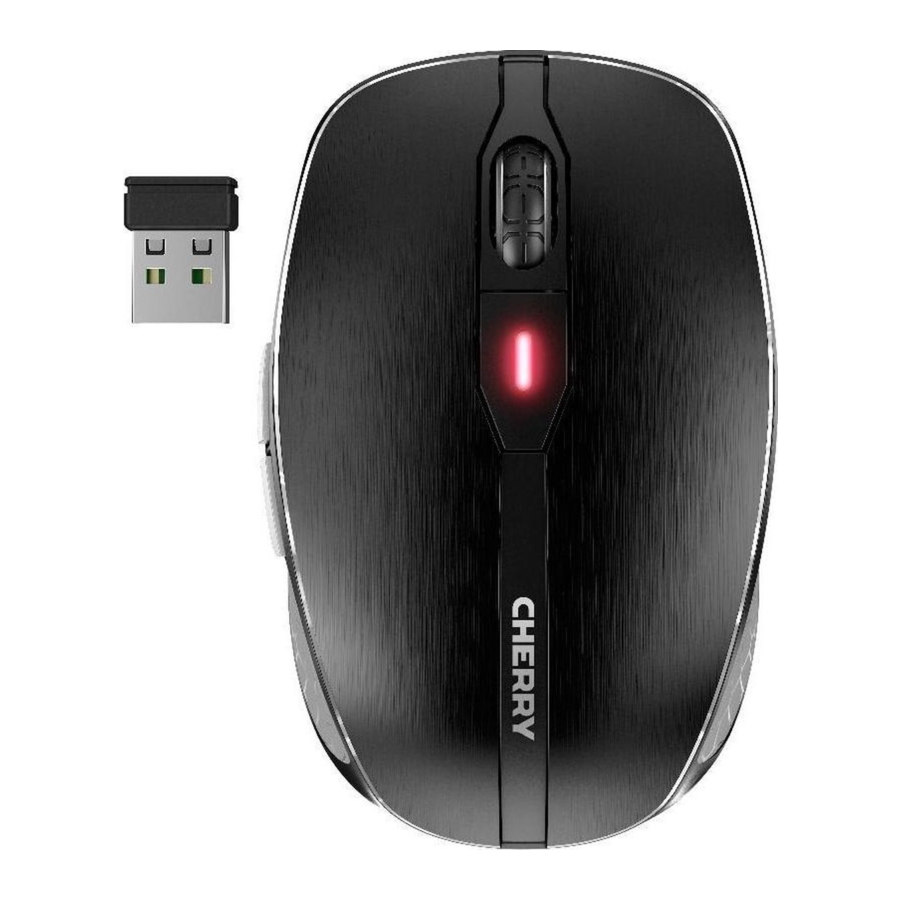
Overview

- Socket for charging cable
- DPI switch
- Status LED for battery charge status, resolution, Bluetooth or wireless connection
- Browser forward
- Browser back
- Off switch/wireless (RF)/Bluetooth (BT)
- Button for Bluetooth connection
- Receiver for wireless connection
Before you begin...
 Every device is different! The operating instructions contain information on effective and reliable use.
|
The CHERRY MW 8 ADVANCED is a wireless mouse for operating PCs and laptops.
For information on other products, downloads and much more, visit us at www.cherry.de.
For your safety
Risk of choking from swallowing small parts
- Keep the device out of the reach of children under 3 years.
RSI stands for "Repetitive Strain Injury".
RSI arises due to small movements continuously repeated over a long period of time.
- Set up your workspace ergonomically.
- Position the keyboard and mouse in such a manner that your upper arms and wrists are outstretched and to the sides of your body.
- Take several short breaks, with stretching exercises if necessary.
- Change your posture often.
Avoiding damage
The magnet in the mouse can wipe storage media and damage mechanical watches.
- Do not place any storage media such as magnetic cards or external hard drives, or mechanical watches within 10 cm of the mouse.
Connecting the mouse with a PC/ laptop
You can connect the mouse to the PC/laptop via Bluetooth or with the receiver using a 2.4 GHz wireless connection.
The Bluetooth connection is convenient if you wish to use the mouse with several devices: You only need to make the connection once and do not require the receiver.
Connecting the mouse via Bluetooth
| Parallel login to multiple PCs/laptops Bluetooth automatically detects if a PC or laptop that has already been connected to the device is switched on. In this case, Bluetooth does not allow a new connection with any other PC or laptop, thus preventing inadvertent entries.
|
- Start the search for Bluetooth devices on your PC/ laptop (for example by calling up Start > Settings > Devices > Bluetooth).
- Follow the instructions in the software.
- Set the switch on the bottom of the mouse to "BT".
- Activate the Bluetooth connection of the mouse by pressing the button on the bottom of the mouse. The blue LED on the mouse flashes quickly.
If the blue LED does not flash:- There is already a connection between the mouse and another PC/laptop. Switch off this PC/laptop or deactivate the connection on this PC/laptop.
- Follow the instructions in the software.
The LED stops glowing and the mouse is connected with your PC/laptop.
If the red LED of the mouse flashes quickly, the connection has failed.- Try to establish the connection again.
Connecting the mouse via the receiver
The receiver is in a compartment on the bottom of the mouse and is held in place by magnets.
- Pull the receiver out of the housing.
- Connect the receiver to the USB socket on the PC/ laptop.
- Set the switch on the bottom of the mouse to "RF".
The mouse is connected with your PC/laptop.
Storing the receiver in the mouse
The receiver is so small that it can stay in the USB socket of a laptop while being transported. To avoid any damage, you can also pull out the receiver and deposit it in the mouse to protect it from dirt and loss.
Setting the DPI rate of the mouse
The speed of the mouse pointer increases with the level of the DPI rate.
- Press the DPI button on the top of the mouse.
The LED flashes according to the setting:
1x = 600 dpi, 2x = 1000 dpi, 3x = 1600 dpi, 4x = 3200 dpi
The setting is saved in the mouse and is retained even when the mouse is switched off.
Charging the mouse
When the red LED flashes slowly, you should charge the mouse soon. The faster the red LED flashes, the lower the charging status of the battery.
- Connect the charging cable to the mouse and a USB socket on the PC/laptop.
The LED glows as long as the mouse is being charged. When the mouse is fully charged, the LED stops glowing.
The battery will be charged as long as the PC/laptop is switched on. You can continue working while the mouse is charging.
Switching the mouse on/off
The CHERRY MW 8 ADVANCED switches to a sleep mode, which requires nearly no energy, when it is not in use. It switches on again automatically the first time a button is pressed.
However, it still consumes power in the energy-saving mode, therefore you should switch it off manually for longer periods of disuse or for transporting.
- Push the switch on the bottom of the mouse to the corresponding position:
Off
Wireless on = RF
Bluetooth on = BT
Cleaning the mouse
- Switch the mouse off.
NOTICE: Damage due to aggressive cleaning agents or liquid in the mouse- Do not use solvents such as benzene, alcohol, scouring agents or abrasive scourers for cleaning the mouse.
- Prevent any liquid from getting inside the mouse.
- Clean the mouse with a slightly damp cloth and some mild detergent (such as washing-up liquid).
- Dry the mouse with a soft, lint-free cloth.
Troubleshooting
- Switch the mouse on and off again.
- Charge the mouse via the charging cable (see "Charging the mouse").
- Remove any objects causing interference between the mouse and the PC/laptop. Interference is caused in particular by metallic or electrical objects such as cables, loudspeakers or USB hubs.
- Reduce the distance between the mouse and the PC/laptop.
- Should any interference be encountered when using USB 3.0 devices right near the receiver: Use a port that is further away, an additional cable, or a USB hub for the receiver or USB 3.0 device.
Rectifying a Bluetooth connection fault
- If your PC/laptop is in standby mode, it cannot be woken up using Bluetooth devices. Switch on the PC/laptop manually.
- If the devices are already connected to another PC/laptop, you cannot establish a parallel connection. Turn off the first PC/laptop or deactivate the connections.
| Operation of several Bluetooth devices on a PC/notebook When too many Bluetooth devices are connected, it may be too much for the Bluetooth receivers in the PC/notebook. |
- Turn off any unnecessary Bluetooth devices.
- Remove the connection to the mouse in the Bluetooth software and add it again as a new device.
- Use an external Bluetooth receiver.
- Connect the mouse using the receiver.
Rectifying a connection fault using the receiver
- Connect the receiver to a USB 2.0 port on your PC/laptop (this usually has a white or black guide). Malfunctions occasionally occur on USB 3.0 ports (blue guide).
- Connect the receiver to another USB 2.0 port on the PC/laptop.
- Reduce the distance between the receiver and the mouse by connecting the receiver to a USB port that is close to the mouse.
- Use a USB extension cable to place the receiver as close to the mouse as possible.
Disposal

This device contains a lithium ion battery. This cannot be replaced.
Electrical devices and batteries contain substances that can be harmful to health and the environment.
- Dispose of the devices and the batteries in accordance with the legal regulations.
Technical data


Documents / Resources
References
Download manual
Here you can download full pdf version of manual, it may contain additional safety instructions, warranty information, FCC rules, etc.
Download Cherry MW 8 ADVANCED, JW-8000 - Wireless Mouse Manual
Advertisement


Need help?
Do you have a question about the MW 8 ADVANCED JW-8000 and is the answer not in the manual?
Questions and answers