Electrolux GK29TCO User Manual
Hide thumbs
Also See for GK29TCO:
- User manual (56 pages) ,
- User manual (68 pages) ,
- User manual (80 pages)

Related Manuals for Electrolux GK29TCO


Summary of Contents for Electrolux GK29TCO
- Page 1 GK29TCO Kochfeld Benutzerinformation Table de cuisson Notice d'utilisation Piano cottura Istruzioni per l’uso User Manual...
-
Page 2: Table Of Contents
11. GARANTIE..................... 19 12. UMWELTTIPPS....................19 WIR DENKEN AN SIE Vielen Dank für Ihren Kauf eines Electrolux-Geräts. Sie haben ein Produkt gewählt, das jahrzehntelange professionelle Erfahrung und Innovation mit sich bringt. Das ausgeklügelte und stilvolle Produkt wurde für Sie entwickelt. So können Sie jedes Mal, wenn Sie das Produkt verwenden, sicher sein, dass Sie... - Page 3 DEUTSCH Verletzungen oder Schäden infolge nicht ordnungsgemäßer Montage oder Verwendung übernimmt der Hersteller keine Haftung. Bewahren Sie die Anleitung zum Nachschlagen an einem sicheren und zugänglichen Ort auf. 1.1 Sicherheit von Kindern und schutzbedürftigen Personen Das Gerät kann von Kindern ab 8 Jahren und •...
- Page 4 Dieses Gerät darf in Büros, Hotelzimmern, • Gästezimmern in Pensionen, Bauernhöfen und anderen ähnlichen Unterkünften verwendet werden, wenn diese Nutzung das (durchschnittliche) Nutzungsniveau im Haushalt nicht überschreitet. WARNUNG: Das Gerät und die zugänglichen • Geräteteile werden während des Betriebs heiß. Seien Sie vorsichtig und berühren Sie niemals die...
-
Page 5: Sicherheitsanweisungen
DEUTSCH nehmen Sie die Sicherung für den Anschluss heraus, um die Stromversorgung zu unterbrechen. Verständigen Sie in jedem Fall den autorisierten Kundendienst. Wenn das Netzkabel beschädigt ist, muss es vom • Hersteller, einem autorisierten Kundendienst oder einer ähnlich qualifizierten Person zur Vermeidung einer Gefahrenquelle ersetzt werden. - Page 6 • muss das Gerät geerdet werden. Sicherungen (Schraubsicherungen • Vor der Durchführung jeglicher müssen aus dem Halter entfernt Arbeiten muss das Gerät von der werden können), elektrischen Stromversorgung Fehlerstromschutzschalter und getrennt werden. Schütze. • Stellen Sie sicher, dass die Daten auf •...
-
Page 7: Montage
DEUTSCH • Die Dämpfe, die sehr heißes Öl • Reinigen Sie das Gerät nicht mit freisetzt, können zu einer spontanen Wasserspray oder Dampf. Verbrennung führen. • Reinigen Sie das Geräts mit einem • Gebrauchtes Öl, das Speisereste weichen, feuchten Tuch. Verwenden enthalten kann, kann schon bei einer Sie ausschließlich Neutralreiniger. - Page 8 3.1 Vor der Montage Aufliegende Montage Notieren Sie vor der Montage des 1. Reinigen Sie die Arbeitsplatte um Kochfelds folgende Daten, die Sie auf den Ausschnitt herum. dem Typenschild finden. Das 2. Bringen Sie das mitgelieferte 2x6 mm Typenschild ist auf dem Boden des Dichtungsband umlaufend auf der Kochfelds angebracht.
- Page 9 DEUTSCH min. 28 mm min. min. 500mm 50mm AUFLIEGENDE MONTAGE INTEGRIERTE MONTAGE 60 30 60 30 min. 55 min. 55 min. 1500 min. min. min. min. min. 12 mm min. 20 mm min. 28 mm...
-
Page 10: Gerätebeschreibung
3.6 Montage mehrerer 3.7 Anschlusskabel Kochfelder • Das Kochfeld wird mit einem Anschlusskabel. • Ersetzen Sie ein defektes Netzkabel durch den Kabeltyp: H05V2V2-F die einer Temperatur von 90 °C oder 490 mm mehr standhält. Wenden Sie sich an min. 500 mm einen autorisierten Kundendienst. -
Page 11: Täglicher Gebrauch
DEUTSCH Sensor‐ Funktion Kommentar feld Verriegelung / Kinder‐ Verriegeln / Entriegeln des Bedienfelds. sicherung Pause Ein- und Ausschalten der Funktion. Ein- und Ausschalten des äußeren Krei‐ ses. Kochstufenanzeige Zeigt die Kochstufe an. Kochzonen-Anzeigen Zeigt an, für welche Kochzone die Zeit des Timers eingestellt wurde. - Page 12 Lebensmitteln oder einem Die Anzeige kann ebenso erscheinen: Gegenstand bedeckt (Topf, Tuch • für die benachbarten Kochzonen, usw.). Ein akustisches Signal ertönt auch wenn Sie sie nicht benutzen, und das Kochfeld schaltet ab. • wenn heißes Kochgeschirr auf die...
- Page 13 DEUTSCH 5.8 Verriegelung Ausschalten der Funktion: Berühren , um die Kochzone auszuwählen Sie können das Bedienfeld sperren, und berühren Sie dann . Die wenn Kochzonen eingeschaltet sind. So verbleibende Zeit zählt rückwärts bis 00. wird verhindert, dass die Kochstufe Die Kontrolllampe der Kochzone erlischt. versehentlich geändert wird.
-
Page 14: Tipps Und Hinweise
5.10 OffSound Control (Ein- Ihre Einstellungen werden übernommen, sobald das Kochfeld automatisch und Ausschalten des ausgeschaltet wird. Signaltons) Haben Sie die Funktion auf Schalten Sie das Kochfeld aus. Berühren eingestellt, ertönt der Signalton nur in 3 Sekunden lang. Das Display folgenden Fällen:... -
Page 15: Reinigung Und Pflege
DEUTSCH Kochstufe Verwendung für: Dauer Tipps (Min.) 3 - 4 Dünsten von Gemüse, Fisch, 20 - 45 Geben Sie ein paar Esslöffel Fleisch. Wasser hinzu. Überprüfen Sie die Wassermenge wäh‐ rend des Prozesses. 4 - 5 Kartoffeln und anderes Ge‐ 20 - 60 Den Boden des Topfes mit müse dämpfen. -
Page 16: Fehlersuche
Glasoberfläche ein mit einer Lösung aus Essig und Wasser angefeuchtetes Tuch. 8. FEHLERSUCHE WARNUNG! Siehe Kapitel Sicherheitshinweise. 8.1 Was zu tun ist, wenn ... Störung Mögliche Ursache Problembehebung Das Kochfeld kann nicht Das Kochfeld ist nicht oder Prüfen Sie, ob das Kochfeld eingeschaltet oder be‐... - Page 17 DEUTSCH Störung Mögliche Ursache Problembehebung Das Kochfeld wird aus‐ Sie haben etwas auf das Entfernen Sie den Gegen‐ geschaltet. stand von dem Sensorfeld. Sensorfeld gestellt. Die Restwärmeanzeige Die Kochzone ist nicht Wenn die Kochzone lange funktioniert nicht. heiß, da sie nur kurze Zeit genug betrieben wurde, um in Betrieb war oder der heiß...
-
Page 18: Technische Daten
Garantiebroschüre. Glaskeramik (befindet sich in der Ecke der Glasoberfläche) und eine 9. TECHNISCHE DATEN 9.1 Typenschild Modell GK29TCO Produkt-Nummer (PNC) 949 492 575 00 Typ 60 HED D1 KO 220 - 240 V, 50 / 60 Hz Hergestellt in: Rumänien Ser.-Nr. -
Page 19: Garantie
DEUTSCH IEC / EN 60350-2 - Elektrische • Stellen Sie das Kochgeschirr schon Kochgeräte für den Hausgebrauch - Teil vor dem Einschalten auf die 2: Kochfelder - Verfahren zur Messung Kochzone. der Leistung. • Der Boden des Kochgeschirrs sollte den gleichen Durchmesser wie die 10.2 Energie sparen Kochzone haben. - Page 20 Sammelstelle oder wenden Sie sich an nicht mit dem Hausmüll. Bringen Sie Ihr Gemeindeamt. das Gerät zu Ihrer örtlichen Für die Schweiz: Wohin mit den Altgeräten? Überall dort wo neue Geräte verkauft werden oder Abgabe bei den offiziellen SENS-Sammelstellen oder offiziellen SENS-Recyclern.
-
Page 21: Informations De Sécurité
12. EN MATIÈRE DE PROTECTION DE L'ENVIRONNEMENT......39 NOUS PENSONS À VOUS Merci d’avoir choisi un appareil Electrolux. Vous avez choisi un produit qui bénéficie de décennies d'expérience professionnelle et d'innovation. Ingénieux et élégant, il a été pensé pour vous. C'est la raison pour laquelle vous pouvez avoir la certitude d'obtenir d'excellents résultats à... - Page 22 être tenu pour responsable des blessures et dégâts résultant d'une mauvaise installation ou utilisation. Conservez toujours les instructions dans un lieu sûr et accessible pour vous y référer ultérieurement. 1.1 Sécurité des enfants et des personnes vulnérables Cet appareil peut être utilisé par des enfants âgés •...
- Page 23 FRANÇAIS Cet appareil peut être utilisé dans les bureaux, les • chambres d’hôtel, les chambres d’hôtes, les maisons d’hôtes de ferme et d’autres hébergements similaires lorsque cette utilisation ne dépasse pas le niveau (moyen) de l’utilisation domestique. AVERTISSEMENT : L'appareil et ses parties •...
-
Page 24: Consignes De Sécurité
Dans tous les cas, veuillez contacter le service après-vente agréé. Si le câble d’alimentation est endommagé, il doit être • remplacé par le fabricant, un service après-vente agréé ou un professionnel qualifié afin d’éviter tout danger. AVERTISSEMENT : Utilisez uniquement les •... - Page 25 FRANÇAIS correspondent aux données d'ouverture de contact de 3 mm électriques nominale de l’alimentation minimum. secteur. 2.3 Utilisation • Vérifiez que l’appareil est correctement installé. Des câbles ou AVERTISSEMENT! des fiches secteur desserrés et Risque de blessures, de incorrects (le cas échéant) peuvent brûlures ou d'électrocution.
-
Page 26: Installation
à l’intérieur, produits de lavage neutres. N'utilisez à proximité ou au-dessus de pas de produits abrasifs, de tampons l’appareil. à récurer, de solvants ni d'objets métalliques. AVERTISSEMENT! Risque d'endommagement 2.5 Service de l'appareil. • Pour réparer l'appareil, contactez le •... - Page 27 FRANÇAIS Si l'appareil est installé dans un meuble 3. Lorsque vous découpez le joint, dont le matériau est inflammable, ajoutez quelques millimètres de respectez impérativement les directives longueur. en matière de protection contre les 4. Rassemblez les deux extrémités du incendies de la norme NIN SEV 1000 joint.
- Page 28 INSTALLATION SUPERPOSÉE INSTALLATION INTÉGRÉE 60 30 60 30 min. 55 min. 55 min. 1500 min. min. min. min. min. 12 mm min. 20 mm min. 28 mm 3.6 Installation de plusieurs tables de cuisson min. 28 mm 490 mm min.
-
Page 29: Description De L'appareil
FRANÇAIS type de câble suivant : H05V2V2-F raccordement ne peut être remplacé qui supporte une température de que par un électricien qualifié. 90 °C ou plus. Contactez un service après-vente agréé. Le câble de 4. DESCRIPTION DE L'APPAREIL 4.1 Agencement des zones de cuisson Zone de cuisson Bandeau de commande 120/180... -
Page 30: Utilisation Quotidienne
Touche Fonction Commentaire sensitive Indicateur du niveau Pour indiquer le niveau de cuisson. de cuisson Voyants du minuteur Pour indiquer la zone à laquelle se réfère des zones de cuisson la durée sélectionnée. Affichage du minuteur Pour indiquer la durée, en minutes. - Page 31 FRANÇAIS 5.5 Activation et désactivation La relation entre le niveau de cuisson et la durée après laquelle la table de des anneaux extérieurs cuisson s'éteint : Vous pouvez ajuster manuellement la surface de cuisson aux dimensions du Niveau de cuis‐ La table de cuis‐...
- Page 32 5.8 Touches Verrouil Lorsque le compte à rebours est terminé, un signal sonore Vous pouvez verrouiller le bandeau de retentit et 00 clignote. La commande pendant que les zones de zone de cuisson se cuisson fonctionnent. Vous éviterez ainsi désactive.
-
Page 33: Conseils
FRANÇAIS 5.10 OffSound Control • - les signaux sonores sont activés (Désactivation et activation des Pour confirmer le réglage, attendez que la table de cuisson s'éteigne signaux sonores) automatiquement. Éteignez la table de cuisson. Appuyez Lorsque cette fonction est réglée sur pendant 3 secondes. -
Page 34: Entretien Et Nettoyage
Réglages de Utilisez pour : Durée Conseils la tempéra‐ (min) ture 3 - 4 Cuisez les légumes, le pois‐ 20 - 45 Ajouter quelques cuillères à son et la viande à la vapeur. soupe d’eau. Vérifiez la quantité d’eau pendant le processus. -
Page 35: Dépannage
FRANÇAIS solution d'eau additionnée de vinaigre et nettoyez la surface vitrée avec un chiffon. 8. DÉPANNAGE AVERTISSEMENT! Reportez-vous aux chapitres concernant la sécurité. 8.1 Que faire si... Problème Cause possible Solution Vous ne pouvez pas ac‐ La table de cuisson n’est Vérifiez que la table de cuis‐... - Page 36 Problème Cause possible Solution La table de cuisson se Vous avez posé quelque Retirez l’objet de la touche met à l’arrêt. chose sur la touche sensiti‐ sensitive. Le voyant de chaleur ré‐ La zone de cuisson n’est Si la zone a eu assez de siduelle ne s’allume pas.
-
Page 37: Caractéristiques Techniques
3 lettres pour la vitrocéramique (situé dans le coin de la surface en verre) et le 9. CARACTÉRISTIQUES TECHNIQUES 9.1 Plaque signalétique Modèle GK29TCO PNC 949 492 575 00 Type 60 HED D1 KO 220 - 240 V, 50 / 60 Hz Fabriqué... -
Page 38: Garantie
Consommation d’énergie de la table de cuisson (EC electric 189.8 Wh/kg hob) IEC / EN 60350-2 - Appareils de cuisson • Posez les récipients sur la zone de domestiques électriques - Partie 2 : cuisson avant de l’activer. Tables de cuisson - Méthodes de •... -
Page 39: Matière De Protection De L'environnement
FRANÇAIS 12. EN MATIÈRE DE PROTECTION DE L'ENVIRONNEMENT Recyclez les matériaux portant le électroniques. Ne jetez pas les appareils portant le symbole avec les ordures symbole . Déposez les emballages ménagères. Emmenez un tel produit dans les conteneurs prévus à cet effet. dans votre centre local de recyclage ou Contribuez à... -
Page 40: Informazioni Di Sicurezza
12. CONSIDERAZIONI SULL'AMBIENTE............57 PENSIAMO A TE Grazie per aver acquistato un elettrodomestico Electrolux. Hai scelto un prodotto che ha alle spalle decenni di esperienza professionale e innovazione. Ingegnoso ed elegante, è stato progettato pensando a te. Quindi, in qualsiasi momento lo utilizzi, avrai la certezza di ottenere sempre i migliori risultati. - Page 41 ITALIANO sono responsabili di eventuali lesioni o danni derivanti da un'installazione o un uso scorretti. Conservare sempre le istruzioni in un luogo sicuro e accessibile per poterle consultare in futuro. 1.1 Sicurezza dei bambini e delle persone vulnerabili Quest’apparecchiatura può essere usata da bambini a •...
- Page 42 (medi). AVVERTENZA: L’elettrodomestico e le parti • accessibili si riscaldano molto durante l'uso. Fare attenzione a non toccare gli elementi riscaldanti. AVVERTENZA: Non lasciare mai il piano cottura •...
-
Page 43: Istruzioni Di Sicurezza
ITALIANO AVVERTENZA: Utilizzare esclusivamente protezioni • per il piano cottura progettate dal produttore dell'apparecchiatura o indicate dallo stesso nelle istruzioni d'uso, come ad esempio accessori idonei o le protezioni per il piano cottura incorporate nell'apparecchiatura. Utilizzare protezioni inadeguate aumenta il rischio di incidenti. 2. - Page 44 • Assicurarsi che sia installata una • Assicurarsi che le aperture di protezione contro gli urti. ventilazione non siano bloccate. • Utilizzare il serracavo sul cavo. • Non lasciare l'elettrodomestico • Assicurarsi che il cavo incustodito durante il funzionamento.
-
Page 45: Installazione
ITALIANO La superficie si potrebbe Autorizzato. Utilizzare solo ricambi danneggiare. originali. • Non attivare le zone di cottura con • Per quanto riguarda la lampada o le pentole vuote o senza pentole. lampade all'interno di questo prodotto • Non mettere fogli di alluminio e le lampade di ricambio vendute sull'apparecchiatura. - Page 46 (come previsto vetroceramica e il piano di lavoro con del dalla norma NIN SEV 1000). silicone. Assicurarsi che il silicone non penetri sotto il vetroceramica. 3.4 Fissaggio della guarnizione 3.5 Montaggio Se s’installa il piano cottura sotto una cappa, consultare le istruzioni d’installazione della cappa per la...
- Page 47 ITALIANO min. 12 mm min. min. 28 mm 20 mm 3.6 Installazione di più di un piano cottura min. 28 mm 490 mm min. 500 mm 270 mm 3.7 Cavo di collegamento • Il piano cottura è fornito con un cavo INSTALLAZIONE INTEGRATA di collegamento.
-
Page 48: Descrizione Del Prodotto
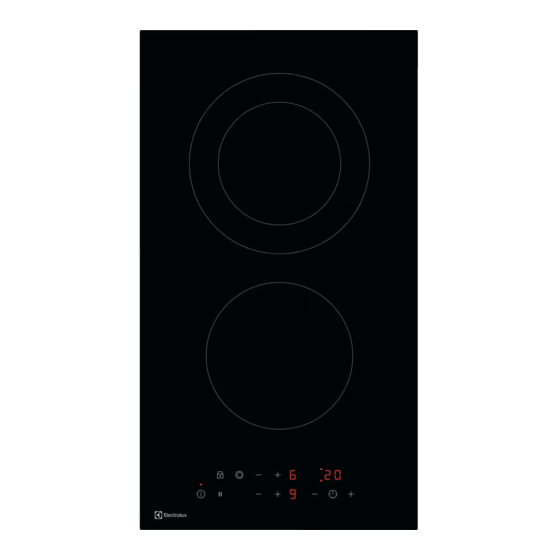
4. DESCRIZIONE DEL PRODOTTO 4.1 Disposizione del piano di cottura Zona di cottura Pannello dei comandi 120/180 120/180 145 mm 4.2 Layout del pannello di controllo Utilizzare i tasti sensore per mettere in funzione l'apparecchiatura. I display, gli indicatori ed i segnali acustici mostrano quali funzioni sono attive. -
Page 49: Utilizzo Quotidiano
ITALIANO Tasto Funzione Commento sensore Per selezionare la zona di cottura. Per aumentare o ridurre il tempo. Per impostare un livello di potenza. 4.3 Display del livello di potenza Display Descrizione La zona di cottura è disattivata. La zona di cottura è in funzione. Sospendi è... - Page 50 5.3 Livello di potenza 5.6 Timer • Timer Sfiorare per aumentare il livello di È possibile utilizzare questa funzione per potenza. Sfiorare per ridurre il livello impostare la durata di una sessione di di potenza. Sfiorare cottura singola. contemporaneamente Per prima cosa, impostare il livello di spegnere la zona di cottura.
- Page 51 ITALIANO 5.9 Dispositivo di sicurezza per Per arrestare il segnale acustico: bambini touch Questa funzione impedisce Per disattivare la funzione: sfiorare l'azionamento accidentale del piano di quindi sfiorare . Viene avviato il contro cottura. alla rovescia del tempo residuo fino a 00. Per attivare la funzione: attivare il piano La funzione non ha alcun di cottura con...
-
Page 52: Consigli E Suggerimenti Utili
• Timer diminuisce • si appoggia un oggetto sul pannello dei comandi. 6. CONSIGLI E SUGGERIMENTI UTILI AVVERTENZA! Le stoviglie in acciaio Fare riferimento ai capitoli smaltato e con i basamenti sulla sicurezza. in alluminio o rame possono subire perdite di colore sulla 6.1 Stoviglie... -
Page 53: Manutenzione E Pulizia
ITALIANO Impostazio‐ Utilizzare per: Tempo Suggerimenti ne di calore (min) 6 - 7 Frittura delicata: scaloppine, se ne‐ Capovolgere quando neces‐ cordon bleu di vitello, costo‐ cessa‐ sario. lette, polpette, salsicce, fega‐ to, roux, uova, frittelle, ciam‐ belle. 7 - 8 Frittura, sformato di patate, 5 - 15 Capovolgere quando neces‐... - Page 54 8.1 Cosa fare se… Problema Causa possibile Soluzione Non è possibile attivare il Il piano cottura non è colle‐ Accertarsi che il piano cottu‐ piano cottura o metterlo gato a una fonte di alimen‐ ra sia collegato correttamen‐ in funzione.
-
Page 55: Dati Tecnici
Autorizzati sono contenute nel libretto di codice a tre lettere per il piano in garanzia. vetroceramica (si trova nell'angolo della superficie in vetro) e il messaggio di 9. DATI TECNICI 9.1 Targhetta identificativa Modello GK29TCO PNC 949 492 575 00... -
Page 56: Efficienza Energetica
Per risultati di cottura ottimali, utilizzare pentole con un diametro non superiore alla zona di cottura. 10. EFFICIENZA ENERGETICA 10.1 Informazioni sul prodotto Identificazione modello GK29TCO Tipo di piano cottura Piano cottura a in‐ casso Numero di zone di cottura Tecnologia di riscaldamento Riscaldatore radian‐... -
Page 57: Garanzia
ITALIANO • Utilizzare il calore residuo per mantenere gli alimenti caldi o per fonderli. GARANZIA Servizio clienti Servizio dopo vendita Industriestrasse 10 Le Trési 6 Via Violino 11 5506 Mägenwil 1028 Préverenges 6928 Manno Morgenstrasse 131 3018 Bern Langgasse 10 9008 St. -
Page 58: Safety Information
12. ENVIRONMENTAL CONCERNS..............74 WE’RE THINKING OF YOU Thank you for purchasing an Electrolux appliance. You’ve chosen a product that brings with it decades of professional experience and innovation. Ingenious and stylish, it has been designed with you in mind. So whenever you use it, you can be safe in the knowledge that you’ll get great results every time. - Page 59 ENGLISH of incorrect installation or usage. Always keep the instructions in a safe and accessible location for future reference. 1.1 Children and vulnerable people safety This appliance can be used by children aged from 8 • years and above and persons with reduced physical, sensory or mental capabilities or lack of experience and knowledge if they have been given supervision or instruction concerning the use of the appliance in a...
- Page 60 WARNING: The appliance and its accessible parts • become hot during use. Care should be taken to avoid touching heating elements. WARNING: Unattended cooking on a hob with fat or • oil can be dangerous and may result in fire.
-
Page 61: Safety Instructions
ENGLISH 2. SAFETY INSTRUCTIONS 2.1 Installation • Before carrying out any operation make sure that the appliance is WARNING! disconnected from the power supply. Only a qualified person must • Make sure that the parameters on the install this appliance. rating plate are compatible with the electrical ratings of the mains power WARNING! - Page 62 • Do not keep hot cookware on the width of minimum 3 mm. control panel. • Do not put a hot pan cover on the 2.3 Use glass surface of the hob. • Do not let cookware boil dry.
-
Page 63: Installation
ENGLISH 2.6 Disposal • Disconnect the appliance from the mains supply. WARNING! • Cut off the mains electrical cable Risk of injury or suffocation. close to the appliance and dispose of • Contact your local authority for information on how to dispose of the appliance. - Page 64 4. Attach the stripes to the rabbets. Do not stretch the stripes. Do not bond the ends of the stripes one over the min. other. 12 mm After you assemble the hob, seal the remaining gap between the glass min.
-
Page 65: Product Description
ENGLISH 3.7 Connection cable • The hob is supplied with a connection cable. • To replace the damaged mains cable, use the cable type: H05V2V2-F which min. withstands a temperature of 90 °C or 28 mm higher. Contact an Authorised Service Centre. - Page 66 4.2 Control panel layout Use the sensor fields to operate the appliance. The displays, indicators and sounds tell which functions operate. Sensor Function Comment field On / Off To activate and deactivate the hob. Lock / Child Safety To lock / unlock the control panel.
-
Page 67: Daily Use
ENGLISH Display Description Lock / Child Safety Device operates. Automatic Switch Off operates. 5. DAILY USE Touch at the same time to WARNING! deactivate the cooking zone. Refer to Safety chapters. 5.4 OptiHeat Control (3 step 5.1 Activating and deactivating Residual heat indicator) Touch for 1 second to activate or... - Page 68 To deactivate the outer ring: touch the The function has no effect symbol until the indicator disappears. on the operation of the cooking zones. 5.6 Timer 5.7 Pause • Count Down Timer You can use this function to set the This function sets all cooking zones that length of a single cooking session.
-
Page 69: Hints And Tips
ENGLISH To override the function for only one comes on. Touch of the front left cooking time: activate the hob with zone to choose one of the following: comes on. Touch for 4 seconds. • - the sounds are off Set the heat setting in 10 seconds. -
Page 70: Care And Cleaning
Heat setting Use to: Time Hints (min) 4 - 5 Steam potatoes and other 20 - 60 Cover the bottom of the pot vegetables. with 1-2 cm of water. Check the water level during the process. Keep the lid on the pot. - Page 71 ENGLISH 8.1 What to do if... Problem Possible cause Remedy You cannot activate or The hob is not connected Check if the hob is correctly operate the hob. to an electrical supply or it connected to the electrical is connected incorrectly. supply.
-
Page 72: Technical Data
(it is in the corner of the glass 9. TECHNICAL DATA 9.1 Rating plate Model GK29TCO PNC 949 492 575 00 Typ 60 HED D1 KO 220 - 240 V, 50 / 60 Hz Made in: Romania Ser.Nr. -
Page 73: Energy Efficiency
For optimal cooking results use cookware no larger than the diameter of the cooking zone. 10. ENERGY EFFICIENCY 10.1 Product Information Model identification GK29TCO Type of hob Built-In Hob Number of cooking zones Heating technology Radiant Heater Diameter of circular cooking zones (Ø) Middle front 14.5 cm... -
Page 74: Environmental Concerns
Point of Service Morgenstrasse 131 3018 Bern Langgasse 10 9008 St. Gallen Am Mattenhof 4a/b 6010 Kriens Schlossstrasse 1 4133 Pratteln Comercialstrasse 19 7000 Chur Spare parts service Industriestrasse 10, guarantee covers the costs of materials, 5506 Mägenwil, Tel. 0848 848 111 labour and travel. - Page 76 www.electrolux.com/shop...
Need help?
Do you have a question about the GK29TCO and is the answer not in the manual?
Questions and answers