OWI AMPIC5 Installation Instructions Manual
Self-amplified in-ceiling speakers (single input/source)
Hide thumbs
Also See for AMPIC5:
- Specification sheet (1 page) ,
- Wiring diagram (1 page) ,
- Brochure & specs (4 pages)
Table of Contents
Advertisement
Quick Links
Installation Instructions
Models AMPIC5 / AMPIC6
(Speaker Combination Models AMP1S51 / AMP1S52 / AMP1S54
AMP1S61 / AMP1S62 / AMP1S64)
SELF-AMPLIFIED IN-CEILING SPEAKERS
(SINGLE INPUT/SOURCE)
Established 1978
OWI Incorporated
17141 Kingsview Ave. Carson CA 90746 USA
Tel. 310-515-1900
www.owi-inc.com
Technical Support: 310-515-1900
Advertisement
Table of Contents

Related Manuals for OWI AMPIC5


Summary of Contents for OWI AMPIC5
-
Page 1: Installation Instructions
Installation Instructions Models AMPIC5 / AMPIC6 (Speaker Combination Models AMP1S51 / AMP1S52 / AMP1S54 AMP1S61 / AMP1S62 / AMP1S64) SELF-AMPLIFIED IN-CEILING SPEAKERS (SINGLE INPUT/SOURCE) Established 1978 OWI Incorporated 17141 Kingsview Ave. Carson CA 90746 USA Tel. 310-515-1900 www.owi-inc.com Technical Support: 310-515-1900... -
Page 2: Risk Of Electric Shock
IMPORTANT SAFETY INSTRUCTIONS 1. Read these instructions - All the safety and operation instructions should be read before this OWI product is operated. 2. Keep these instructions - The safety and operating instructions should be kept for future reference. - Page 3 18. OWI recommends that this apparatus is to be placed on a switched power outlet, one that switches both sides of the line and has contact separation of at least 3mm.
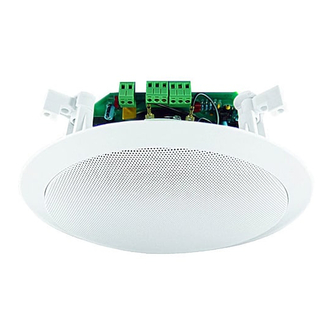
- Page 4 ( IC5/IC6, Tile Bridge, Backcan and Volume Controls are Optional – Sold Separately) Introduction: The AMPIC5/AMPIC6 is designed to provide an OWI 5.25” (IC5) or 6.5” (IC6) speaker that is self powered allowing line input audio that is either balanced or unbalanced to provide the input signal. The power amplifier provides up to 25 watts of power.
- Page 5 Having many of the recent most popular installer features, the AMPIC 5/6 power module is made to expressly fit onto the OWI Model IC5 or IC6 coaxial speaker providing a high fidelity module providing up to 25 watts of Class AB power right at the speaker.
- Page 6 Loud music installations, dance floors etc. Provide power at every speaker. Turn their volumes all the way up controlling level at a central location. If a subwoofer is used, crossover at 180 Hz and provide signal the module from 180 Hz and up. A CD output on each channel will power up to 5 power modules.
- Page 7 Filename:AMPIC5_6 MANUAL Page 7 of 16 07/18/08...
- Page 8 SELF AMPLIFIED SPEAKER TO NON-AMPLIFIED SPEAKERS DETAILED WIRING DIAGRAM Filename:AMPIC5_6 MANUAL Page 8 of 16 07/18/08...
-
Page 9: Troubleshooting Guide
2. Intermittent output: Check for shorted output causing the amplifier to into and output protection. Check each input wire for loose screws. 3. Distortion: Do not power more than one AMPIC5/6 on one power supply. While it will work, it will cause distortion. - Page 10 OWI INCORPORATED 17141 Kingsview Ave Carson, CA 90746 -----------CUT AND MAIL-------------------------------------------- OWI INCORPORATED 17141 Kingsview Ave Carson, CA 90746 LIMITED ONE YEAR WARRANTY Model Number:_______________________________________________ Model Name: ________________________________________________ Serial No.____________________________________________________ Date of Purchase: Month: ________________ Day _____ Year _________ Owner’s Name:_______________________________________________...
- Page 11 Filename:AMPIC5_6 MANUAL Page 11 of 16 07/18/08...
- Page 12 Filename:AMPIC5_6 MANUAL Page 12 of 16 07/18/08...
-
Page 13: Installation
Mounting your OWI Speakers Determine the best area to mount your OWI speakers. It will be necessary to run your speaker wires to that MODEL IC6 6.5"... - Page 14 Insert a paper clip into one of the grille openings, then pull upwards to remove the grille. Be sure to position the four Mounting Tabs on your OWI speaker inward, then insert the four screws (supplied) from the front of the speaker into the screw opening.
- Page 15 Attach the speaker wires to the speaker terminals. Insert your OWI speaker into the opening and tighten the four screws. As you tighten the screws, the tabs will automatically flip into an outward position thereby clamping the drywall between the feet and the flange of the speaker.
-
Page 16: Limited Five Year Warranty
2. If the speaker proves to be defective in materials or workmanship within five years from the date of the original customer purchase, OWI, at its sole option may repair or replace the unit with a current model of equal or greater value.
Need help?
Do you have a question about the AMPIC5 and is the answer not in the manual?
Questions and answers