Table of Contents
Advertisement
Quick Links
Advertisement
Table of Contents

Subscribe to Our Youtube Channel
Related Manuals for Automationdirect.com D4-454 PLC


Summary of Contents for Automationdirect.com D4-454 PLC
- Page 1 D4-454 PLC User Manual Manual Number: D4-454-M...
- Page 2 ~ WARNING ~ Thank you for purchasing automation equipment from Automationdirect.com®, doing business as, AutomationDirect. We want your new automation equipment to operate safely. Anyone who installs or uses this equipment should read this publication (and any other relevant publications) before installing or operating the equipment.
- Page 3 Esta publicación puede contener referencias a productos producidos y/u ofrecidos por otras compañías. Los nombres de las compañías y productos pueden tener marcas registradas y son propiedad única de sus respectivos dueños. Automationdirect.com, renuncia cualquier interés propietario en las marcas y nombres de otros.
- Page 4 AVERTISSEMENT Nous vous remercions d’avoir acheté l’équipement d’automatisation de Automationdirect.com®, en faisant des affaires comme, AutomationDirect. Nous tenons à ce que votre nouvel équipement d’automatisation fonctionne en toute sécurité. Toute personne qui installe ou utilise cet équipement doit lire la présente publication (et toutes les autres publications pertinentes) avant de l’installer ou de l’utiliser.
- Page 5 D4-454 PLC USER MANUAL Please include the Manual Number and the Manual Issue, both shown below, when communicating with Technical Support regarding this publication. Manual Number: D4-454-M Issue: 1st Ed. Rev. D Issue Date: 03/23 Publication History Issue Date Description of Changes...
-
Page 6: Table Of Contents
Table of Contents Chapter 1: Getting Started Introduction .............................1-2 The Purpose of this Manual ��������������������������������������������������������������������������������������������������������������� 1-2 Where to Begin �������������������������������������������������������������������������������������������������������������������������������������� 1-2 Technical Support ��������������������������������������������������������������������������������������������������������������������������������� 1-2 Key Topics for Each Chapter ������������������������������������������������������������������������������������������������������������ 1-3 DL405 System Components .......................1-4 CPUs ����������������������������������������������������������������������������������������������������������������������������������������������������������� 1-4 Bases ���������������������������������������������������������������������������������������������������������������������������������������������������������� 1-4 I/O Configuration������������������������������������������������������������������������������������������������������������������������������������... - Page 7 I/O Wiring Checklist ��������������������������������������������������������������������������������������������������������������������������� 2-30 DL405 Input Module Chart �������������������������������������������������������������������������������������������������������������� 2-31 DL405 Output Module Chart ���������������������������������������������������������������������������������������������������������� 2-31 Chapter 3: CPU Specifications and Operation Overview ............................3-2 General CPU Features �������������������������������������������������������������������������������������������������������������������������3-2 CPU Electrical Specifications �����������������������������������������������������������������������������������������������������������3-2 D4-454 PLC User Manual, 1st Edition, Rev. D...
- Page 8 Write Outputs �������������������������������������������������������������������������������������������������������������������������������������� 3-18 Write Outputs to Specialty and Remote I/O ���������������������������������������������������������������������������� 3-18 Diagnostics ������������������������������������������������������������������������������������������������������������������������������������������ 3-18 I/O Response Time ........................3-19 Is Timing Important for Your Application ��������������������������������������������������������������������������������� 3-19 Normal Minimum I/O Response���������������������������������������������������������������������������������������������������� 3-19 D4-454 PLC User Manual, 1st Edition, Rev. D...
- Page 9 Word Memory (V Data Type) ����������������������������������������������������������������������������������������������������������3-31 Stages (S Data type) ��������������������������������������������������������������������������������������������������������������������������3-32 Special Relays (SP Data Type) �������������������������������������������������������������������������������������������������������3-32 Remote I/O Points (GX and GY Data Type) �������������������������������������������������������������������������������3-32 System Parameters (V Data Type) �����������������������������������������������������������������������������������������������3-33 D4-454 PLC User Manual, 1st Edition, Rev. D...
- Page 10 Configure Remote I/O Slaves��������������������������������������������������������������������������������������������������������� 4–15 Configuring the Remote I/O Table ����������������������������������������������������������������������������������������������� 4–15 Remote I/O Setup Program ������������������������������������������������������������������������������������������������������������ 4–16 Remote I/O Test Program ��������������������������������������������������������������������������������������������������������������� 4–17 Network Connections to MODBUS ® and DirectNet ............4–18 D4-454 PLC User Manual, 1st Edition, Rev. D...
- Page 11 Boolean Stack ��������������������������������������������������������������������������������������������������������������������������������������� 5-8 Immediate Boolean ����������������������������������������������������������������������������������������������������������������������������� 5-9 Boolean Instructions ....................... 5-10 Comparative Boolean ......................5-25 Immediate Instructions ......................5-31 Timer, Counter and Shift Register Instructions ............... 5-38 Using Timers ��������������������������������������������������������������������������������������������������������������������������������������� 5-38 D4-454 PLC User Manual, 1st Edition, Rev. D...
- Page 12 Table Instructions ........................5-141 Copy Data From a Data Label Area to V-memory �������������������������������������������������������������5-143 Clock/Calendar Instructions ....................5-173 CPU Control Instructions ...................... 5-175 Program Control Instructions ..................... 5-177 Interrupt Instructions ......................5-185 D4-454 PLC User Manual, 1st Edition, Rev. D...
- Page 13 Masked Event Drum with Word Output (MDRMW) �������������������������������������������������������������� 6-18 Chapter 7: RLL Stage Programming PLUS Introduction to Stage Programming ..................7-2 Overcoming “Stage Fright” �������������������������������������������������������������������������������������������������������������� 7-2 Learning to Draw State Transition Diagrams ..............7-3 Introduction to Process States ������������������������������������������������������������������������������������������������������ 7-3 viii D4-454 PLC User Manual, 1st Edition, Rev. D...
- Page 14 Power Flow Transition Technique ���������������������������������������������������������������������������������������������� 7-18 Parallel Processing Concepts ....................7-19 Parallel Processes ���������������������������������������������������������������������������������������������������������������������������� 7-19 Converging Processes ������������������������������������������������������������������������������������������������������������������� 7-19 Convergence Stages (CV) ������������������������������������������������������������������������������������������������������������� 7-19 Convergence Jump (CVJMP) ������������������������������������������������������������������������������������������������������ 7-20 Convergence Stage Guidelines �������������������������������������������������������������������������������������������������� 7-20 D4-454 PLC User Manual, 1st Edition, Rev. D...
- Page 15 Some Things to Do and Know Before Starting ��������������������������������������������������������������������� 8-18 Establishing the Loop Table Size and Location �������������������������������������������������������������������� 8-19 Loop Table Word Definitions ������������������������������������������������������������������������������������������������������� 8-21 PID Mode Setting 1 Bit Descriptions (Addr + 00) ����������������������������������������������������������������� 8-22 D4-454 PLC User Manual, 1st Edition, Rev. D...
- Page 16 Ramp/Soak Profile Monitoring ����������������������������������������������������������������������������������������������������� 8-64 Ramp/Soak Programming Errors ������������������������������������������������������������������������������������������������ 8-64 DirectSOFT Ramp/Soak Example ..................8-65 Setup the Profile in PID Setup ����������������������������������������������������������������������������������������������������� 8-65 Program the Ramp/Soak Control in Relay Ladder ��������������������������������������������������������������� 8-65 D4-454 PLC User Manual, 1st Edition, Rev. D...
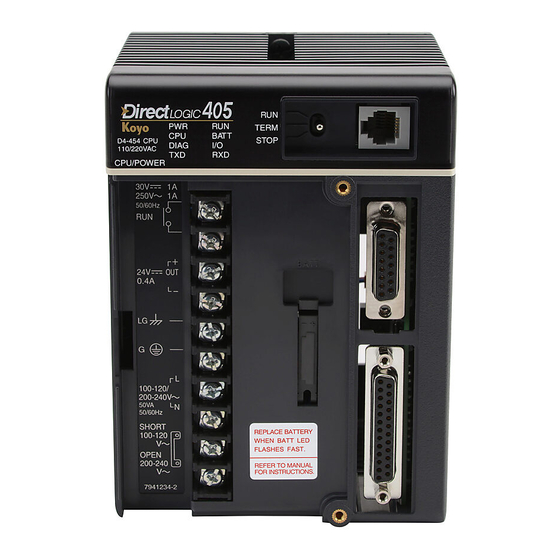
- Page 17 Program Error Codes ����������������������������������������������������������������������������������������������������������������������� 9-7 CPU Status Indicators ......................9-8 PWR Indicator �������������������������������������������������������������������������������������������������������������������������������������� 9-9 RUN Indicator ������������������������������������������������������������������������������������������������������������������������������������9-10 CPU Indicator ������������������������������������������������������������������������������������������������������������������������������������9-11 BATT Indicator ����������������������������������������������������������������������������������������������������������������������������������9-11 DIAG Indicator �����������������������������������������������������������������������������������������������������������������������������������9-11 TXD and RXD Indicators ����������������������������������������������������������������������������������������������������������������9-12 I/O Point Troubleshooting .....................9-13 D4-454 PLC User Manual, 1st Edition, Rev. D...
- Page 18 Introduction ........................... E-2 Binary Numbering System ......................E-2 Hexadecimal Numbering System .................... E-3 Octal Numbering System......................E-4 Binary Coded Decimal (BCD) Numbering System .............. E-5 Real (Floating Point) Numbering System ................E-5 xiii D4-454 PLC User Manual, 1st Edition, Rev. D...
- Page 19 BCD/Binary/Decimal/Hex/Octal - What is the Difference?....................... E-6 Data Type Mismatch ........................E-7 Signed vs. Unsigned Integers ....................E-8 AutomationDirect.com Products and Data Types .............. E-9 DirectLOGIC PLCs ���������������������������������������������������������������������������������������������������������������������������������E-9 C-more/C-more Micro-Graphic Panels ����������������������������������������������������������������������������������������E-9 D4-454 PLC User Manual, 1st Edition, Rev. D...
- Page 20 Chapter Chapter Chapter ettinG tarted In This Chapter... Introduction ..........................1-2 Conventions Used........................1-3 DL405 System Components ....................1-4 Programming Methods ......................1-4 DL405 Family ..........................1-6 Quick Start for PLC Checkout and Programming .............1-8 Steps to Designing a Successful System ................. 1-12 Frequently Asked Questions ....................1-14...
-
Page 21: Chapter 1: Getting Started
Specifications”, and proceed on to other chapters as needed. Be sure to keep this manual handy for reference when you have questions. If you are new to the D4-454 PLC controller, we suggest you read this manual completely so you can understand the wide variety of features available. -
Page 22: Key Topics For Each Chapter
Key Topics for Each Chapter The beginning of each chapter will list HAPTER Getting Started the key topics that can be found in that chapter. In This Chapter... General Information ..............1-2 Speci cations ................1-4 D4-454 PLC User Manual, 1st Edition, Rev. D... -
Page 23: Dl405 System Components
DL05 ,DL06, DL105, DL205, DL305, DL405 or any new DirectLOGIC CPUs that we add to our product line. There is a separate manual for the DirectSOFT programming software and 1 copy is shipped with each purchase. D4-454 PLC User Manual, 1st Edition, Rev. D... -
Page 24: Dl405 System Diagrams
DCM MB DCM MSTR Connects to D4-454Programming Port (Max. 3.3ft/1m) Up to 3 expansion bases total (only 2 shown) REMOTE I/O 1. Flexible Placement of I/O 2. Reduced Installation Costs 3. Versatile I/O Offering D4-454 PLC User Manual, 1st Edition, Rev. D... - Page 25 D4-454DC-1: 24 VDC P/S 4 Loop Temperature Controller 7.5K Built-in Flash Memory BASES 4 Slot Base D4-04B-1 6 Slot Base D4-06B-1 8 Slot Base D4-08B-1 MEMORY CARTRIDGES CMOS RAM w/battery UVPROM EEPROM D4-454 PLC User Manual, 1st Edition, Rev. D...
- Page 26 8CH Input DirectNET Network/Modbus® 16CH Input D4-454 CPU (Ports 1 , 2 and 3) 4CH Output DirectNET Network/Modbus® 8CH Output Modbus®Master Module 16CH Output Modbus®Slave Module 8CH Thermocouple Input 8CH RTD Input D4-454 PLC User Manual, 1st Edition, Rev. D...
- Page 27 A 24 VDC toggle switch (if not using the input simulator module) • A screwdriver, regular or Phillips type • DirectSOFT Programming Software, DirectSOFT manual, and a programming cable (connects the CPU to a personal computer). D4-454 PLC User Manual, 1st Edition, Rev. D...
- Page 28 If you are using 220 VAC power, do not install the jumper. You can find a detailed explanation of the terminal block on both the CPU and expansion units in Chapter 2, Installation, Wiring and Specifications. D4-454 PLC User Manual, 1st Edition, Rev. D...
- Page 29 (X0) to the toggle switch and 24 VDC auxiliary power supply on the CPU terminal strip as shown below for the D4-16ND2 input module. Chapter 2, Installation, Wiring and Specifications provides a list of I/O wiring guidelines. 1-10 D4-454 PLC User Manual, 1st Edition, Rev. D...
- Page 30 Put the CPUs mode switch in the STOP position to ensure that the CPU is not running a program. Next, put the CPU mode switch in the TERM position. This puts the CPU in the program mode and allows access to the CPU program. 1-11 D4-454 PLC User Manual, 1st Edition, Rev. D...
-
Page 31: Steps To Designing A Successful System
4: Determine the I/O Module Specifications and Wiring There are many different I/O modules available with the DL405 system. Chapter 2 provides the specifications and wiring diagrams for the discrete I/O modules. 1-12 D4-454 PLC User Manual, 1st Edition, Rev. D... - Page 32 LOWER DOWN 7: Choose the Instructions After installation and studying the main programming concepts, you can begin writing the application program or configuring loop operation. You’ll discover a powerful instruction set. 1-13 D4-454 PLC User Manual, 1st Edition, Rev. D...
-
Page 33: Frequently Asked Questions
A. Yes, the H4-ECOM100 module is needed to support Ethernet. Q. Are more FAQs available for the DL405 and other products. A. Yes, visit www.automationdirect.com for more FAQs and other technical information. 1-14 D4-454 PLC User Manual, 1st Edition, Rev. D... - Page 34 Chapter Chapter Chapter nstallatIon IrIng and pecIfIcatIons In This Chapter... Safety Guidelines ....................... 2-2 Mounting Guidelines ....................2-5 Installing DL405 Bases ....................2-9 Installing Components in the Base ................. 2-10 CPU and Expansion Unit Wiring Guidelines ............2-11 I/O Wiring Strategies ....................2-14 I/O Modules Wiring, and Specification ..............
-
Page 35: Chapter 2: Installation, Wiring And Specifications
Chapter 2: Installation, Wiring and Specifications Safety Guidelines NOTE: Products with CE marks perform their required functions safely and adhere to relevant standards as specified by CE directives, provided they are used according to their intended purpose and that the instructions in this manual are adhered to. The protection provided by the equipment may be impaired if this equipment is used in a manner not specified in this manual. - Page 36 Chapter 2: Installation, Wiring and Specifications Three Levels of Protection The publications mentioned provide many ideas and requirements for system safety. At a minimum, you should follow these regulations. Also, you should use the following techniques, which provide three levels of system control. •...
-
Page 37: Emergency Power Disconnect
Chapter 2: Installation, Wiring and Specifications Emergency Power Disconnect A properly rated emergency power disconnect should be used to power the PLC controlled system as a means of removing the power from the entire control system. It may be necessary to install a capacitor across the disconnect to protect against a condition known as “out rush”. -
Page 38: Mounting Guidelines
Chapter 2: Installation, Wiring and Specifications Mounting Guidelines In addition to the panel layout guidelines, other specifications can affect the installation of a PLC system. Always consider the following: • Environmental specifications • Power Supply specifications • Regulatory Agency Approvals •... -
Page 39: Panel Layout And Clearances
Chapter 2: Installation, Wiring and Specifications Panel Layout and Clearances There are many things to consider when designing the panel layout. The following items correspond to the diagram shown on the following page. Note, there may be additional requirements, depending on your application and use of other components in the cabinet. •... -
Page 40: Enclosures
Chapter 2: Installation, Wiring and Specifications Temperature Probe 2” 50mm min. DL405 CPU Base 3” 75mm min. Power Source 2” 50mm min. 7.2” -- 13.75” 183 -- 350mm DL405 Local Expansion Base Panel 2” 50mm min. BUS Bar Star Washers Ground Braid Panel Ground Copper Lugs... -
Page 41: Agency Approvals
Chapter 2: Installation, Wiring and Specifications Agency Approvals Some applications require agency approvals. Typical agency approvals which your application may require are: • UL (Underwriters’ Laboratories, Inc.) • CSA (Canadian Standards Association) • CUL (Canadian Underwriters’ Laboratories, Inc.) To obtain the most current agency approval information, see the Agency Approval Checklist section on the specific component part number web page. -
Page 42: Installing Dl405 Bases
Chapter 2: Installation, Wiring and Specifications Installing DL405 Bases Three Sizes of Bases All I/O configurations of the DL405 will use a selection of either 4, 6, or 8 slot base(s). Local and expansion bases can be 4, 6, or 8 slot in size. Local and expansion bases differ only in how they are wired in a system. -
Page 43: Installing Components In The Base
Chapter 2: Installation, Wiring and Specifications Component Dimensions Before installing your PLC system you will need to know the dimensions for the components in your system. The diagram on this page provide the component dimensions and should be used to define your enclosure specifications. Remember to leave room for potential expansion. -
Page 44: Cpu And Expansion Unit Wiring Guidelines
Chapter 2: Installation, Wiring and Specifications CPU and Expansion Unit Wiring Guidelines The main power terminal connections are under the front covers of the D4-454 CPUs and DL405 Expansion Units. The list below describes the function of each of the terminal screws. -
Page 45: Expansion Unit Wiring
Chapter 2: Installation, Wiring and Specifications Expansion Unit Wiring The following diagram details the appropriate connections for each terminal. 24VDC AC Terminal Strip Terminal Strip 24V Auxiliary Power Logic Logic Ground Ground Chassis Chassis Ground Ground + DC AC Line AC Neutral - - DC 120/240... - Page 46 Chapter 2: Installation, Wiring and Specifications On the D4-454, you may use port 2 instead for DirectSOFT programming. The cable shown below is approximately 12 feet (3.66 m) long. D4-454 CPU, port 2 RJ12 9-pin D-shell phone style female Use cable part no. D2- -DSCBL Connecting Operator Interface Devices It is very common to connect an operator interface to DL405 PLCs.
-
Page 47: I/O Wiring Strategies
Chapter 2: Installation, Wiring and Specifications I/O Wiring Strategies The DL405 PLC system is very flexible and will work in many different wiring configurations. By studying this section before actual installation, you can probably find the best wiring strategy for your application. This will help to lower system cost, wiring errors, and avoid safety problems. -
Page 48: Powering I/O Circuits With The Auxiliary Supply
Chapter 2: Installation, Wiring and Specifications Powering I/O Circuits with the Auxiliary Supply In some cases, using the built-in auxiliary +24VDC supply can result in a cost savings for your control system. It can power combined loads up to 400mA. Be careful not to exceed the current rating of the supply. -
Page 49: Powering I/O Circuits Using Separate Supplies
Chapter 2: Installation, Wiring and Specifications Powering I/O Circuits Using Separate Supplies In most applications it will be necessary to power the input devices from one power source, and to power output loads from another source. Loads often require high-energy AC power, while input sensors use low-energy DC. -
Page 50: Sinking / Sourcing Concepts
Chapter 2: Installation, Wiring and Specifications Sinking / Sourcing Concepts Before going further in the study of wiring strategies, you must have a solid understanding of “sinking” and “sourcing” concepts. Use of these terms occurs frequently in input or output circuit discussions. It is the goal of this section to make these concepts easy to understand, further ensuring your success in installation. -
Page 51: I/O "Common" Terminal Concepts
Chapter 2: Installation, Wiring and Specifications I/O “Common” Terminal Concepts In order for a PLC I/O circuit to operate, current must enter at one terminal and exit at another. Main Path Field Therefore, at least two terminals are associated Device (I/O Point) with every I/O point. -
Page 52: Connecting Dc I/O To "Solid State" Field Devices
Chapter 2: Installation, Wiring and Specifications Connecting DC I/O to “Solid State” Field Devices In the previous section on Sourcing and Sinking concepts, the DC I/O circuits were explained to sometimes only allow current to flow one way. This is also true for many of the field devices which have solid-state (transistor) interfaces. - Page 53 Chapter 2: Installation, Wiring and Specifications In the next example a PLC sinking DC output point is connected to the sinking input of a field device. This is a little tricky, because both the PLC output and field device input are sinking type.
-
Page 54: Relay Output Guidelines
Chapter 2: Installation, Wiring and Specifications Relay Output Guidelines Several output modules in the DL405 I/O family feature relay outputs: D4–08TR, F4-08TRS-1, F4-08TRS-2, D4-16TR. Relays are best for the following applications: • Loads that require higher currents than the solid-state outputs can deliver •... - Page 55 Chapter 2: Installation, Wiring and Specifications This example shows a simple circuit with a small 24V/125mA/3W relay. As you can see, when the switch is opened, thereby de-energizing the coil, the transient voltage generated across the switch contacts peaks at 140V. Example: Circuit with no Suppression Volts Oscilloscope...
- Page 56 Chapter 2: Installation, Wiring and Specifications PLC’s Integrated Transient Suppressors Although the PLC’s outputs typically have integrated suppressors to protect against transients, they are not capable of handling them all. It is usually necessary to have some additional transient suppression for an inductive load. The next example uses the same 24V/125mA/3W relay used earlier.
- Page 57 Chapter 2: Installation, Wiring and Specifications Additional transient suppression should be used in both these examples. If you are unable to measure the transients generated by the connected loads of your control system, using additional transient suppression on all inductive loads would be the safest practice. Types of Additional Transient Protection DC Coils: The most effective protection against transients from a DC coil is a fly back diode.
- Page 58 Chapter 2: Installation, Wiring and Specifications AutomationDirect’s ZL-TSD8-24 transorb module is a good choice for 24VDC circuits. It is a bank of 8 uni-directional 30V TVS diodes. Since they are uni-directional, be sure to observe the polarity during installation. MOVs or bi-directional TVS diodes would install at the same location, but have no polarity concerns.
-
Page 59: I/O Modules Wiring, And Specification
Chapter 2: Installation, Wiring and Specifications I/O Modules Wiring, and Specification Slot Numbering The DL405 bases come in 4, 6 or 8 slot sizes with the first slot on the far left dedicated for the CPU or one of the Base Controller Modules. The I/O and Specialty Modules can be placed in any of the remaining slots on the base. -
Page 60: Module Placement
Chapter 2: Installation, Wiring and Specifications Module Placement Before wiring the I/O modules in your system to field devices, it’s very important to make sure each I/O module is in the right slot and base in the system. Costly wiring errors may be avoided by doing the following: •... -
Page 61: Wiring The Different Module Connectors
Chapter 2: Installation, Wiring and Specifications Wiring the Different Module Connectors You must first remove the front cover of the module prior to wiring. To remove the cover depress the bottom tab of the cover and tilt the cover up to loosen from the module All DL405 I/O module terminal blocks are removable for your convenience. -
Page 62: Wiring 32 And 64 Point I/O Modules
Chapter 2: Installation, Wiring and Specifications Wiring 32 and 64 Point I/O Modules The 32-point and 64-point I/O modules use a different style of connector due to the increased number of I/O points. A ZIPLink connection system is shown in the figure below. -
Page 63: I/O Wiring Checklist
Chapter 2: Installation, Wiring and Specifications I/O Wiring Checklist Use the following guidelines when wiring the I/O modules in your system. Module type Suggested AWG Range Suggested Torque 12AWG 10.63 lb·inch (1.2 N·m) 8 Point 12AWG 7.97 lb·inch (0.9 N·m) 16 Point 14AWG 7.97 lb·inch (0.9 N·m) -
Page 64: Dl405 Input Module Chart
Chapter 2: Installation, Wiring and Specifications DL405 Input Module Chart The following table lists the available DL405 input modules. Specifications begin on the following page. DL405 Input Number of DC Current DC Current AC Input Module Types Input Points Sink Input Source Input ✔... - Page 65 Chapter 2: Installation, Wiring and Specifications D4-08ND3S DC Input D4-16ND2 DC Input Inputs Per Module 8 (sink/source) Inputs Per Module 16 (current sourcing) Commons Per Module 8 (isolated) Commons Per Module 2 (isolated) Input Voltage Range 20–52.8 VDC Input Voltage Range 10.2–26.4 VDC Peak Voltage 52.8 VDC...
- Page 66 Chapter 2: Installation, Wiring and Specifications D4-16ND2F DC Input D4-16 SIM Input Simulator Inputs Per Module 16 (current sourcing) Inputs per Module 8 or 16 selectable by internal switch Base Power Required 5V Commons Per Module 2 (isolated) 150mA max Terminal Type None Input Voltage Range...
- Page 67 Chapter 2: Installation, Wiring and Specifications D4-32ND3-1 DC Input Inputs Per Module 32 (sink/source) Commons Per Module 4 (isolated) Input Voltage Range 20–28 VDC Peak Voltage 30VDC On Voltage Level > 19V Off Voltage Level < 10V Input Impedance 4.8 kΩ Input Current 5mA @ 24VDC Minimum On Current...
- Page 68 Chapter 2: Installation, Wiring and Specifications D4-64ND2 DC Input External Power (Optional) 24VDC ± 10%, 320mA max OFF to ON Response 2 .5 ms (typical) Inputs Per Module 64 (current sourcing) ON to OFF Response 5ms (typical) Commons Per Module 8 (isolated) Terminal Type Connector sold separately *...
- Page 69 Chapter 2: Installation, Wiring and Specifications D4-08NA AC Input D4-16NA AC Input Inputs Per Module Inputs Per Module Commons Per Module 2 (isolated) Commons Per Module 2 (isolated) Input Voltage Range 80–265 VAC Input Voltage Range 80–132 VAC Peak Voltage 265VAC Peak Voltage 132VAC...
- Page 70 Chapter 2: Installation, Wiring and Specifications F4-08NE3S AC/DC Input D4-16NE3 AC/DC Input Inputs Per Module 8 (sink/source) Inputs Per Module 16 (sink/source) Commons Per Module 8 (isolated) Commons Per Module 2 (isolated) Input Voltage Range 10.2–26.4 VAC/VDC Input Voltage Range 90–150 VAC/VDC Peak Voltage 350 peak <...
- Page 71 Chapter 2: Installation, Wiring and Specifications F4-08TD1S DC Output Outputs Per Module 8 (current sinking) Commons Per Module 4 (isolated, 8 terminals) Operating Voltage 24–150 VDC Output Type MOS FET Peak Voltage 47–63 Hz On Voltage Drop 0.5 VDC @ 2A 2A/point Max Current (resistive) 4A/common...
- Page 72 Chapter 2: Installation, Wiring and Specifications D4-16TD2 DC Output D4-16TD1 DC Output Outputs Per Module 16 (current sourcing) Outputs Per Module 16 (current sinking) Commons Per Module 2 (isolated) Commons Per Module 2 internally connected Operating Voltage 10.2–26.4 VDC Operating Voltage 4.5–26.4 VDC Output Type NPN Emitter Follower...
- Page 73 Chapter 2: Installation, Wiring and Specifications D4-32TD1-1 DC Output D4-32TD1 DC Output Outputs Per Module Outputs Per Module 32 (current sinking) 32 (current sinking) Commons Per Module Commons Per Module 4 (isolated) 4 (isolated) Operating Voltage 5–15 VDC Operating Voltage 4.75–26.4 VDC Output Type NPN Open Collector (with pull-up)
- Page 74 Chapter 2: Installation, Wiring and Specifications D4-32TD2 DC Output Outputs Per Module 32 (current sourcing) Commons Per Module 4 (isolated) Operating Voltage 10.8–26.4 VDC Output Type PNP Open Collector Peak Voltage 30VDC On Voltage Drop 0.6 VDC @ 0.2 A 0.2A/point Max Current (resistive) 1A/common...
- Page 75 Chapter 2: Installation, Wiring and Specifications D4-64TD1 DC Output Base Power Required 5V 800mA max 24VDC ± 10%, Inputs Per Module 64 (current sinking) External DC Required (850mA per common) Commons Per Module 8 (non-isolated) 7A total max OFF to ON Response 0.1 ms Operating Voltage 4.75–28 VDC...
- Page 76 Chapter 2: Installation, Wiring and Specifications D4-08TA AC Output D4-08TA AC Output Outputs Per Module Outputs Per Module Commons Per Module 2 (isolated) Commons Per Module 2 (isolated) Operating Voltage 15–265 VAC Operating Voltage 15–265VAC Output Type SSR Triac Output Type SSR Triac Peak Voltage 265VAC...
- Page 77 Chapter 2: Installation, Wiring and Specifications F4-08TRS-1 Relay Output D4-08TR Relay Output Outputs Per Module 8 relays Outputs Per Module 8 relays Commons Per Module 8 (isolated) Commons Per Module 2 (isolated) 12–30 VDC / 12–125 VAC Operating Voltage Operating Voltage 5–30VDC / 5–250VAC *125–250 VAC 4 Form C (SPST)
- Page 78 Chapter 2: Installation, Wiring and Specifications F4-08TRS-2 Relay Output D4-16TR Relay Output Outputs Per Module 8 relays Outputs Per Module 16 relays Commons Per Module 8 (isolated) Commons Per Module 2 (isolated) Operating Voltage 12–30 VDC / 12–250 VAC Operating Voltage 5–30 VDC / 5–250 VAC 4 Form C (SPST) Output Type...
- Page 79 Chapter Chapter Chapter CPU S PeCifiCationS Peration In This Chapter... CPU Overview ......................3-2 CPU Specifications ..................... 3-3 Using Battery Backup ....................3-10 CPU Setup Information ................... 3-11 CPU Operation ......................3-13 I/O Response Time ....................3-19 CPU Scan Time Considerations ................3-21 PLC Numbering Systems ..................
-
Page 80: Chapter 3: Cpu Specifications And Operation
Port 1 is RS232/RS422 interface and supports K Sequence, DirectNET, Non- sequence and MODBUS protocols. Port 2 has RS232 interface and supports DirectNET, K-Sequence, Non-sequence, and Modbus RTU protocols. Port 3 is RS422 interface and supports K-Sequence, DirectNet, Non-sequence and MODBUS protocols. D4-454 PLC User Manual, 1st Edition, Rev. D... -
Page 81: Cpu Electrical Specifications
Insulation Resistance > 10MΩ at 500 VDC 20–28 VDC (24 nominal), ripple more than 1V P-P Output Voltage, auxiliary power supply Output Current, auxiliary power supply 24 VDC @ 400 mA maximum D4-454 PLC User Manual, 1st Edition, Rev. D... -
Page 82: Cpu Specifications
System Error Log Total Bases per Slave (H4-EBC) 4 (H4-EBC base, three D4-EX User Error Log bases) Battery Backup D2-BAT-1 included Slots per Base 4/6/8 Discrete I/O Module Point 8/12/16/32/64 Density D4-454 PLC User Manual, 1st Edition, Rev. D... -
Page 83: Toggle Switch Functions
RUN, PROGRAM and Debug modes are available. Mode and program changes are allowed by the programming / monitoring device. STOP (Stop Program) CPU is forced into the STOP mode. No changes are allowed by the programming / monitoring device. D4-454 PLC User Manual, 1st Edition, Rev. D... -
Page 84: Status Indicators
I/O self diagnostics good Data is being transmitted by the CPU No data is being transmitted by the CPU Data is being received by the CPU No data is being received by the CPU D4-454 PLC User Manual, 1st Edition, Rev. D... -
Page 85: Communication Ports
Clear to Send (RS232) Sense connection between HPP and 15-pin Female Not Used D Connector LCBL Sense cable connection (TTL) 5VDC for HPP logic 5VDC for LCD back-light Logic Ground Logic Ground Logic Ground D4-454 PLC User Manual, 1st Edition, Rev. D... -
Page 86: Port 1 Specifications
– Not Used RTS- Request to Send–(RS422) RTS+ Request to Send + (RS422) – Not Used – Not Used – Not Used CTS- Clear to Send–(RS422) – (Port 3) – (Port 3) D4-454 PLC User Manual, 1st Edition, Rev. D... -
Page 87: Port 2 Specifications
NOTE: The 5V pins are rated at 200mA maximum, primarily for use with some operator interfaces. Port 2 Port 2 Pin Descriptions Power (–) connection (GND) Power (+) connection Receive Data (RS232) Transmit Data (RS232) Power (+) connection 6-pin Female Modular Connector Power (–) connection (GND) D4-454 PLC User Manual, 1st Edition, Rev. D... -
Page 88: Port 3 Specifications
When using both logical ports, you will TXD-- probably have make custom RTS-- connector which divides the signals in two RTS+ for two separate cables. RXD+ RXD-- CTS-- CTS+ RXD+ TXD+ RXD-- TXD-- 3-10 D4-454 PLC User Manual, 1st Edition, Rev. D... -
Page 89: Using Battery Backup
V7633.12. The super capacitor will retain memory IF it is configured as retentive regardless of the state of V7633.12. The battery will do the same, but for a much longer time. Battery 3-11 D4-454 PLC User Manual, 1st Edition, Rev. D... -
Page 90: Cpu Setup Information
(along with the ladder logic project ) removed. Is is the policy of AutomationDirect to require the memory of the PLC to be cleared along with the password. 3-12 D4-454 PLC User Manual, 1st Edition, Rev. D... -
Page 91: Initializing System Memory
C0 – C3777 V-Memory V400 – V37777 V0 – V37777 Timers None by default T0 – T377 Counters CT0 – CT377 CT0 – CT377 Stages None by default S0 – S1777 3-13 D4-454 PLC User Manual, 1st Edition, Rev. D... -
Page 92: Cpu Operation
CPU remains in its current mode. If a fatal error occurs, the CPU is forced into program mode and the outputs go off. Force CPU into PGM mode 3-14 D4-454 PLC User Manual, 1st Edition, Rev. D... -
Page 93: Program Mode Operation
Changes during Run Mode become effective immediately. Make sure you thoroughly consider the impact of any changes to minimize the risk of personal injury or damage to equipment. 3-15 D4-454 PLC User Manual, 1st Edition, Rev. D... -
Page 94: Read Inputs
For example, if you enabled the Bit Override for Y0 and it was off at the time, then the CPU would not change the state of Y0. 3-16 D4-454 PLC User Manual, 1st Edition, Rev. D... -
Page 95: Update Special Relays And Special Registers
CPU (local) base. There is a portion of the execution cycle used to communicate with these modules. The CPU performs both read and write requests during this segment. Data 3-17 D4-454 PLC User Manual, 1st Edition, Rev. D... -
Page 96: Update Clock, Special Relays And Special Registers
You may recall the CPU may have obtained and stored forcing information when it serviced the peripheral devices. If any I/O points or memory data have been forced, the output image register also contains this information. 3-18 D4-454 PLC User Manual, 1st Edition, Rev. D... -
Page 97: Solve Pid Loop Equations
The default value set from the factory is 200ms. If this time is exceeded Write Outputs to Specialty I/O the CPU will enter the Program Mode, turn off all outputs, and report the error. Diagnostics 3-19 D4-454 PLC User Manual, 1st Edition, Rev. D... -
Page 98: I/O Response Time
The following diagram shows an example of the timing for this situation. In this case, you can calculate the response time by simply adding the following items. Input Delay + (2 x Scan Time) + Output Delay = Response Time 3-20 D4-454 PLC User Manual, 1st Edition, Rev. D... -
Page 99: Improving Response Time
Therefore, any regular instructions that follow will still use image register values. Any immediate instructions that follow will access the module again to update the status. 3-21 D4-454 PLC User Manual, 1st Edition, Rev. D... -
Page 100: Cpu Scan Time Considerations
Write output data to can require. Specialty and Remote I/O Do diagnostics Report the error, set flag, register, turn on LED Fatal error Force CPU into PGM mode 3-22 D4-454 PLC User Manual, 1st Edition, Rev. D... -
Page 101: Initialization Process
Time = 146.8 µs NOTE: This information provides the amount of time the CPU spends reading the input status from the modules. Don’t confuse this with the I/O response time that was discussed earlier. 3-23 D4-454 PLC User Manual, 1st Edition, Rev. D... -
Page 102: Reading Inputs From Specialty I
Send Min. / Max. 41 / 48 µs Rec. Min. / Max. 47 / 59 µs Port 3 Send Min. / Max. 38 / 38 µs Rec. Min. / Max. 45 / 45 µs 3-24 D4-454 PLC User Manual, 1st Edition, Rev. D... -
Page 103: Cpu Bus Communications
NO is the number of output points in a module. • Time = 15µs + (13µs x 2) + (14.1 µs x 32) • Time = 492.2 µs 3-25 D4-454 PLC User Manual, 1st Edition, Rev. D... -
Page 104: Writing Outputs To Specialty I
I/O modules installed, etc. The following table shows the minimum and maximum times that can be expected. Diagnostic Time D4-454 Minimum 282.0 µs Maximum 398.0 µs 3-26 D4-454 PLC User Manual, 1st Edition, Rev. D... -
Page 105: Application Program Execution
These instructions include FOR/NEXT loops, Subroutines and Interrupt Routines. These instructions can interrupt the normal program flow and affect the program execution time. Chapter 5 provides detailed information on how these different types of instructions operate. 3-27 D4-454 PLC User Manual, 1st Edition, Rev. D... -
Page 106: Plc Numbering Systems
Our circles are in an array of square containers to the right. To access a resource, our PLC instruction will address its location using the octal references shown If these were counters, “CT14” would access the black circle location. 3-28 D4-454 PLC User Manual, 1st Edition, Rev. D... -
Page 107: V-Memory
Hexadecimal is just a convenient way for humans to view full binary data. Hexadecimal number 1 0 1 0 0 1 1 1 1 1 1 1 0 1 0 0 V- -memory storage 3-29 D4-454 PLC User Manual, 1st Edition, Rev. D... -
Page 108: Memory Map
X inputs are mapped into V-memory locations. These discrete memory areas and the corresponding V-memory locations are listed in the Memory Map tables for the D4-454 in this chapter. 16 Discrete (X) Input Points Bit # V40400 3-30 D4-454 PLC User Manual, 1st Edition, Rev. D... -
Page 109: Input Points (X Data Type)
T1 turns on, output Y12 turns on. Turning off X0 resets the timer. NOTE: Some timers and counters use one V-memory register, and other types require two V-memory registers. See the instruction descriptions in Chapter 5. 3-31 D4-454 PLC User Manual, 1st Edition, Rev. D... -
Page 110: Timer Current Values (V Data Type)
Word Locations -- 16 bits is loaded into the accumulator and then stored in a V-memory location. 0 0 1 0 0 1 1 0 1 0 0 0 1 0 3-32 D4-454 PLC User Manual, 1st Edition, Rev. D... -
Page 111: Stages (S Data Type)
Remote and Slice I/O modules manual provides the details.) In this example, memory location GY0 turns on when local input X3 is not ON. On the second rung, local output Y12 will turn ON when GX10 turns on. GX10 3-33 D4-454 PLC User Manual, 1st Edition, Rev. D... -
Page 112: System Parameters (V Data Type)
Description of Contents V-Memory V736 Contains a BCD value (from 3 to 999) for Timed-interrupt 16 feature. V7746 454: Battery voltage in tenths of a volt, (e.g., V7746 = 0031 is 3.1 Volts) 3-34 D4-454 PLC User Manual, 1st Edition, Rev. D... - Page 113 (C7250 = master, C751 =slave 1 C757 = slave 7) C760 to C767 Communication Ready: The corresponding relay will be ON if the setup table data is valid (C760 = master, C761 = slave 1, C767 = slave 7) 3-35 D4-454 PLC User Manual, 1st Edition, Rev. D...
- Page 114 Remote In / Out GX0 – GX3777 V40000 –V40177 2048 GY0 – GY3777 V40200 –V40377 2048 System None V700 – V777 None specific, use with many instructions Parameters V7400 – V7777 V37000 –V37777 3-36 D4-454 PLC User Manual, 1st Edition, Rev. D...
- Page 115 V41200 is the word memory reference for discrete bits SP0 through SP17, therefore, it’s alias is VSP0. V41201 is the word memory reference for discrete bits SP20 through SP37,therefore, its alias is VSP20. 3-37 D4-454 PLC User Manual, 1st Edition, Rev. D...
- Page 116 V40520 V40421 V40521 V40422 V40522 V40423 V40523 V40424 V40524 V40425 V40525 V40426 V40526 V40427 V40527 V40430 V40530 V40431 V40531 V40432 V40532 V40433 V40533 V40434 V40534 V40435 V40535 V40436 V40536 V40437 V40537 3-38 D4-454 PLC User Manual, 1st Edition, Rev. D...
- Page 117 1754 1753 1752 1751 1750 1747 1746 1745 1744 1743 1742 1741 1740 V40477 V40577 1777 1776 1775 1774 1773 1772 1771 1770 1767 1766 1765 1764 1763 1762 1761 1760 3-39 D4-454 PLC User Manual, 1st Edition, Rev. D...
- Page 118 V40601 V40602 V40603 V40604 V40605 V40606 V40607 V40610 V40611 V40612 V40613 V40614 V40615 V40616 V40617 V40620 V40621 V40622 V40623 V40624 V40625 V40626 V40627 V40630 V40631 V40632 V40633 V40634 V40635 V40636 V40637 3-40 D4-454 PLC User Manual, 1st Edition, Rev. D...
- Page 119 1754 1753 1752 1751 1750 1747 1746 1745 1744 1743 1742 1741 1740 V40676 1777 1776 1775 1774 1773 1772 1771 1770 1767 1766 1765 1764 1763 1762 1761 1760 V40677 3-41 D4-454 PLC User Manual, 1st Edition, Rev. D...
- Page 120 2754 2753 2752 2751 2750 2747 2746 2745 2744 2743 2742 2741 2740 V40736 2777 2776 2775 2774 2773 2772 2771 2770 2767 2766 2765 2764 2763 2762 2761 2760 V40737 3-42 D4-454 PLC User Manual, 1st Edition, Rev. D...
- Page 121 3754 3753 3752 3751 3750 3747 3746 3745 3744 3743 3742 3741 3740 V40776 3777 3776 3775 3774 3773 3772 3771 3770 3767 3766 3765 3764 3763 3762 3761 3760 V40777 3-43 D4-454 PLC User Manual, 1st Edition, Rev. D...
- Page 122 V41110 V41111 V41112 V41113 V41114 V41115 V41116 V41117 This portion of the table shows additional Counter contacts available with the D4-454. Counter Address V41150 V41151 V41152 V41153 V41154 V41155 V41156 V41157 3-44 D4-454 PLC User Manual, 1st Edition, Rev. D...
- Page 123 V40220 V40021 V40221 V40022 V40222 V40023 V40223 V40024 V40224 V40025 V40225 V40026 V40226 V40027 V40227 V40030 V40230 V40031 V40231 V40032 V40232 V40033 V40233 V40034 V40234 V40035 V40235 V40036 V40236 V40037 V40237 3-45 D4-454 PLC User Manual, 1st Edition, Rev. D...
- Page 124 1752 1751 1750 1747 1746 1745 1744 1743 1742 1741 1740 V40076 V40276 1777 1776 1775 1774 1773 1772 1771 1770 1767 1766 1765 1764 1763 1762 1761 1760 V40077 V40277 3-46 D4-454 PLC User Manual, 1st Edition, Rev. D...
- Page 125 2752 2751 2750 2747 2746 2745 2744 2743 2742 2741 2740 V40136 V40336 2777 2776 2775 2774 2773 2772 2771 2770 2767 2766 2765 2764 2763 2762 2761 2760 V40137 V40337 3-47 D4-454 PLC User Manual, 1st Edition, Rev. D...
- Page 126 3752 3751 3750 3747 3746 3745 3744 3743 3742 3741 3740 V40176 V40376 3777 3776 3775 3774 3773 3772 3771 3770 3767 3766 3765 3764 3763 3762 3761 3760 V40177 V40377 3-48 D4-454 PLC User Manual, 1st Edition, Rev. D...
- Page 127 V41001 V41002 V41003 V41004 V41005 V41006 V41007 V41010 V41011 V41012 V41013 V41014 V41015 V41016 V41017 V41020 V41021 V41022 V41023 V41024 V41025 V41026 V41027 V41030 V41031 V41032 V41033 V41034 V41035 V41036 V41037 3-49 D4-454 PLC User Manual, 1st Edition, Rev. D...
- Page 128 1754 1753 1752 1751 1750 1747 1746 1745 1744 1743 1742 1741 1740 V41076 1777 1776 1775 1774 1773 1772 1771 1770 1767 1766 1765 1764 1763 1762 1761 1760 V41077 3-50 D4-454 PLC User Manual, 1st Edition, Rev. D...
- Page 129 Chapter Chapter Chapter yStem deSign and configuration In This Chapter... D4-454 System Design Strategies ................4–2 Module Placement and Configuration ..............4–4 Calculating the Power Budget .................. 4–7 Local I/O Expansion ....................4–11 Remote I/O Expansion ..................... 4–12 Network Connections to MODBUS ® and DirectNet ..........4–18 Network Slave Operation ..................
- Page 130 Chapter 4: System Design and Configuration D4-454 System Design Strategies I/O System Configurations The D4-454 PLCs offer the following ways to add networking to the system: • - consists of I/O modules located in the same base as the CPU. Local I/O •...
- Page 131 Chapter 4: System Design and Configuration Network Configurations The D4-454 PLCs offer the following four ways to add I/O modules to the system: Data Communications Module - connects a D4-454 system to devices using the DirectNET protocol, or connects as a slave to a MODBUS network. D4-454 Communications Ports - the D4-454 CPU has 4 built-in communication ports.
- Page 132 Chapter 4: System Design and Configuration Module Placement and Configuration Valid Module/Unit Locations The most commonly used I/O modules for the D4-454 system (AC, DC, AC/DC, Relay and Analog) can be used in any base in your system. The table below lists by category the valid locations for all modules/units in a D4-454 system.
- Page 133 Chapter 4: System Design and Configuration I/O Configuration Methods There are two methods of I/O configuration for the D4-454 CPUs. • - the CPU automatically configures the I/O. It assigns Auto configuration the lowest I/O numbers to the module in slot 0 (the slot next to the CPU), the next set of I/O numbers to the next module in the base, etc.
- Page 134 Chapter 4: System Design and Configuration Removing a Manual Configuration After a manual configuration, the system will automatically retain the new I/O addresses through a power cycle. You can remove (overwrite) any manual configuration changes by simply performing an automatic configuration. The following diagram shows how I/O addresses change after manually configuring a slot.
- Page 135 Chapter 4: System Design and Configuration Calculating the Power Budget Managing your Power Resource As you have seen, the I/O configuration depends on your choice of I/O modules, bases, and I/O location. When determining the types and quantity of I/O modules you will be using in the D4-454 system it is important to remember there is limited amount of power available from the power supply to the system.
- Page 136 Chapter 4: System Design and Configuration External External Current 24V Current Current 24V Current Device Device Required Required Required Required (mA) (mA) (mA) (mA) I/O Bases Analog Modules D4-04B-1 F4-04AD None D4-06B-1 F4-04ADS None D4-08B-1 F4-08AD None DC Input Modules D4-02DA* D4-08ND3S None...
- Page 137 Chapter 4: System Design and Configuration Power Budget Calculation Example The following example shows how to calculate the power budget for the D4-454 system. Auxiliary Power Source Base 0 Module Type 5VDC (mA) 24VDC Output (mA) CPU/ Expansion Unit/ D4-454 3700 Remote Slave Used Slot 0...
- Page 138 Chapter 4: System Design and Configuration Power Budget Calculation Worksheet You may copy and use the following blank chart for your power budget calculations. Auxiliary Power Source Module Type 5VDC (mA) Base (X) 24VDC Output (mA) CPU/ Expansion Unit/ Remote Slave Used Slot 0 Slot 1 Slot 2...
- Page 139 Chapter 4: System Design and Configuration Local I/O Expansion The following I/O base configurations will assist you in understanding the options available in the D4-454 series. Local and expanded bases are the most common and cost effective way of installing I/O. With local and expanded I/O the CPU can automatically configure the I/O for you.
- Page 140 Chapter 4: System Design and Configuration Remote I/O Expansion How to Add Remote I/O Channels Remote I/O is useful for a system that has a sufficient number of sensors and other field devices located a relative long distance away (up to 1000 meters, or 3050 feet) from the more central location of the CPU.
- Page 141 Chapter 4: System Design and Configuration Configuring the CPU’s Remote I/O Channel This section describes how to configure the D4-454 built-in remote I/O channel. Additional information is in the Remote I/O manual, D4-REMIO-M, which you will need in configuring the Remote slave units on the network. You can use the D4-REMIO-M exclusively when using regular Remote Master and Remote Slave modules for remote I/O in the DL405 system.
- Page 142 For more details and information on Remote I/O link wiring, please refer to the Remote I/O link user manual D4-REMIO-M available for free download from: www.automationdirect.com. 4–14 D4-454 User Manual, 1st Edition, Rev. D...
- Page 143 Chapter 4: System Design and Configuration Configure Remote I/O Slaves After configuring the D4-454 CPUs Port 3 and wiring it to the remote slave(s), use the following checklist to complete the configuration of the remote slaves. Full instructions for these steps are in the Remote I/O manual. Set the baud rate DIP switches to match CPUs Port 3 setting.
- Page 144 Chapter 4: System Design and Configuration Consider the simple system featuring the Remote I/O shown below. The D4-454 built-in Remote I/O channel connects to one slave base, which we will assign a station address = 1. The baud rates on the master and slave will be 38400kB. We can map the remote I/O points as any type of I/O point, simply by choosing the appropriate range of V-memory.
- Page 145 Chapter 4: System Design and Configuration When configuring a Remote I/O channel for fewer than 7 slaves, we must fill the remainder of the table with zeros. This is necessary because the CPU will try to interpret any non-zero number as slave information. We continue our setup program from the previous page by adding a segment which fills the remainder of the table with O37710...
- Page 146 This section describes how to configure the CPU’s built-in networking port for either MODBUS or DirectNET. This will allow you to connect the D4-454 PLC system directly to MODBUS networks using the RTU protocol, or to other devices on a DirectNET network.
- Page 147 NOTE: If the D4-454 is to be used as a MODBUS Master and the distance will be more than 1,000 feet, you can use the MODBUS Network Master module, F4-MAS-MB, and use the RS-485 port. See the module on our website, automationdirect.com for more details. RXD+...
- Page 148 Chapter 4: System Design and Configuration MODBUS Port Configuration In DirectSOFT, choose the PLC menu, then Setup > Secondary Comm Port. • From the port number list box, choose Port 1, 2 or 3. Port: • Click the box to the left of Modbus to select it. The dialog below will Protocol: appear.
- Page 149 Chapter 4: System Design and Configuration DirectNET Port Configuration In DirectSOFT, choose the PLC menu, then Setup > Secondary Comm Port. • From the port number list box, choose Port 1, 2 or 3. Port: • Click the box to the left of DirectNET to select it. The dialog below Protocol: will appear.
- Page 150 Chapter 4: System Design and Configuration Network Slave Operation This section describes how other devices on a network can communicate with a CPU port that you have configured as a DirectNET slave or MODBUS slave. A MODBUS host must use the MODBUS RTU protocol to communicate with the D4-454 as a slave. The host software must send a MODBUS function code and MODBUS address to specify a PLC memory location the D4-454 comprehends.
- Page 151 Chapter 4: System Design and Configuration MODBUS Data Types Supported The memory types in a D4-454 system include X input, Y output, C control relay, V-memory data registers, etc. MODBUS uses differently named data types. So, you will need to determine which MODBUS data types corresponds to any desired PLC memory location by using the cross-reference table below.
- Page 152 Chapter 4: System Design and Configuration PLC Range MODBUS Address MODBUS D4-454 Memory Type (Decimal) (Octal) Range (Decimal) Data Type For Discrete Data Types Convert PLC Address to Decimal + Start of Range + Data Inputs (X) 1024 X0 – X1777 2048 –...
- Page 153 Chapter 4: System Design and Configuration Example 3: T10 Current Value Find the MODBUS address to obtain the current value from Timer T10. 1. Find Timer Current Values in the table. PLC Address (Dec.) + Data Type 2. Convert T10 into decimal (8). T10 = 8 decimal 3.
- Page 154 – 44097 * Modbus Function 04 NOTE: For an automated MODBUS/KOYO address conversion utility, go to our website, www.automationdirect.com, and download the EXCEL file: modbus_conversion.xls located at: Tech Support > Technical and Application Notes > AN-MISC-010. Example 1: V2100 584/984 Mode Find the MODBUS address for User V location V2100.
- Page 155 Chapter 4: System Design and Configuration Example 2: Y20 584/984 Mode Find the MODBUS address for output Y20. PLC Addr. (Dec.) + Start Address + Mode 1. Find Y outputs in the table. 2. Convert Y20 into decimal (16). Y20 = 16 decimal 3.
- Page 156 Chapter 4: System Design and Configuration Network Master Operation This section describes how the D4-454 can communicate on a MODBUS or DirectNET network as a master. For MODBUS networks, it uses the MODBUS RTU protocol, which must be interpreted by all the slaves on the network. Both MODBUS and DirectNet are single master/multiple slave networks.
- Page 157 Chapter 4: System Design and Configuration Step 1: Identify Master Port # and Slave The first Load (LD) instruction identifies the communications port number on the Slave address (BCD) network master (D4-454) and the address of Port number (BCD) the slave station. This instruction can address Internal port (hex) up to 99 MODBUS slaves, or 90 DirectNET slaves.
- Page 158 Chapter 4: System Design and Configuration Step 3: Specify Master Memory Area (octal) The third instruction in the RX or WX sequence is a Load Address (LDA) instruction. Its purpose is to load the starting address of the memory area Starting address of to be transferred.
- Page 159 Chapter 4: System Design and Configuration Step 4: Specify Slave Memory Area The last instruction in our sequence is the WX or RX instruction itself. Use WX to write to the slave, and RX to read from the slave. All four of our instructions are shown to the right. In the last instruction, you must specify the starting address and a valid data type for the slave.
- Page 160 Chapter 4: System Design and Configuration Multiple Read and Write Interlocks If you are using multiple reads and writes in the RLL program, you have to interlock the routines to make sure all the routines are executed. If you don’t use the interlocks, then the CPU will only execute the first routine.
- Page 161 Chapter Chapter Chapter tandard nStructIonS In This Chapter... Introduction ....................... 5-2 Using Boolean Instructions ..................5-5 Boolean Instructions ....................5-10 Comparative Boolean ....................5-25 Immediate Instructions ................... 5-31 Timer, Counter and Shift Register Instructions ............5-38 Accumulator/Stack Load and Output Data Instructions ........5-51 Logical Instructions (Accumulator) .................
- Page 162 5 – 15 Disable Interrupts (DISI) 5 – 186 And Not (ANDN) 5 – 30 Divide (DIV) 5 – 95 And Not Immediate (ANDNI) 5 – 32 Divide Binary (DIVB) 5 – 104 D4-454 PLC User Manual, 1st Edition, Rev. D...
- Page 163 Or Positive Differential (ORPD) 5 – 21 Load Immediate (LDI) 5 – 36 Or Store (ORSTR) 5 – 16 Load Immediate Formatted (LDIF) 5 – 37 Or with Stack (ORS) 5 – 76 D4-454 PLC User Manual, 1st Edition, Rev. D...
- Page 164 Up Down Counter (UDC) 5 – 48 Shuffle Digits (SFLDGT) 5 – 139 Write to Intelligent I/O Module (WT) 5 – 197 Sine Real (SINR) 5 – 118 Write to Network (WX) 5 – 200 D4-454 PLC User Manual, 1st Edition, Rev. D...
- Page 165 Store or, STR instruction. The output point is represented by the Output or, OUT instruction. The following example shows how to enter a single contact and a single output coil. D4-454 PLC User Manual, 1st Edition, Rev. D...
- Page 166 Sometimes, it is necessary to use midline outputs to get additional outputs that are conditional on other contacts. The following example shows how you can use the AND instruction to continue a rung with more conditional outputs. D4-454 PLC User Manual, 1st Edition, Rev. D...
- Page 167 Combination Networks You can combine the various types of series and parallel branches to solve almost any application problem. The following example shows a simple combination network. D4-454 PLC User Manual, 1st Edition, Rev. D...
- Page 168 X4 AND {X1 or (X2 AND X3)} NOT X5 OR X4 AND {X1 OR (X2 AND X3)} STR X0 STR X0 STR X0 ANDSTR XO AND (NOT X5 or X4) AND {X1 or (X2 AND X3)} D4-454 PLC User Manual, 1st Edition, Rev. D...
- Page 169 Immediate instruction does not use the input image register, but instead reads Solve the Application Program the status from the module immediately. I/O Point X0 Changes Write Outputs Write Outputs to Specialty I/O Diagnostics D4-454 PLC User Manual, 1st Edition, Rev. D...
- Page 170 Special Relay In the following Store example, when input X1 is on, output Y2 will energize. In the following Store Not example, when input X1 is off output Y2 will energize. 5-10 D4-454 PLC User Manual, 1st Edition, Rev. D...
- Page 171 When bit 12 of V-memory location V1400 is on, output Y2 will energize. B1400.12 In the following Store Not Bit-of-Word example, when bit 12 of V-memory location V1400 is off, output Y2 will energize. B1400.12 5-11 D4-454 PLC User Manual, 1st Edition, Rev. D...
- Page 172 In the following Or example, when input X1 or X2 is on, output Y5 will energize. In the following Or Not example, when input X1 is on or X2 is off, output Y5 will energize. 5-12 D4-454 PLC User Manual, 1st Edition, Rev. D...
- Page 173 In the following Or Bit-of-Word example, when input X1 or bit 7 of V1400 is on, output Y5 will energize. B1400.7 In the following Or Bit-of-Word example, when input X1 is on or bit 7 of V1400 is off, output Y7 will energize. B1400.7 5-13 D4-454 PLC User Manual, 1st Edition, Rev. D...
- Page 174 In the following And example, when input X1 and X2 are on output Y5 will energize. In the following And Not example, when input X1 is on and X2 is off output Y5 will energize. 5-14 D4-454 PLC User Manual, 1st Edition, Rev. D...
- Page 175 In the following And Bit-of-Word example, when input X1 and bit 4 of V1400 is on output Y5 will energize. B1400.4 In the following And Not Bit-of-Word example, when input X1 is on and bit 4 of V1400 is off output Y5 will energize. B1400.4 5-15 D4-454 PLC User Manual, 1st Edition, Rev. D...
- Page 176 X1. In the following OR Store example, the branch consisting of X1 and X2 have been OR’d with the branch consisting of X3 and X4. 5-16 D4-454 PLC User Manual, 1st Edition, Rev. D...
- Page 177 D4-454 Range Inputs 0 – 1777 Outputs 0 – 1777 Control Relays 0 – 3777 In the following example, when X1 or X4 is on, Y2 will energize. OR OUT OR OUT 5-17 D4-454 PLC User Manual, 1st Edition, Rev. D...
- Page 178 X1 will override the logic state controlled by X0. To avoid this situation, multiple outputs using the same location must not be used in programming. B1400.3 B1400.3 5-18 D4-454 PLC User Manual, 1st Edition, Rev. D...
- Page 179 In the following example, every time X1 makes an Off-to-On transition, C0 will energize for one scan. Operand Data Type D4-454 Range Inputs 0 – 1777 Outputs 0 – 1777 Control Relays 0 – 3777 5-19 D4-454 PLC User Manual, 1st Edition, Rev. D...
- Page 180 In the following example, each time X1 makes an Off-to-On transition, Y4 will energize for one scan. In the following example, each time X1 makes an On-to-Off transition, Y4 will energize for one scan. 5-20 D4-454 PLC User Manual, 1st Edition, Rev. D...
- Page 181 In the following example, Y5 will energize whenever X1 is on, or for one CPU scan when X2 transitions from Off to On. In the following example, Y5 will energize whenever X1 is on, or for one CPU scan when X2 transitions from On to Off. 5-21 D4-454 PLC User Manual, 1st Edition, Rev. D...
- Page 182 In the following example, Y5 will energize for one CPU scan whenever X1 is on and X2 transitions from Off to On. In the following example, Y5 will energize for one CPU scan whenever X1 is on and X2 transitions from On to Off. 5-22 D4-454 PLC User Manual, 1st Edition, Rev. D...
- Page 183 0 – 377 In the following example when X1 is on, Y2 through Y5 will energize. In the following example when X2 is on, Y2 through Y5 will be reset or de-energized. 5-23 D4-454 PLC User Manual, 1st Edition, Rev. D...
- Page 184 In the following example, when X1 turns on, bit 1 in V1400 is set to the on state. B1400.1 In the following example, when X2 turns on, bit 1 in V1400 is reset to the off state. B1400.1 5-24 D4-454 PLC User Manual, 1st Edition, Rev. D...
- Page 185 In the following example, when the BCD value in V-memory location V2000 is equal to 4933, Y3 will energize. V2000 K4933 In the following example, when the BCD value in V-memory location V2000 does not equal 5060, Y3 will energize. V2000 K5060 5-25 D4-454 PLC User Manual, 1st Edition, Rev. D...
- Page 186 V2002 K2500 In the following example, when the BCD value in V-memory location V2000 is equal to 3916 or V2002 does not equal 2500, Y3 will energize V2000 K3916 V2002 K2500 5-26 D4-454 PLC User Manual, 1st Edition, Rev. D...
- Page 187 In the following example, when the BCD value in V-memory location V2000 is equal to V2000 K5000 V2002 K2345 5000 and V2002 does not equal 2345, Y3 will energize. V2000 K5000 V2002 K2345 5-27 D4-454 PLC User Manual, 1st Edition, Rev. D...
- Page 188 In the following example, when the BCD value in V-memory location V2000 is equal to or greater than 1000, Y3 will energize. V2000 K1000 In the following example, when the value in V-memory location V2000 is less than 4050, Y3 will energize. V2000 K4050 5-28 D4-454 PLC User Manual, 1st Edition, Rev. D...
- Page 189 V2002 K2345 In the following example when the BCD value in V-memory location V2000 is equal to 1000 or V2002 is less than 2500, Y3 will energize. V2000 K1000 V2002 K2500 5-29 D4-454 PLC User Manual, 1st Edition, Rev. D...
- Page 190 K5000 V2002 K2345 In the following example, when the value in V-memory location V2000 is equal to 7000 and V2002 is less than 2500, Y3 will energize. V2000 K7000 V2002 K2500 5-30 D4-454 PLC User Manual, 1st Edition, Rev. D...
- Page 191 The Or Not Immediate connects two contacts in parallel. The status of the contact will be opposite the status of the associated input point at the time the instruction is executed. The image register is not updated. 5-31 D4-454 PLC User Manual, 1st Edition, Rev. D...
- Page 192 Inputs 0 –1777 In the following example, when X1 and X2 are on, Y5 will energize. In the following example, when X1 is on and X2 is off, Y5 will energize. 5-32 D4-454 PLC User Manual, 1st Edition, Rev. D...
- Page 193 In the following example, when X1 is on, output point Y2 on the output module will turn on. . OUTI In the following example, when X1 or X4 is on, Y2 will energize. OR OUTI OR OUTI 5-33 D4-454 PLC User Manual, 1st Edition, Rev. D...
- Page 194 31 30 29 28 27 26 25 24 23 22 21 20 19 18 17 16 31 30 29 28 27 26 25 24 23 22 21 20 19 18 17 16 15 14 13 12 11 10 9 7 6 5 Acc. Constant Location 5-34 D4-454 PLC User Manual, 1st Edition, Rev. D...
- Page 195 In the following example, when X1 is on, Y2 through Y5 will be set (on) for the corresponding output points. SETI In the following example, when X1 is on, Y5 through Y22 will be reset (off) for the corresponding output module(s). RSTI 5-35 D4-454 PLC User Manual, 1st Edition, Rev. D...
- Page 196 31 30 29 28 27 26 25 24 23 22 21 20 19 18 17 16 31 30 29 28 27 26 25 24 23 22 21 20 19 18 17 16 15 14 13 12 11 10 9 7 6 5 Acc. Location V40502 5-36 D4-454 PLC User Manual, 1st Edition, Rev. D...
- Page 197 31 30 29 28 27 26 25 24 23 22 21 20 19 18 17 16 31 30 29 28 27 26 25 24 23 22 21 20 19 18 17 16 15 14 13 12 11 10 9 7 6 5 Acc. Location Constant 5-37 D4-454 PLC User Manual, 1st Edition, Rev. D...
- Page 198 Value 1/10 Seconds NOTE: Decimal points are not used in these timers, but the decimal point is implied. The preset and current value for all four timers is in BCD format. 5-38 D4-454 PLC User Manual, 1st Edition, Rev. D...
- Page 199 You can perform functions when the timer reaches the specified preset using the discrete status bit. Or, use comparative contacts to perform functions at different time intervals, based on one timer. The examples on the following page show these two methods of programming timers. 5-39 D4-454 PLC User Manual, 1st Edition, Rev. D...
- Page 200 When X1 is turned off, the timer will be reset to 0 and the comparative contacts will turn off Y3, Y4, and Y5. Timing Diagram Seconds TA20 TA20 TA20 Current Value 1/10th Seconds 5-40 D4-454 PLC User Manual, 1st Edition, Rev. D...
- Page 201 V /T** 0 – 377 NOTE: The DirectSOFT programming software uses separate references, such as “T2” for discrete status bit for Timer T2, and “TA2” for the current value of Timer T2. 5-41 D4-454 PLC User Manual, 1st Edition, Rev. D...
- Page 202 Comparative contacts are used to energized Y3, Y4, and Y5 at one second intervals respectively. The comparative contacts will turn off when the timer is reset. Timing Diagram Seconds Current Value 5-42 D4-454 PLC User Manual, 1st Edition, Rev. D...
- Page 203 The maximum count value is 9999. The timing diagram below shows the relationship between the counter input, associated discrete bit, current value, counter preset and reset instruction. SGCNT Current Counter preset Value Counts 5-43 D4-454 PLC User Manual, 1st Edition, Rev. D...
- Page 204 NOTE: *May be non-volatile if MOV instruction is used. * DirectSOFT programming software uses separate references, such as “CT2” for discrete status bit for Counter CT2, and “CTA2” for the current value of Counter CT2. 5-44 D4-454 PLC User Manual, 1st Edition, Rev. D...
- Page 205 When the reset C10 turns on, the counter status bit will turn off and the counter current value will be 0, and the comparative contacts will turn off. Counting diagram CTA2 CTA2 Current Value CTA2 5-45 D4-454 PLC User Manual, 1st Edition, Rev. D...
- Page 206 Counter current values V /CT** 1000-1377 NOTE: The DirectSOFT programming software uses separate references, such as “CT2” for discrete status bit for Counter CT2, and “CTA2” for the current value of Counter CT2. 5-46 D4-454 PLC User Manual, 1st Edition, Rev. D...
- Page 207 Reset instruction, the counter status bit will turn off and the current value will be 0. The current value for counter CT2 will be held in V-memory location V1002 (CTA2). Counting diagram SGCNT CTA2 CTA2 Current CTA2 Value 5-47 D4-454 PLC User Manual, 1st Edition, Rev. D...
- Page 208 Counter current values V /CT** 1000-1377 NOTE: The DirectSOFT programming software uses separate references, such as “CT2” for discrete status bit for Counter CT2, and “CTA2” for the current value of Counter CT2. 5-48 D4-454 PLC User Manual, 1st Edition, Rev. D...
- Page 209 When the reset (X3) turns on, the counter status bit will turn off, the current value will be 0, and the comparative contacts will turn off. Counting Diagram V2000 CTA2 CTA2 Current Value 5-49 D4-454 PLC User Manual, 1st Edition, Rev. D...
- Page 210 Control Relay 0 – 3777 0 – 3777 Data Input From Clock Input Reset Input Inputs on Successive Scans Shift Register Bits Data Clock Reset 0-1-0 0-1-0 0-1-0 0-1-0 0-1-0 Indicates 5-50 D4-454 PLC User Manual, 1st Edition, Rev. D...
- Page 211 V2010 and V2011 the most efficient way to perform this function would be as follows: V2001 V2000 V2000 Copy data from V2000 and V2001 to the accumulator Acc. OUTD V2010 Copy data from the accumulator to V2011 V2010 V2010 and V2011 5-51 D4-454 PLC User Manual, 1st Edition, Rev. D...
- Page 212 (V2006 & V2007) V2006 Acc. Add the value in the accumulator with the value in V2006 and V2007 OUTD V2010 V2011 V2010 Copy the value in the accumulator to V2010 and V2011 5-52 D4-454 PLC User Manual, 1st Edition, Rev. D...
- Page 213 POP is executed, the value which was in the accumulator is cleared and the value that was on top of the stack is in the accumulator. The values in the stack are shifted up one position in the stack. 5-53 D4-454 PLC User Manual, 1st Edition, Rev. D...
- Page 214 V713 - V712 Level 5 can read them or use them in comparative boolean V715 - V714 Level 6 instructions, etc. V717 - V716 Level 7 V721 - V720 Level 8 5-54 D4-454 PLC User Manual, 1st Edition, Rev. D...
- Page 215 HEX. 440 HEX. = 2100 Octal which contains the value 2635. V2102 V2000 V2103 Accumulator V2104 V2105 V2200 Copy the data from the lower 16 bits of V2200 the accumulator to V2200. V2201 5-55 D4-454 PLC User Manual, 1st Edition, Rev. D...
- Page 216 2 6 3 5 V2105 X X X X Copy the data from the lower 16 bits of the accumulator to V2200 2 6 3 5 V2200 V 2200 V2201 X X X X 5-56 D4-454 PLC User Manual, 1st Edition, Rev. D...
- Page 217 Load the value in V2000 into bits are set to zero the lower 16 bits of the accumulator Acc. V2010 Copy the value in the lower 16 bits of the accumulator to V2010 V2010 5-57 D4-454 PLC User Manual, 1st Edition, Rev. D...
- Page 218 V2000 V2000 Load the value in V2000 and V2001 into the 32 bit accumulator Acc. OUTD V2011 V2010 V2010 Copy the value in the 32 bit accumulator to V2010 and V2011 5-58 D4-454 PLC User Manual, 1st Edition, Rev. D...
- Page 219 0 0 0 0 0 0 0 0 0 0 0 0 1 1 OUTF Location Constant Y6 Y5 Copy the value from the specified number of bits in the accumulator to Y0 – Y6 5-59 D4-454 PLC User Manual, 1st Edition, Rev. D...
- Page 220 16 bits of the accumulator Acc. V2000 V2000 Copy the value in lower 16 bits of the accumulator to V2000 5-60 D4-454 PLC User Manual, 1st Edition, Rev. D...
- Page 221 Level 4 Acc. V1500 Level 5 The value in V1435 Level 6 Copy the value in the lower is 2345 16 bits of the accumulator Level 7 to V1500 Level 8 V1500 5-61 D4-454 PLC User Manual, 1st Edition, Rev. D...
- Page 222 Copy the value in the lower 16 bits of the accumulator The unused accumulator to V2000 bits are set to zero Acc. DLBL NCON Offset 0 V2000 K3333 NCON Offset 1 K2323 NCON Offset 2 K4549 5-62 D4-454 PLC User Manual, 1st Edition, Rev. D...
- Page 223 V1401. Suppose that now we want to retrieve that number. Just use the Load Real with the V data type, as shown to the right. Next we could perform real math on it, or convert it to a binary V1400 number. 5-63 D4-454 PLC User Manual, 1st Edition, Rev. D...
- Page 224 V2010 and V2011 using the OUTD instruction. V2001 V2000 V2000 Load the value in V2000 and V2001 into the accumulator Acc. OUTD V2010 Copy the value in the accumulator to V2010 and V2011 V2010 V2011 5-64 D4-454 PLC User Manual, 1st Edition, Rev. D...
- Page 225 0 0 0 0 0 0 0 0 0 0 0 0 1 1 OUTF Accumulator Copy the value of the specified number of bits from the accumulator to Y20–Y26 Location Constant Y26 Y25 Y24 Y23 Y22 Y21 Y20 5-65 D4-454 PLC User Manual, 1st Edition, Rev. D...
- Page 226 Level 2 V1525 address of V1500 to yield offset address 1525 the final answer Level 3 (V1500+25) Level 4 Level 5 Level 6 Level 7 Level 8 5-66 D4-454 PLC User Manual, 1st Edition, Rev. D...
- Page 227 V1400 Copy the value in the upper The unused accumulator OUTM 8 bits of the lower 16 bits of bits are set to zero V1500 the accumulator to 1500 Acc. V1500 5-67 D4-454 PLC User Manual, 1st Edition, Rev. D...
- Page 228 Level 1 V2002 Level 2 Level 3 Copy the value in the lower 16 bits of the accumulator to V2002 Level 4 Level 5 V2002 Level 6 Level 7 Level 8 5-68 D4-454 PLC User Manual, 1st Edition, Rev. D...
- Page 229 0 0 0 0 0 0 0 1 0 1 0 0 0 0 0 1 1 1 0 0 0 Acc. V2010 Copy the lower 16 bits of the accumulator to V2010 V2010 5-69 D4-454 PLC User Manual, 1st Edition, Rev. D...
- Page 230 ANDD K36476A38 Acc. AND the value in the AND 36476A38 accumulator with the constant value 36476A38 Acc. OUTD V2010 Copy the value in the V2011 V2010 accumulator to V2010 and V2011 5-70 D4-454 PLC User Manual, 1st Edition, Rev. D...
- Page 231 And the binary bit pattern Acc. (Y20-Y23) with the value in the accumulator AND (Y20-Y23) OUTF Acc. Copy the value in the lower 4 bits in accumulator to C20-C23 Location Constant 5-71 D4-454 PLC User Manual, 1st Edition, Rev. D...
- Page 232 AND the value in the (top of stack) accumulator with the first level of the Acc. accumulator stack OUTD V1500 Copy the value in the accumulator to V1500 V1501 V1500 and 1501 5-72 D4-454 PLC User Manual, 1st Edition, Rev. D...
- Page 233 0 0 0 0 0 0 0 0 0 0 0 0 0 0 0 0 0 1 1 0 0 1 1 Acc. V2010 Copy the value in the lower 16 bits of the accumulator to V2010 V2010 5-73 D4-454 PLC User Manual, 1st Edition, Rev. D...
- Page 234 0 1 1 1 0 1 1 0 0 0 0 0 1 1 1 1 1 0 0 1 1 Acc. OUTD V2010 Copy the value in the accumulator to V2010 and V2011 V2010 V2011 5-74 D4-454 PLC User Manual, 1st Edition, Rev. D...
- Page 235 ON OFF OFF OFF OR (Y20- - Y23) OUTF Acc. Copy the specified number of bits from the accumulator to C20-C23 Location Constant C23 C22 C21 C20 ON ON ON 5-75 D4-454 PLC User Manual, 1st Edition, Rev. D...
- Page 236 31 30 29 28 27 26 25 24 23 22 21 20 19 18 17 16 15 14 13 12 11 10 9 Acc. Acc. 36476A38 OR (top of stack) Acc. V1501 V1500 5-76 D4-454 PLC User Manual, 1st Edition, Rev. D...
- Page 237 0 0 0 0 0 1 0 0 0 0 0 0 0 0 0 0 0 0 0 0 1 0 0 0 0 1 0 0 1 0 Acc. V2010 5-77 D4-454 PLC User Manual, 1st Edition, Rev. D...
- Page 238 1 1 0 0 1 1 0 0 0 0 1 0 0 1 0 0 0 0 1 Acc. V2010 Copy the value in the accumulator to V2010 and V2011 V2011 V2010 5-78 D4-454 PLC User Manual, 1st Edition, Rev. D...
- Page 239 Exclusive OR the binary bit Acc. pattern (Y20-Y23) with the value in the accumulator XORF (Y20-Y23) OUTF Acc. Copy the specified number of bits from the accumulator to C20-C23 Location Constant 5-79 D4-454 PLC User Manual, 1st Edition, Rev. D...
- Page 240 XOR (1st level of Stack) with the value in the first level of the Acc. accumulator stack OUTD V1500 Copy the value in the accumulator to V1500 and V1501 V1501 V1500 5-80 D4-454 PLC User Manual, 1st Edition, Rev. D...
- Page 241 4526 into the lower 16 bits of bits are set to zero the accumulator Acc. Compared with V2000 Compare the value in the V2000 accumulator with the value in V2000 SP60 5-81 D4-454 PLC User Manual, 1st Edition, Rev. D...
- Page 242 Load the value in V2000 and V2001 into the accumulator Acc. CMPD Compared with V2010 Compare the value in the accumulator with the value in V2010 and V2011 V2011 V2010 SP60 5-82 D4-454 PLC User Manual, 1st Edition, Rev. D...
- Page 243 The unused accumulator bits are set to zero Compare the value in the CMPF accumulator with the value of the specified discrete Acc. location (Y20- - Y23) Compared SP60 with 5-83 D4-454 PLC User Manual, 1st Edition, Rev. D...
- Page 244 V1411 into the accumulator V1410 Compare the value in the V1411 V1410 CMPS accumulator with the value in the first level of the accumulator stack SP60 Acc. 5 Compared with Top of Stack 5-84 D4-454 PLC User Manual, 1st Edition, Rev. D...
- Page 245 (special relay SP62), turning on control relay Load the real number representation for decimal 7 R7.0 into the accumulator Acc. Compare the value with the CMPR real number representation R6.0 for decimal 6 CMPR SP62 5-85 D4-454 PLC User Manual, 1st Edition, Rev. D...
- Page 246 Add the value in the lower 16 bits of the accumulator with the value in V2006 V2010 Copy the value in the lower V2010 16 bits of the accumulator to V2010 5-86 D4-454 PLC User Manual, 1st Edition, Rev. D...
- Page 247 (V2006 and V2007) V2006 Acc. Add the value in the accumulator with the value in V2006 and V2007 OUTD V2010 V2001 V2010 Copy the value in the accumulator to V2010 and V2011 5-87 D4-454 PLC User Manual, 1st Edition, Rev. D...
- Page 248 ADDR R15.0 Add the real number 15.0 to the accumulator contents, which is in real number format. OUTD V1400 Copy the result in the accumulator to V1400 and V1401. 5-88 D4-454 PLC User Manual, 1st Edition, Rev. D...
- Page 249 Subtract the value in V2006 from the value in the lower 16 bits of the accumulator V2010 V2010 Copy the value in the lower 16 bits of the accumulator to V2010 5-89 D4-454 PLC User Manual, 1st Edition, Rev. D...
- Page 250 V2001 into the accumulator SUBD V2006 ACC. The in V2006 and V2007 is subtracted from the value in the accumulator OUTD V2010 V2011 V2010 Copy the value in the accumulator to V2010 and V2011 5-90 D4-454 PLC User Manual, 1st Edition, Rev. D...
- Page 251 V1400 and V1401. Exponent (8 bits) 128 + 1 = 129 1.11 x 2 (exp 2) = 111. binary= 7 decimal 129 - - 127 = 2 Implies 2 (exp 2) 5-91 D4-454 PLC User Manual, 1st Edition, Rev. D...
- Page 252 (Accumulator) accumulator (V2006) Acc. V2006 The value in V2006 is multiplied by the value in the accumulator OUTD V2011 V2010 V2010 Copy the value in the accumulator to V2010 and V2011 5-92 D4-454 PLC User Manual, 1st Edition, Rev. D...
- Page 253 Multiply the accumulator MULD contents (2) by the V1403 V1402 V1400 8-digit number in V1400 and V1401. Move the result in the OUTD accumulator to V1402 V1402 and V1403 using the OUTD instruction. 5-93 D4-454 PLC User Manual, 1st Edition, Rev. D...
- Page 254 V1400 and V1401. Mantissa (23 bits) 128 + 4 + 1 = 133 1.101001 x 2 (exp 6) = 1101001. binary= 105 decimal 133 - - 127 = 6 Implies 2 (exp 6) 5-94 D4-454 PLC User Manual, 1st Edition, Rev. D...
- Page 255 The value in the First stak location contains accumulator is divided by the remainder the value in V2006 V2010 V2010 Copy the value in the lower 16 bits of the accumulator to V2010 5-95 D4-454 PLC User Manual, 1st Edition, Rev. D...
- Page 256 V1420 and V1421 OUTD V1500 V1501 V1500 Copy the value in the accumulator to V1500 and V1501 Retrieve the remainder OUTD V1502 Copy the value into V1502 and V1503 5-96 D4-454 PLC User Manual, 1st Edition, Rev. D...
- Page 257 64 + 32 + 16 + 8 + 4 + 2 + 1 = 127 1.1 x 2 (exp 0) = 1.1 binary= 1.5 decimal 127 - - 127 = 0 Implies 2 (exp 0) 5-97 D4-454 PLC User Manual, 1st Edition, Rev. D...
- Page 258 Increment the value in V1400 In the following decrement example, when C5 makes an Off-to-On transition the value in V1400 is decreased by one. V1400 V1400 Decrement the value in V1400 by “1” V1400 5-98 D4-454 PLC User Manual, 1st Edition, Rev. D...
- Page 259 The binary value in the accumulator is added to the binary value in V1420 OUTD V1500 V1500 Copy the value in the lower 16bits of the accumulator to V1500 and V1501 5-99 D4-454 PLC User Manual, 1st Edition, Rev. D...
- Page 260 Acc. V1420 The binary value in the accumulator is added with the value in V1420 and V1421 OUTD V1501 V1500 V1500 Copy the value in the accumulator to V1500 and V1501 5-100 D4-454 PLC User Manual, 1st Edition, Rev. D...
- Page 261 (Accumulator) The binary value in V1420 is (V1420) subtracted from the value in the accumulator Acc. V1500 Copy the value in the lower 16 bits of the accumulator to V1500 V1500 5-101 D4-454 PLC User Manual, 1st Edition, Rev. D...
- Page 262 Acc. The binary value in V1420 and V1421 is subtracted from the binary value in the accumulator OUTD V1500 V1501 V1500 Copy the value in the accumulator to V1500 and V1501 5-102 D4-454 PLC User Manual, 1st Edition, Rev. D...
- Page 263 (V1420) V1420 Acc. The binary value in V1420 is multiplied by the binary value in the accumulator OUTD V1500 Copy the value of the accumulator V1501 V1500 to V1500 and V1501 5-103 D4-454 PLC User Manual, 1st Edition, Rev. D...
- Page 264 The binary value in th accumulator is divided by First stack location contains the binary value in V1420 the remainder V1500 Copy the value in the lower 16 V1500 bits of the accumulator to V1500 5-104 D4-454 PLC User Manual, 1st Edition, Rev. D...
- Page 265 NOTE: Status flags are valid only until another instruction uses the same flag. In the following example when C5 is on, the value in V2000 is decreased by 1. V2000 DECB V2000 Decrement the binary value V2000 in V2000 by“1” 5-105 D4-454 PLC User Manual, 1st Edition, Rev. D...
- Page 266 Add the BCD value in the ADDF accumulator with the value (C0-C3) represented by discrete location C0–C3 Acc. Copy the lower 4 bits of the OUTF accumulator to discrete locations Y10–Y13 5-106 D4-454 PLC User Manual, 1st Edition, Rev. D...
- Page 267 Subtract the BCD value SUBF represented by C0-C3 from (C0- - C3) the value in the accumulator ACC. Copy the lower 4 bits of the OUTF accumulator to discrete locations Y10- - Y13 5-107 D4-454 PLC User Manual, 1st Edition, Rev. D...
- Page 268 MULF accumulator with the value represented by discrete (C0- - C3) locations C0- - C3 Acc. Copy the lower 4 bits of the OUTF accumulator to discrete locations Y10- - Y13 5-108 D4-454 PLC User Manual, 1st Edition, Rev. D...
- Page 269 (C0- - C3) represented by discrete location C0- - C3 Acc. First stack location contains Copy the lower 4 bits of the OUTF the remainder accumulator to discrete locations Y10- - Y13 5-109 D4-454 PLC User Manual, 1st Edition, Rev. D...
- Page 270 C opy the value in the OU T D accumulator to V1500 Level 2 V1500 and V1501 Level 3 Level 4 V1501 V1500 Level 5 Level 6 Level 7 Level 8 5-110 D4-454 PLC User Manual, 1st Edition, Rev. D...
- Page 271 2nd LDD Copy the value in the OUTD Level 1 accumulator to V1500 V1500 and V1501 Level 2 Level 3 Level 4 V1501 V1500 Level 5 Level 6 Level 7 Level 8 5-111 D4-454 PLC User Manual, 1st Edition, Rev. D...
- Page 272 2nd LDD Copy the value in the Level 1 OUTD accumulator to V1500 Level 2 V1500 and V1501 Level 3 V1501 V1500 Level 4 Level 5 Level 6 Level 7 Level 8 5-112 D4-454 PLC User Manual, 1st Edition, Rev. D...
- Page 273 Level 6 V1501 V1500 Level 7 Level 8 The remainder resides in the first stack location Level 1 Level 2 Level 3 Level 4 Level 5 Level 6 Level 7 Level 8 5-113 D4-454 PLC User Manual, 1st Edition, Rev. D...
- Page 274 Level 1 C opy the value in the OU T D accumulator to V1500 Level 2 V1500 and V1501 Level 3 Level 4 Level 5 Level 6 Level 7 Level 8 5-114 D4-454 PLC User Manual, 1st Edition, Rev. D...
- Page 275 2nd LDD Level 1 Copy the value in the OUTD accumulator to V1500 Level 2 V1500 and V1501 Level 3 V1501 V1500 Level 4 Level 5 Level 6 Level 7 Level 8 5-115 D4-454 PLC User Manual, 1st Edition, Rev. D...
- Page 276 Level 1 Level 2 Copy the value in the OUTD Level 3 accumulator to V1500 V1500 and V1501 Level 4 V1501 V1500 Level 5 Level 6 Level 7 Level 8 5-116 D4-454 PLC User Manual, 1st Edition, Rev. D...
- Page 277 V1500 and V1501 V1501 V1500 Level 8 The remainder resides in the first stack location Level 1 Level 2 Level 3 Level 4 Level 5 Level 6 Level 7 Level 8 5-117 D4-454 PLC User Manual, 1st Edition, Rev. D...
- Page 278 The Arc Sine Real instruction takes the inverse sine of the real number stored in the accumulator. The result resides in the accumulator. Both the original number and the result must be Real data type (IEEE floating point format). AS INR 5-118 D4-454 PLC User Manual, 1st Edition, Rev. D...
- Page 279 Take the sine of the number in SINR 0.7071067 the accumulator, which is in radians. Copy the value in the OUTD 0.7071067 accumulator to V2000 V2000 and V2001. 5-119 D4-454 PLC User Manual, 1st Edition, Rev. D...
- Page 280 0 0 1 0 1 1 Acc. Sum the number of bits in the accumulator set to “1” V1500 V1500 Copy the value in the lower 16 bits of the accumulator to V1500 5-120 D4-454 PLC User Manual, 1st Edition, Rev. D...
- Page 281 0 0 0 0 0 1 0 0 0 0 0 0 1 0 0 0 1 0 Acc. Copy the value in the accumulator to V2010 and V2011 V2011 V2010 5-121 D4-454 PLC User Manual, 1st Edition, Rev. D...
- Page 282 0 0 0 0 0 1 0 0 1 1 0 0 0 1 0 0 0 0 0 0 OUTD V2010 Copy the value in the accumulator to V2010 and V2011 V2011 V2010 5-122 D4-454 PLC User Manual, 1st Edition, Rev. D...
- Page 283 The bit pattern in the accumulator is rotated 2 bit positions to the left OUTD V1500 Acc. Copy the value in the accumulator to V1500 and V1501 9 C 1 4 V1500 V1501 5-123 D4-454 PLC User Manual, 1st Edition, Rev. D...
- Page 284 0 1 0 1 1 0 0 1 1 1 0 0 0 0 0 1 0 1 0 0 1 1 0 0 0 1 0 0 0 0 0 0 Acc. accumulator to V1500 and V1501 V1501 V1500 5-124 D4-454 PLC User Manual, 1st Edition, Rev. D...
- Page 285 0 0 1 1 to “1” in the accumulator to a 5 bit binary value V2010 Copy the value in the lower 16 bits of the accumulator to V2010 V2010 Binary value for 12. 5-125 D4-454 PLC User Manual, 1st Edition, Rev. D...
- Page 286 0 0 0 0 0 0 0 1 0 0 0 0 0 0 0 0 0 0 0 pattern in the accumulator and set the corresponding bit position to a “1” 5-126 D4-454 PLC User Manual, 1st Edition, Rev. D...
- Page 287 OU T D V2010 The Binary (HEX) value copied to Copy the binary data in the V2010 V2011 V2010 accumulator to V2010 and V2011 5-127 D4-454 PLC User Manual, 1st Edition, Rev. D...
- Page 288 BCD equivalent value Acc. OUTD V2010 The BCD value Copy the BCD value in the copied to accumulator to V2010 and V2011 V2011 V2010 V2010 and V2011 5-128 D4-454 PLC User Manual, 1st Edition, Rev. D...
- Page 289 1 0 1 1 0 1 0 1 1 1 1 Invert the binary bit pattern in the accumulator OUTD V2011 V2010 V2010 Copy the value in the accumulator to V2010 and V2011 5-129 D4-454 PLC User Manual, 1st Edition, Rev. D...
- Page 290 BC DC PL Acc. Takes a 10’s complement of the value in the accumulator OU T D V2010 V2011 V2010 C opy the value in the accumulator to V2010 and V2011 5-130 D4-454 PLC User Manual, 1st Edition, Rev. D...
- Page 291 Exponent (8 bits) Mantissa (23 bits) Real Number Format OUTD V1500 The real number (HEX) value Copy the real value in the copied to V1500 V1501 V1500 accumulator to V1500 and V1501 5-131 D4-454 PLC User Manual, 1st Edition, Rev. D...
- Page 292 127 + 18 = 145 Binary Value 2 (exp 18) Acc. OUTD V1500 Copy the real value in the V1501 V1500 accumulator to V1500 and V1501 The binary number copied to V1500. 5-132 D4-454 PLC User Manual, 1st Edition, Rev. D...
- Page 293 Take the sine of the number in SINR 0.7071067 the accumulator, which is in radians. Copy the value in the OUTD 0.7071067 accumulator to V2000 V2000 and V2001. 5-133 D4-454 PLC User Manual, 1st Edition, Rev. D...
- Page 294 HEX table (V1600) is specified in the ASCII to HEX instruction. The table below lists valid ASCII values for ATH conversion. ASCII Values Valid for ATH Conversion ASCII Value Hex Value ASCII Value Hex Value 5-134 D4-454 PLC User Manual, 1st Edition, Rev. D...
- Page 295 Helpful Hint: For parameters that require HEX values when referencing memory locations, the LDA instruction can be used to convert an octal address to the HEX equivalent and load the value into the accumulator. 5-135 D4-454 PLC User Manual, 1st Edition, Rev. D...
- Page 296 The conversion is executed V1403 by this instruction. The table below lists valid ASCII values for HTA conversion. ASCII Values Valid for HTA Conversion Hex Value ASCII Value Hex Value ASCII Value 5-136 D4-454 PLC User Manual, 1st Edition, Rev. D...
- Page 297 31 30 29 28 27 26 25 24 23 22 21 20 19 18 17 16 15 14 13 12 11 10 9 Copy the value in the accumulator to Y20- - Y57 Acc. Segment Labels Segment Labels 5-137 D4-454 PLC User Manual, 1st Edition, Rev. D...
- Page 298 Copy the value in the lower Gray Code 16 bits of the accumulator to V2010 0000000000 0000 0000000001 0001 V2010 0000000011 0002 0000000010 0003 0000000110 0004 0000000111 0005 0000000101 0006 0000000100 0007 1000000001 1022 1000000000 1023 5-138 D4-454 PLC User Manual, 1st Edition, Rev. D...
- Page 299 The digits are shuffled and the result resides in the accumulator. Digits to be shuffled (first stack location) Specified order (accumulator) Bit Positions Result (accumulator) 5-139 D4-454 PLC User Manual, 1st Edition, Rev. D...
- Page 300 The result is in the accumulator . OUTD V2010 V2011 V2010 V2011 V2010 V2011 V2010 Copy the value in the accumulator to V2010 and V2011 5-140 D4-454 PLC User Manual, 1st Edition, Rev. D...
- Page 301 O 2000 V2001 V2031 V2002 V2032 Copy the specified table locations to a table V2003 V2033 V2030 beginning at location V2030 V2004 V2034 V2005 V2035 V2006 V2036 V2007 V2037 5-141 D4-454 PLC User Manual, 1st Edition, Rev. D...
- Page 302 When an offset is outside of the source information boundaries, then unknown data values will be transferred into the destination table. 5-142 D4-454 PLC User Manual, 1st Edition, Rev. D...
- Page 303 V2000 is the destination starting address for the data to be copied. ( END ) DLBL NCON K 1234 NCON K 4532 NCON K 6151 NCON K 8845 NCON K 7777 5-143 D4-454 PLC User Manual, 1st Edition, Rev. D...
- Page 304 (1 and 2) were used. Notice how the offset is used for both the data label (source) and the destination table. Also, notice how an improper offset (two in this case can result in unknown values being copied into the destination table. Offset = 1, move 4 words 5-144 D4-454 PLC User Manual, 1st Edition, Rev. D...
- Page 305 Chapter 5: Standard RLL Instructions Offset = 2, move 4 words Since there is no NCON, the CPU does not know where to get the data. Unknown values will be copied into V1405. 5-145 D4-454 PLC User Manual, 1st Edition, Rev. D...
- Page 306 17 + 14 = 34 octal. The following program V3001 shows how to set the bit as shown to a “1”. 7 6 5 4 3 2 1 5-146 D4-454 PLC User Manual, 1st Edition, Rev. D...
- Page 307 Convert octal 3000 to HEX and load the value into the O 3000 accumulator. This is the table beginning. Set bit 34 (octal) in the table SETBIT to a ”1”. O 34 5-147 D4-454 PLC User Manual, 1st Edition, Rev. D...
- Page 308 Convert the octal address 1600 to HEX 380 and load the V1600 O 1600 value into the accumulator V1400 V1601 V1602 Fill the table with the value FILL V1603 in V1400 V1400 V1604 V1605 5-148 D4-454 PLC User Manual, 1st Edition, Rev. D...
- Page 309 Find instruction. If a value is found equal to the search value, the offset (from the starting location of the table) where the value is located will reside in the accumulator. 5-149 D4-454 PLC User Manual, 1st Edition, Rev. D...
- Page 310 LDA instruction can be used to convert an octal address to the HEX equivalent and load the value into the accumulator. NOTE: This instruction does not have an offset, such as the one required for the FIND instruction. 5-150 D4-454 PLC User Manual, 1st Edition, Rev. D...
- Page 311 V1405 found. 9999 was the 2nd location after the start of the V1406 specified table. FDGT V1407 K8989 Find the value in the table greater than the specified value 5-151 D4-454 PLC User Manual, 1st Edition, Rev. D...
- Page 312 The pointer for this instruction starts at 0 and resets when the table length is reached. At first glance it may appear that the pointer should reset to 0. However, it resets to 1, not 0. 5-152 D4-454 PLC User Manual, 1st Edition, Rev. D...
- Page 313 SP56 here is not required, it’s just an optional method. Since Special Relays are reset at the end of the scan, this latch must follow the TTD instruction in the program 5-153 D4-454 PLC User Manual, 1st Edition, Rev. D...
- Page 314 Table Pointer (Resets to 1, not 0) V1400 V1400 V1401 V1401 V1402 V1402 Destination Destination V1403 V1403 V1500 V1500 V1404 V1404 V1405 V1405 SP56 SP56 V1406 V1406 SP56 = OFF SP56 = OFF V1407 V1407 5-154 D4-454 PLC User Manual, 1st Edition, Rev. D...
- Page 315 The pointer for this instruction can be set to start anywhere in the table. It is not set automatically. You must load a value into the pointer somewhere in your program. 5-155 D4-454 PLC User Manual, 1st Edition, Rev. D...
- Page 316 Convert octal 1400 to HEX 300 and load the value into 300 and load the value into the accumulator. This is the the accumulator. This is the table pointer location. table pointer location. 5-156 D4-454 PLC User Manual, 1st Edition, Rev. D...
- Page 317 Destination V1403 V1403 V1500 V1500 V1404 V1404 V1405 V1405 SP56 SP56 V1406 V1406 SP56 = OFF SP56 = ON V1407 V1407 until end of scan or next instruction that uses SP56 5-157 D4-454 PLC User Manual, 1st Edition, Rev. D...
- Page 318 NOTE: Status flags (SPs) are only valid until another instruction that uses the same flag is executed, or the end of the scan. The pointer for this instruction starts at 0 and resets to 1 automatically when the table length is reached. 5-158 D4-454 PLC User Manual, 1st Edition, Rev. D...
- Page 319 (PD) to move one value each time the input contact transitions from low to high. O 1400 Convert octal 1400 to HEX 300 and load the value into the accumulator. This is the starting table location. 5-159 D4-454 PLC User Manual, 1st Edition, Rev. D...
- Page 320 Table Pointer (Resets to 1, not 0) V1400 V1400 V1401 V1401 V1402 V1402 Source Source V1403 V1403 V1500 V1500 V1404 V1404 V1405 V1405 SP56 SP56 V1406 V1406 SP56 = OFF SP56 = OFF V1407 V1407 5-160 D4-454 PLC User Manual, 1st Edition, Rev. D...
- Page 321 The pointer for this instruction can be set to start anywhere in the table. It is not set automatically. You must load a value into the pointer somewhere in your program. 5-161 D4-454 PLC User Manual, 1st Edition, Rev. D...
- Page 322 O 1400 Convert octal 1400 to HEX 300 and load the value into the accumulator. This is the table pointer location. 5-162 D4-454 PLC User Manual, 1st Edition, Rev. D...
- Page 323 2 0 4 6 V1406 2 0 4 6 SP56= OFF SP56 = ON X X X X V1407 X X X X V1407 until end of scan or next instruction that uses SP56 5-163 D4-454 PLC User Manual, 1st Edition, Rev. D...
- Page 324 The pointer for this instruction can be set to start anywhere in the table. It is not set automatically. You must load a value into the pointer somewhere in your program. 5-164 D4-454 PLC User Manual, 1st Edition, Rev. D...
- Page 325 O 1400 value each time the input contact transitions Convert octal 1400 to HEX from low to high. 300 and load the value into the accumulator. This is the starting table location. 5-165 D4-454 PLC User Manual, 1st Edition, Rev. D...
- Page 326 V1403 V1500 V1500 V1404 V1404 V1405 V1405 SP56 SP56 V1406 V1406 SP56 = OFF SP56 = V1407 V1407 until end of scan or next instruction Discard Bucket that uses SP56 3074 5-166 D4-454 PLC User Manual, 1st Edition, Rev. D...
- Page 327 SP 67 will be set if the last bit shifted (just before it is discarded) is a “1”. Operand Data Type D4-454 Range V-memory See memory map 5-167 D4-454 PLC User Manual, 1st Edition, Rev. D...
- Page 328 Convert octal 3000 to HEX and load the value into the accumulator. This is the 0 3000 table beginning. TSHFR Do a table shift right by 12 bits, which is 14 octal. 0 14 5-168 D4-454 PLC User Manual, 1st Edition, Rev. D...
- Page 329 This new table will automatically be the same length as the original table. Operand Data Type D4-454 Range V-memory See memory map 5-169 D4-454 PLC User Manual, 1st Edition, Rev. D...
- Page 330 The ladder program example for the XORMOV is similar K 3333 to the one above for the ORMOV. Just use the XORMOV 1 1 1 1 2 2 2 2 instruction. 5-170 D4-454 PLC User Manual, 1st Edition, Rev. D...
- Page 331 Start Addr. Number Table 1 of words Table 2 Start Addr. Table 3 Number Block of bytes Table n End Addr. 5-171 D4-454 PLC User Manual, 1st Edition, Rev. D...
- Page 332 0 3000 accumulator. This is the table beginning. Swap the contents of the SWAP table in the previous 0 3100 instruction with the one at V3100. 5-172 D4-454 PLC User Manual, 1st Edition, Rev. D...
- Page 333 V2000 and V2001 V2001 V2000 Format DATE V2001 V2000 V2000 Set the date in the CPU using the value in V2000 and 2001 Year Month Day Day of Week 5-173 D4-454 PLC User Manual, 1st Edition, Rev. D...
- Page 334 Copy the Value in the accumulator to V2000 Format V2001 V2000 and V2001 V2001 V2000 TIME V2000 Set the time in the CPU using the value in V2000 and V2001 Hour Minutes Seconds Used 5-174 D4-454 PLC User Manual, 1st Edition, Rev. D...
- Page 335 Run to Program (Stop) mode. This instruction is typically used to stop PLC operation in an error condition. In the following example, when C0 turns on, the CPU will stop operation and switch to the program mode. STOP 5-175 D4-454 PLC User Manual, 1st Edition, Rev. D...
- Page 336 This eliminates the need for the RSTWT instruction. In the following example, the CPU scan timer will be reset to 0 when the RSTWT instruction is executed. See the For/Next instruction for a detailed example. RSTWT 5-176 D4-454 PLC User Manual, 1st Edition, Rev. D...
- Page 337 In the following example, when C7 is on, all the program logic between the GOTO and the corresponding LBL instruction (designated with the same constant Kaaa value) will be skipped. The instructions being skipped will not be executed by the CPU. GOTO 5-177 D4-454 PLC User Manual, 1st Edition, Rev. D...
- Page 338 For / Next loop using the RSTWT instruction. Operand Data Type D4-454 Range V-memory See memory map Constant 1-9999 5-178 D4-454 PLC User Manual, 1st Edition, Rev. D...
- Page 339 Also, The RSTWT instruction is not necessary if the For / Next loop does not extend the scan time beyond the Watch Dog Timer setting. For more information on the Watch Dog Timer, refer to the RSTWT instruction. RSTWT NEXT 5-179 D4-454 PLC User Manual, 1st Edition, Rev. D...
- Page 340 The Subroutine Return Conditional instruction is an optional instruction used with an input contact to implement a conditional return from the subroutine. The Subroutine Return (RT) is still required for termination of the Subroutine. 5-180 D4-454 PLC User Manual, 1st Edition, Rev. D...
- Page 341 CPU will return to the main program at the RTC instruction. If X35 is not on, Y0 – Y17 will be reset to off and the CPU will return to the main body of the program. OUTI OUTI RT C RSTI 5-181 D4-454 PLC User Manual, 1st Edition, Rev. D...
- Page 342 Subroutine Label K3 and the ladder logic in the subroutine will be executed. The CPU will return to the main body of the program after the RT instruction is executed. 5-182 D4-454 PLC User Manual, 1st Edition, Rev. D...
- Page 343 When contact X0 is ON, logic under the first MLS will be executed. When contact X0 and X2 are ON, logic under the second MLS will be executed. The MLR instructions note the end of the Master Control area. 5-183 D4-454 PLC User Manual, 1st Edition, Rev. D...
- Page 344 X0 is on. The logic between the MLS K2 (C) and MLR K1 (D) will function only if input X10 and X0 is on. The last rung is not controlled by either of the MLS coils. 5-184 D4-454 PLC User Manual, 1st Edition, Rev. D...
- Page 345 Enable Interrupts (ENI) The Enable Interrupt instruction is placed in the main ladder program (before the End instruction), enabling the interrupt. The interrupt remains enabled until the program executes a Disable Interrupt instruction. 5-185 D4-454 PLC User Manual, 1st Edition, Rev. D...
- Page 346 For example, Store immediate (STRI), Out of the accumulator immediate (OUTI) and Set immediate (SETI). V737 Copy the value in the lower 16 bits of the accumulator to V737 DISI OUTI OUTI IRTC RSTI 5-186 D4-454 PLC User Manual, 1st Edition, Rev. D...
- Page 347 NCON -- Numeric Constant The next few pages provide details on these instructions. Also, at the end of this section, there are two examples that show how the instructions are used together. 5-187 D4-454 PLC User Manual, 1st Edition, Rev. D...
- Page 348 The NCON use the HEX ASCII equivalent of the text to be displayed. (HEX ASCII for a blank is 20, a 1 is 31, 4 is 34 and 6 is 36). FAULT DLBL ACON A SW NCON K 2031 NCON K 3436 5-188 D4-454 PLC User Manual, 1st Edition, Rev. D...
- Page 349 Two digits can be stored in an NCON K aaa instruction. Operand Data Type D4-454 Range Constant 0-FFFF History (HISTRY) The History instruction stores event history information in HISTRY memory of the PLC. A aaaa 5-189 D4-454 PLC User Manual, 1st Edition, Rev. D...
- Page 350 When X1 is on, turn C0 on for one scan When C0 is on, the fault instruction copies the message built by the ACONs and NCONs following DLBL K1 into the error tables. FAULT DLBL ACON CHECK CLAMP 10 5-190 D4-454 PLC User Manual, 1st Edition, Rev. D...
- Page 351 Data Label Area K1 as the V2003 starting address of the data to be copied. V2004 MOVBLK V2000 V2000 is the destination starting address for the data to be copied. 5-191 D4-454 PLC User Manual, 1st Edition, Rev. D...
- Page 352 Before ending the setup, click the button indicated to send the port configuration to the CPU, and click Close. See Chapter 3 for port wiring information, in order to connect your printer to the D4-454. 5-192 D4-454 PLC User Manual, 1st Edition, Rev. D...
- Page 353 / line feed on the output device. This prepares the printer to print the next line, starting from the left margin. PRINT Print the message to Port 2 when X1 makes an off-to-on transition. “Hello, this is a PLC message.$N” 5-193 D4-454 PLC User Manual, 1st Edition, Rev. D...
- Page 354 ASCII codes for the text from memory. Example: V2000%16 16 characters in V2000 to V2007 are printed. V2000%0 The characters in V2001 to Vxxxx (determined by the number in V2000) will be printed. 5-194 D4-454 PLC User Manual, 1st Edition, Rev. D...
- Page 355 NOTE: You must use the appropriate special relay in conjunction with the PRINT command to ensure the ladder program does not try to PRINT to a port that is still busy from a previous PRINT or WX or RX instruction. 5-195 D4-454 PLC User Manual, 1st Edition, Rev. D...
- Page 356 Address 5 The constant value K0 specifies the starting address in the intelligent module. V1400 is the starting location in the CPU where the specified V1400 data will be stored. 5-196 D4-454 PLC User Manual, 1st Edition, Rev. D...
- Page 357 The constant value K0 specifies the starting address in the intelligent module. V1400 is the starting location in the CPU where the specified V1400 data will be written from. 5-197 D4-454 PLC User Manual, 1st Edition, Rev. D...
- Page 358 0 – 3777 Stage 0 – 1777 Timer 0 – 377 Counter 0 – 377 Special Relay 0 – 777 Global I/O 0 – 377 Program Memory 0 – 7680 (2K program mem.) 5-198 D4-454 PLC User Manual, 1st Edition, Rev. D...
- Page 359 Master CPU where the specified data will be read into V2000 V2000 is the starting location in the for the Slave device where the specified data will be read from 5-199 D4-454 PLC User Manual, 1st Edition, Rev. D...
- Page 360 See memory map Pointer See memory map Inputs 0–1777 Outputs 0–1777 Control Relays 0–3777 Stage 0–1777 Timer 0–377 Counter 0–377 Special Relay 0–777 Global I/O 0–377 Program Memory 0–7680 (2K program mem.) 5-200 D4-454 PLC User Manual, 1st Edition, Rev. D...
- Page 361 Master CPU where the specified data will be read from. V2000 V2000 is the starting location in the for the slave device where the specified data will be written to 5-201 D4-454 PLC User Manual, 1st Edition, Rev. D...
- Page 362 Chapter Chapter Chapter nstructIon rogrammIng In This Chapter... Introduction ....................... 6-2 Step Transitions ......................6-4 Overview of Drum Operation ................... 6-8 Drum Control Techniques ..................6-10 Drum Instructions ....................6-12...
- Page 363 Electronic drums provide the benefits of mechanical drums and more. For example, they have a preset feature that is impossible for mechanical drums: The preset function lets you move from the present step directly to any other step on command! D4-454 PLC User Manual, 1st Edition, Rev. D...
- Page 364 Compare the two, and you will find that they are equivalent. If you can see their equivalence, you are well on your way to understanding drum instruction operation. Step Output D4-454 PLC User Manual, 1st Edition, Rev. D...
- Page 365 Step 2. The outputs change immediately to match the new pattern for Step 2. The drum spends a specific amount of time in each step, given by the formula: Time in step = 0.01 seconds X Timebase x Counts per step D4-454 PLC User Manual, 1st Edition, Rev. D...
- Page 366 The timer increments as long as the event (X0) remains true. When the counts for Step 1 have expired, then the drum moves to Step 2. The outputs change immediately to match the new pattern for Step 2. D4-454 PLC User Manual, 1st Edition, Rev. D...
- Page 367 Counter bit CT10 turns on when the drum cycle is complete, and turns off when the drum is reset. D4-454 PLC User Manual, 1st Edition, Rev. D...
- Page 368 Are transition Timer and/or conditions Event Criteria met? Set Drum Complete Bit CT10 = 1 Complete Outputs: Reset Input Active? Reset Reset Drum Complete Bit CT10 = 0 Go to Preset Step D4-454 PLC User Manual, 1st Edition, Rev. D...
- Page 369 Preset Step – A step number from 1 to 16 that you define (typically is step 1). The drum moves to this step whenever Reset is on, and whenever the CPU first enters run mode. D4-454 PLC User Manual, 1st Edition, Rev. D...
- Page 370 The default option is the retentive case. This means that if you initialize scratchpad V-memory, the memory will be retentive. D4-454 PLC User Manual, 1st Edition, Rev. D...
- Page 371 Drum Complete bit (CT10), and forces the drum to enter the preset step. NOTE: The timing diagram shows all steps using equal time durations. Step times can vary greatly, depending on the counts/step programmed. 6-10 D4-454 PLC User Manual, 1st Edition, Rev. D...
- Page 372 Just use a control relay contact such as C0 for the step transition event. Elsewhere in ladder logic, you may use C0 as an output coil, making it dependent on many other events (contacts). 6-11 D4-454 PLC User Manual, 1st Edition, Rev. D...
- Page 373 0 – 377 Preset Step 1 – 16 Timer base Kcccc 0 – 99.99 seconds Counts per step Kdddd 0 – 9999 Discrete Outputs Fffff X, Y, C, GX, GY See memory map 6-12 D4-454 PLC User Manual, 1st Edition, Rev. D...
- Page 374 Therefore, the duration of step 1 is (25 x 0.1) = 2.5 seconds. In the last rung, the Drum Complete bit (CT10) turns on output Y0 upon completion of the last step (step 10). A drum reset also resets CT10. 6-13 D4-454 PLC User Manual, 1st Edition, Rev. D...
- Page 375 Counts per step Kdddd 0 – 9999 Eeeee X, Y, C, GX, GY, S, T, CT, SP See memory map Event Discrete Outputs Fffff X, Y, C, GX, GY See memory map 6-14 D4-454 PLC User Manual, 1st Edition, Rev. D...
- Page 376 In the last rung, the Drum Complete bit (CT4) turns on output Y0 upon completion of the last step (step 11). A drum reset also resets CT4. 6-15 D4-454 PLC User Manual, 1st Edition, Rev. D...
- Page 377 Counts per step Kdddd 0 – 9999 Event Eeeee X, Y, C, GX, GY. S, T, CT, SP See memory map Discrete Outputs Fffff X, Y, C, GX, GY Output Mask Ggggg 6-16 D4-454 PLC User Manual, 1st Edition, Rev. D...
- Page 378 Complete bit (CT10) turns on output Y0 upon completion of the last step (step 10). A drum reset also resets CT10. NOTE: The ladder program must load constants in V2000 through V2012 to cover all mask registers for the eleven steps used in this drum. 6-17 D4-454 PLC User Manual, 1st Edition, Rev. D...
- Page 379 Counts per step Kdddd 0 – 9999 Event Eeeee X, Y, C, GX, GY, S, T, CT, CP see memory map Word Output Fffff see memory map Output Mask Ggggg see memory map 6-18 D4-454 PLC User Manual, 1st Edition, Rev. D...
- Page 380 (step 10). A drum reset also resets CT14. NOTE: The ladder program must load constants in V2000 through V2012 to cover all mask registers for the eleven steps used in this drum. 6-19 D4-454 PLC User Manual, 1st Edition, Rev. D...
- Page 381 Chapter Chapter Chapter RLLPLUS S tage RogRamming In This Chapter... Introduction to Stage Programming ................ 7-2 Learning to Draw State Transition Diagrams ............7-3 Using the Stage Jump Instruction for State Transitions ........... 7-7 Stage Program Example: Toggle On/Off Lamp Controller ........7-8 Four Steps to Writing a Stage Program ..............
- Page 382 NOTE: Stage and relay ladder logic can both exist in the same program. The only restriction is that all stage logic must be below the regular relay ladder logic in the program. D4-454 PLC User Manual, 1st Edition, Rev. D...
- Page 383 ON state. In a boolean sense, Y0=ON state. Next, we will implement the state diagram first as RLL, then as a stage program. This will help you see the relationship between the two methods in problem solving. D4-454 PLC User Manual, 1st Edition, Rev. D...
- Page 384 On the next PLC scan, the CPU will not execute Stage S1, so the motor output Y0 will turn off. The Off state (Stage 0) will be ready for the next cycle. D4-454 PLC User Manual, 1st Edition, Rev. D...
- Page 385 NOTE: If the ISG is within the retentive range for stages, the ISG will remain in the state it was in before power down and will NOT turn itself on during the first scan. D4-454 PLC User Manual, 1st Edition, Rev. D...
- Page 386 Any order – You can skip numbers and sequence the stage numbers in any order. • Last Stage – The last stage in the ladder program includes all rungs from its stage box until the end coil. D4-454 PLC User Manual, 1st Edition, Rev. D...
- Page 387 Jmp Note: Assume we start with Stage 0 active and stage 1 inactive for both examples. NOTE: Assume we start with Stage 0 active and Stage 1 inactive for both examples. D4-454 PLC User Manual, 1st Edition, Rev. D...
- Page 388 Push–Off State relay contact SP1, which is always on. Note that even as our programs grow more complex, it is still easy to correlate the state transition diagram with the stage program. D4-454 PLC User Manual, 1st Edition, Rev. D...
- Page 389 However, the program virtually writes itself because of the preparation beforehand. Soon you’ll be able to start with a word description of an application and create a stage program in one easy session! D4-454 PLC User Manual, 1st Edition, Rev. D...
- Page 390 The controller has two outputs to drive the motor. Program Y1 is the up (raise the door) command, and Y2 is Raise the down (lower the door) command. Down limit Lower 7-10 D4-454 PLC User Manual, 1st Edition, Rev. D...
- Page 391 Stage S5 to the DOWN stage S0, where we began. NOTE: The only special thing about an initial stage (ISG) is that it is automatically active at power up. Afterwards, it is just like any other. 7-11 D4-454 PLC User Manual, 1st Edition, Rev. D...
- Page 392 Light stage. The path out of the Light stage goes nowhere, indicating the Light stage just becomes inactive, and the light goes out. Output equations: Y1 = RAISE Y2 = LOWER Y3 = LIGHT RAISE Push–UP DOWN LIGHT LOWER Push–DOWN 7-12 D4-454 PLC User Manual, 1st Edition, Rev. D...
- Page 393 Stage 6. That is, the door can go up, K1800 down, or whatever, but the light will be on for precisely 3 minutes. 7-13 D4-454 PLC User Manual, 1st Edition, Rev. D...
- Page 394 The second and third to DOWN rungs implement the transitions we need. Note the opposite relay contact usage for X3, which ensures the stage will execute only one of the to Push-UP JMP instructions. 7-14 D4-454 PLC User Manual, 1st Edition, Rev. D...
- Page 395 The monitor stage could set the stage Monitor Status bit for Status and Reset the stages Control and Recipe. E-Stop and Alarm Monitoring 7-15 D4-454 PLC User Manual, 1st Edition, Rev. D...
- Page 396 Drum – Realize that the drum sequencer is its own process, and is a different programming method than stage programming. If you need to use a drum with stages, be sure to place the drum instruction in an ISG stage that is always active. 7-16 D4-454 PLC User Manual, 1st Edition, Rev. D...
- Page 397 The standard Counter instruction does not have this global reset capability. You may still use a regular Counter instruction inside a stage... however, the reset input to the counter is the only way to reset it. 7-17 D4-454 PLC User Manual, 1st Edition, Rev. D...
- Page 398 The power flow transition method does eliminate one Stage JMP instruction, its only advantage. However, it is not as easy to make program changes as using the Stage JMP. Therefore, we advise using Stage JMP transitions for most programmers. 7-18 D4-454 PLC User Manual, 1st Edition, Rev. D...
- Page 399 CV stages! The transition condition (X3 in this case) must be located in the last convergence stage. The transition condition only has power flow when all convergence stages in the group are active. 7-19 D4-454 PLC User Manual, 1st Edition, Rev. D...
- Page 400 The CVJMP instruction must only be used in a convergence stage, as it is invalid in regular or initial stages. • Convergence Stages or CVJMP instructions may not be used in subroutines or interrupt routines. 7-20 D4-454 PLC User Manual, 1st Edition, Rev. D...
- Page 401 Operand Data Type D4-454 Range Stage S 0–1777 The following example is a simple RLLPLUS program. This program utilizes an Initial Stage, Stage, and Jump instructions to create a structured program. 7-21 D4-454 PLC User Manual, 1st Edition, Rev. D...
- Page 402 The jump will occur when the input logic is NJMP false. The active stage that contains the Not Jump will be deactivated 1 scan after the Not Jump instruction is executed. Operand Data Type D4-454 Range Stage 0–1777 7-22 D4-454 PLC User Manual, 1st Edition, Rev. D...
- Page 403 Converge Stages must be programmed in the main body of the application program. This means they cannot be ( CVJMP ) programmed in Subroutines or Interrupt Routines. Operand Data Type D4-454 Range Stage 0–1777 7-23 D4-454 PLC User Manual, 1st Edition, Rev. D...
- Page 404 X4 is on. The CVJMP will deactivate S10 and S11, and activate S20. Then, if X5 is on, the program execution will jump back to the initial stage, S0. S1 1 S1 1 CVJMP 7-24 D4-454 PLC User Manual, 1st Edition, Rev. D...
- Page 405 The Block End instruction is a label used with the Block instruction. It marks the end of a block of stages. There is no operand with this BEND instruction. Only one Block End is allowed per Block Call. 7-25 D4-454 PLC User Manual, 1st Edition, Rev. D...
- Page 406 Jump Set Stage Logic a Stage Output Reset Stage The following diagram is a typical stage view of a ladder program containing stages. Note the left-to-right direction of the flow chart. 7-26 D4-454 PLC User Manual, 1st Edition, Rev. D...
- Page 407 1 scan by including a stage Jump instruction at the bottom of the rung. Then the ladder will execute on the last scan before its stage jumps to a new one. 7-27 D4-454 PLC User Manual, 1st Edition, Rev. D...
- Page 408 And a good process design will be mostly sequential, with only one stage on at a time. However, all the processes in the program may be active simultaneously. 7-28 D4-454 PLC User Manual, 1st Edition, Rev. D...
- Page 409 Chapter Chapter Chapter PID L PeratIon In This Chapter... D4-454 PID Control ........................8-2 Introduction to PID Control ......................8-4 Introducing D4-454 PID Control .....................8-6 PID Loop Operation ........................8-9 Ten Steps to Successful Process Control ................ 8-16 PID Loop Setup ......................... 8-18 PID Loop Tuning ........................
- Page 410 D4-454 PID Control D4-454 PID Control Features Along with control functions discussed in this manual, the D4-454 PLC features PID process control capability. The D4-454 PID process control loops offer the same features offered in much larger PLCs. The primary features are: •...
- Page 411 Select PV alarm settings for Low–low, Low, High, and High-high conditions PV Deviation Specify alarms for two ranges of PV deviation from the setpoint value Rate of Change Detect when PV exceeds a rate of change limit you specify D4-454 PLC User Manual, 1st Edition, Rev. D...
- Page 412 The ON-OFF controller is used in some industrial control applications, but is not practical in the majority of industrial control processes. The most common process controller that is used in industry is the PID controller. D4-454 PLC User Manual, 1st Edition, Rev. D...
- Page 413 Its job is to anticipate the probable growth of the error and generate a contribution to the output in advance. D4-454 PLC User Manual, 1st Edition, Rev. D...
- Page 414 As previously mentioned, the control of a variable, such as temperature, at a given level (setpoint) as long as there are no disturbances (cold water) in the process. The D4-454 PLC has the ability to directly accept signals from electronic sensors, such as thermocouples, pressure transducers, VFDs, etc. These signals may be used in mathematically derived control systems.
- Page 415 PLC to the manufacturing process and back to the PLC is the closed loop control. Loop Configuring External and Monitoring Disturbances PLC System Setpoint Value Error Term Control Output Loop Manufacturing Calculation Process – Process Variable D4-454 PLC User Manual, 1st Edition, Rev. D...
- Page 416 Loop Monitoring – The function which allows an operator to observe the status and performance of a control loop. This is used in conjunction with the loop configuring to optimize the performance of a loop (minimize the error term). D4-454 PLC User Manual, 1st Edition, Rev. D...
- Page 417 This bump is not present in the second form of the equation. D4-454 PLC User Manual, 1st Edition, Rev. D...
- Page 418 This will also cause the process variable to undershoot. The D4-454 CPU is programmed to solve the overshoot problem by either freezing the bias term, or by adjusting the bias term. 8-10 D4-454 PLC User Manual, 1st Edition, Rev. D...
- Page 419 The choice of whether to use the default loop action or to freeze the bias is dependent on the application. If large, step changes to the setpoint are anticipated, then it is probably better to select the freeze bias option (see page 8-34). 8-11 D4-454 PLC User Manual, 1st Edition, Rev. D...
- Page 420 “n” from the equation at time “n-1”. The velocity equation is given by: ∆Mn = M - Mn-1 ∆Mn = Kc * (en - en-1) + Ki * (PVn - 2 * PVn-1 + PVn-2) 8-12 D4-454 PLC User Manual, 1st Edition, Rev. D...
- Page 421 CPU. As the PV value crosses an alarm threshold, its fluctuations will cause the alarm to be intermittent and annoy process operators. The solution is to use the PV Alarm Hysteresis feature. 8-13 D4-454 PLC User Manual, 1st Edition, Rev. D...
- Page 422 V-memory. All alarms are monitored while in automatic. Cascade Cascade mode is an option with the D4-454 PLC and is used in special control applications. If the cascade feature is used, the loop will operate as it would if in automatic mode except for the fact that a cascaded loop has a setpoint which is the control output from another loop.
- Page 423 = Kc * en - Kr * (Yn-Yn-1) + Mx Velocity Algorithm ∆M = Kc * (en - en-1) + Ki * en - Kr * (Yn - 2 * Yn-1 + Yn-2) 8-15 D4-454 PLC User Manual, 1st Edition, Rev. D...
- Page 424 Chapter 8: PID Loop Operation Ten Steps to Successful Process Control Controllers such as the D4-454 PLC provide sophisticated process control features. Automated control systems can be difficult to debug, because a given symptom can have many possible causes. We recommend a careful, step-by-step approach to bringing new...
- Page 425 Step 10: Save Parameters When the loop tests and tuning sessions are complete, be sure to save all loop setup parameters to disk. 8-17 D4-454 PLC User Manual, 1st Edition, Rev. D...
- Page 426 Have your analog module installed and operational before beginning the loop setup (refer to the D4-ANLG-M Manual). The D4-454 PLC gets its PID loop processing instructions from V-memory tables. There isn’t a PID instruction that can be used in RLL, such as a block, to setup the PID loop control.
- Page 427 DirectSOFT 6.1 or later Programming Software NOTE: The D4-454 CPU’s PID algorithm requires DirectSOFT Version 6.1 (or later) and firmware version 1.0 (or later). See our website for more information: www.automationdirect.com. The Loop Table contains data for only the number of loops V–Memory...
- Page 428 NOTE: Have an edited program open, then click on PLC > Setup > PID to access the Setup PID dialog. 8-20 D4-454 PLC User Manual, 1st Edition, Rev. D...
- Page 429 * Read data only when alarm enable bit transitions from 0 to 1. ** Read data only on PLC Mode change. *** Read on-the-fly means that the content of V-memory can be changed while the PID loop is in operation. 8-21 D4-454 PLC User Manual, 1st Edition, Rev. D...
- Page 430 Write PV Deviation alarm select Write PV rate-of-change alarm select Write Loop mode is independent from CPU mode when set Write Loop with CPU Loop Indepen- mode dent of CPU mode 8-22 D4-454 PLC User Manual, 1st Edition, Rev. D...
- Page 431 If bit 10 and bit 13 each have a value of 1, then bits 11 and 12 are not read, and bit 13 defines the data format, (the output range is automatically unipolar). 8-23 D4-454 PLC User Manual, 1st Edition, Rev. D...
- Page 432 Soak generator in the profile. This byte will have the values 1, 2, 3, 4, 5, 6, 7, 8, 9, A, B, C, D, E, F, and 10, which represent segments 1 to 16 respectively. If the byte=0, then the Ramp/ Soak table is not active. 8-24 D4-454 PLC User Manual, 1st Edition, Rev. D...
- Page 433 Starting Addr out of upper V-memory range Read – Error 2–3 Reserved for Future Use – – – Starting Addr in System Parameter V-memory Range Read – Error 5–15 Reserved for Future Use – – – 8-25 D4-454 PLC User Manual, 1st Edition, Rev. D...
- Page 434 CPU automatically schedules and executes PID Internal calculations on the appropriate scans. Diagnostics Write Outputs NOTE: If more than 4 loops are programmed, enter a minimum of 0.1 second. 8-26 D4-454 PLC User Manual, 1st Edition, Rev. D...
- Page 435 (-4095 to 4095 or -32767 to 32767) and requires a sign bit. Bipolar selection displays input/output as magnitude plus sign, not two’s complement. The bipolar selection is not available when 16-bit data format is selected. 8-27 D4-454 PLC User Manual, 1st Edition, Rev. D...
- Page 436 It calculates the PID equation and writes the result in location V+05 every sample period of that loop. The equivalent schematic diagram is shown below. Manual Input from Operator Control Output V+05 Loop Calculation Auto 8-28 D4-454 PLC User Manual, 1st Edition, Rev. D...
- Page 437 If bit 15 is set to one, then the loops will run independently of the CPU mode. It is like having two independent processors in the CPU... one is running the RLL program and the other is running the process loops. 8-29 D4-454 PLC User Manual, 1st Edition, Rev. D...
- Page 438 You can temporarily make the loops follow the CPU mode by changing bit 15 to 0. Then, you will be able to place the loop into Manual Mode using DirectSOFT. After you change the loop’s parameter settings, restore bit 15 to 1. 8-30 D4-454 PLC User Manual, 1st Edition, Rev. D...
- Page 439 NOTE: When auto transfer to/from I/O is used, the analog data for all of the channels on the analog module cannot be accessed by any other method, i.e., pointer or multiplex. 8-31 D4-454 PLC User Manual, 1st Edition, Rev. D...
- Page 440 If the Independent format had been checked previously, make the Data format selections here. NOTE: The SP/PV dialog can be left as it first appears for basic PID operation. 8-32 D4-454 PLC User Manual, 1st Edition, Rev. D...
- Page 441 If the Upper Limit is set to zero, the output will never get above zero. In WARNING: effect, there will be no control output. The default value is zero, so this value MUST be changed. 8-33 D4-454 PLC User Manual, 1st Edition, Rev. D...
- Page 442 An entry of “0000” allows removal of the derivative term from the PID equation (a common practice). This accommodates applications which require only proportional and/or integral loops. Most control loops will operate as a PI loop. 8-34 D4-454 PLC User Manual, 1st Edition, Rev. D...
- Page 443 • Non-linear process – some processes (such as chemical pH control) require non-linear controllers for best results. Another application is surge tank control, where the Control Output signal must be smooth. 8-35 D4-454 PLC User Manual, 1st Edition, Rev. D...
- Page 444 If you have set limits on the control output other than the range (i.e, 0–4095 for a unipolar/12-bit loop), the bias term still uses the end of range for the stopping point and bias freeze will not work. 8-36 D4-454 PLC User Manual, 1st Edition, Rev. D...
- Page 445 V+13 XXXX Low-low Alarm Low–low Alarm NOTE: The Alarm dialog can be left as it first appears, without alarm entries. The alarms can then be setup in the DirectSOFT PID View. 8-37 D4-454 PLC User Manual, 1st Edition, Rev. D...
- Page 446 Remember the alarm hysteresis feature works in conjunction with both the deviation and absolute value alarms, and is discussed at the end of this section. NOTE: PID deviation alarm only works in Auto mode. 8-38 D4-454 PLC User Manual, 1st Edition, Rev. D...
- Page 447 The PV Rate-of-Change Alarm can be independently enabled and disabled from the other PV alarms, using bit 14 of the PID Mode 1 Setting V+00 word. The alarm hysteresis feature (discussed next) does not affect the Rate-of-Change Alarm. 8-39 D4-454 PLC User Manual, 1st Edition, Rev. D...
- Page 448 Loop Calculation Overflow/Underflow Error NOTE: Overflow/underflow can be alarmed in PID View. The optional C-more operator interface panel (see the automationdirect.com website) can also be setup to read these error bits using the PID Faceplate templates. 8-40...
- Page 449 NOTE: It is good practice to save your project after setting up the PID loop by selecting File from the menu toolbar, then Save project > to disk. In addition to saving your entire project, all the PID parameters are also saved. 8-41 D4-454 PLC User Manual, 1st Edition, Rev. D...
- Page 450 (see Configure the PID Loop on page 8-25). However, if you are going to use auto tuning, the auto tuning procedure will automatically calculate the sample rate in addition to the PID gains. 8-42 D4-454 PLC User Manual, 1st Edition, Rev. D...
- Page 451 • Increase the Proportional gain in small increments, such as 4, 6, 7, etc., until the control output response begins to oscillate. This is the Proportional gain that should be recorded. 8-43 D4-454 PLC User Manual, 1st Edition, Rev. D...
- Page 452 Derivative gain is almost never used in a temperature control loop. This method can also be used for other control loops, but other parameters may need to be added for a stable control output. 8-44 D4-454 PLC User Manual, 1st Edition, Rev. D...
- Page 453 If there is little or no response, increase the derivative by increments of 0.5 until there is an improvement to the output trend. Recall that the derivative gain reacts with a rate of change of the error. 8-45 D4-454 PLC User Manual, 1st Edition, Rev. D...
- Page 454 For no overshoot during startup: G = Gu/5.0 Ti = 3/Pu (repeats/minute) Td = Pu/2 (minutes) For some overshoot, but better response to disturbances: G = Gu/3 Ti = 3/Pu (repeats/minute) Td = Pu/3 (minutes) 8-46 D4-454 PLC User Manual, 1st Edition, Rev. D...
- Page 455 (0 to 1 transition) Active 0=PID tuning, Auto Tune 1=open PI tuning Error Auto Tuning Auto Tuning Controls Status 0=closed loop, 1=open loop PID Mode 2 Setting V+01 Loop Mode and Alarm Status V+06 8-47 D4-454 PLC User Manual, 1st Edition, Rev. D...
- Page 456 Cycle Wave: Step Response Method. Rr = Slope Tangent Process Wave Base Line LrRr (sec.) Time (sec) Step Change m=10% Output Value Auto Tune Cycle PID Cycle PID Cycle Auto Tune Start Auto Tune End 8-48 D4-454 PLC User Manual, 1st Edition, Rev. D...
- Page 457 Therefore, the frequency of the limit cycle is roughly proportional to the mass of the process. From the PV response, the auto tune function calculates the gains and the sample time. It automatically places the results in the corresponding registers in the loop table. 8-49 D4-454 PLC User Manual, 1st Edition, Rev. D...
- Page 458 NOTE: If your PV fluctuates rapidly, you probably need to use the built-in analog filter (see page 8–55) or create a filter in ladder logic (see example on page 8–56). 8-50 D4-454 PLC User Manual, 1st Edition, Rev. D...
- Page 459 The Data View window can be used just as it is shown above for troubleshooting your PID logic, and it can be most useful when tuning the PID loop. 8-51 D4-454 PLC User Manual, 1st Edition, Rev. D...
- Page 460 The PID View will open and appear over the Ladder View which can be brought into view by clicking on its tab. When using the Data View and the PID View together, each view can be sized for better use as shown on the facing page. 8-52 D4-454 PLC User Manual, 1st Edition, Rev. D...
- Page 461 When both windows are positioned in this manner, you are able to see where the PID values have been set and see the process that it is controlling. 8-53 D4-454 PLC User Manual, 1st Edition, Rev. D...
- Page 462 Auto/Cascade – Auto/Manual Process Variable Mode Select PID Mode Control PID Mode 1 Setting V+00 Loop Mode and Alarm Status V+06 Mode Monitoring Mode Request Cascade Manual Cascade Manual Automatic Automatic 8-54 D4-454 PLC User Manual, 1st Edition, Rev. D...
- Page 463 PLC Run Mode. • You can add and configure new loops only when the PLC is in Program Mode. New loops automatically begin in Manual Mode. 8-55 D4-454 PLC User Manual, 1st Edition, Rev. D...
- Page 464 A loop which develops an error condition automatically goes to Manual. • If the minor loop of a cascaded pair of loops leaves Cascade Mode for any reason, its major loop automatically goes to Manual Mode. 8-56 D4-454 PLC User Manual, 1st Edition, Rev. D...
- Page 465 DirectSOFT converts values above the valid range to 001.0 and values below this range to 000.1 • Values close to 001.0 result in higher roll-off frequencies, while values closer to 000.1 result in lower roll-off frequencies. 8-57 D4-454 PLC User Manual, 1st Edition, Rev. D...
- Page 466 PID loop PV (loop PV is a binary number). Loads the BCD number filtered value from the accumulator into location V1402 to use V1402 in your application or PID loop. 8-58 D4-454 PLC User Manual, 1st Edition, Rev. D...
- Page 467 A value of 1 results with no filtering. The filtered value will be placed in V2100. NOTE: For information on the Filter Over Time-Binary Ibox IB-402, see the DL405-IBOX-S manual. 8-59 D4-454 PLC User Manual, 1st Edition, Rev. D...
- Page 468 The ladder program can monitor the status of the ramp soak profile (current ramp/segment number). Ramp/soak table Setpoint Control Output Ramp/soak Loop Generator Calculation Ramp/soak controls – Process Variable 8-60 D4-454 PLC User Manual, 1st Edition, Rev. D...
- Page 469 V-memory. Of course, you may locate all the V3600 Ramp/Soak #2 tables in one group, as long as they do not overlap. 32 words 8-61 D4-454 PLC User Manual, 1st Edition, Rev. D...
- Page 470 + 34 Ramp End SP Value + 15 Ramp Slope + 35 Ramp Slope + 16 Soak Duration + 36 Soak Duration + 17 Soak PV Deviation + 37 Soak PV Deviation 8-62 D4-454 PLC User Manual, 1st Edition, Rev. D...
- Page 471 X0 can turn on, and the PD contact uses the leading edge to set the proper control bit to start B2033.0 the ramp soak profile. This uses the Set Bit-of-word instruction. 8-63 D4-454 PLC User Manual, 1st Edition, Rev. D...
- Page 472 Mode. Using DirectSOFT’s PID View will be a real time-saver, because it will draw the profile on-screen for you. Be sure to set the trending timebase slow enough to display completed ramp-soak segment pairs in the waveform window. 8-64 D4-454 PLC User Manual, 1st Edition, Rev. D...
- Page 473 Program the Ramp/Soak Control in Relay Ladder Refer to the Ramp/Soak Flag Bit Description table on page 8-63 when adding the control rungs to your program similar to the ladder rungs below. 8-65 D4-454 PLC User Manual, 1st Edition, Rev. D...
- Page 474 PID View. If there are any changes to be made in the profile, they are made in the PID Setup R/S profile. Make the changes in Program mode then start the Ramp/Soak process again. 8-66 D4-454 PLC User Manual, 1st Edition, Rev. D...
- Page 475 Remember the minor loop is faster acting than the major loop. Therefore, if a disturbance affects process A in the minor loop, the Loop A PID calculation can correct the resulting error before the major loop sees the effect. 8-67 D4-454 PLC User Manual, 1st Edition, Rev. D...
- Page 476 Remote Setpoint Output Calculation Local SP – V+02 Auto/Manual Process Variable Remember that a major loop goes to Manual Mode automatically if its minor loop is taken out of Cascade Mode. 8-68 D4-454 PLC User Manual, 1st Edition, Rev. D...
- Page 477 Tune the major loop, following the standard loop tuning procedure in this section. The response of the major loop PV is actually the overall response of the cascaded loops together. 8-69 D4-454 PLC User Manual, 1st Edition, Rev. D...
- Page 478 If we were to plot the on/off times of the burner in the hot-air balloon, we would probably see a very similar relationship to its effect on balloon temperature and altitude. 8-70 D4-454 PLC User Manual, 1st Edition, Rev. D...
- Page 479 Y0 turns off when T1 times out. The STRNE contact prevents Y0 from energizing during the one scan when T0 resets T1. Y0 is the actual control output. END coil marks the end of the main program. 8-71 D4-454 PLC User Manual, 1st Edition, Rev. D...
- Page 480 PID Parameter Table location V+04. Parameter Table location V+04. Loop Calculation V+04 Setpoint Error T erm Control Output XXXX Bias Term – Process Variable 8-72 D4-454 PLC User Manual, 1st Edition, Rev. D...
- Page 481 The step changes in the bias are the result of our two feed-forward writes to the bias term. We can see the PV variations are greatly reduced. The same technique may be applied for changes in setpoint. 8-73 D4-454 PLC User Manual, 1st Edition, Rev. D...
- Page 482 CH 1 Input V2000 Loop 1 PID PV V3003 Store PID loop 1 control value, CV, (binary format) to a V-memory location for use in the program. Loop 1 PID Output V3005 V4000 8-74 D4-454 PLC User Manual, 1st Edition, Rev. D...
- Page 483 Loop 1 PID SP V3002 Select PID Loop 1 Manual Mode Manual Mode Rqst Loop 1 Manual B3000.0 Select PID Loop 1Auto Mode Loop 1 Auto Auto Mode Rqst B3000.1 END ) 8-75 D4-454 PLC User Manual, 1st Edition, Rev. D...
- Page 484 For a step-by-step tutorial, go to the Technical Support section located on our website, automationdirect.com. Once you are at the website, click on Technical Support Home. After this page opens, find and select Guided Tutorials located under the Using Your Products column.
- Page 485 PLC Run Mode, and manually start the ramp/soak generator. Q. The PV value in the table is constant, even though the analog module receives 8-77 D4-454 PLC User Manual, 1st Edition, Rev. D...
- Page 486 PV sensor, or the actuator may be weak in its ability to transfer energy into the process. • There may be a process disturbance that is over-powering the loop. Make sure the PV is relatively steady when the SP is not changing. 8-78 D4-454 PLC User Manual, 1st Edition, Rev. D...
- Page 487 The mass of the process averages the on/off effect for a relatively smooth PV. A simple ladder program can convert the D4-454’s continuous loop output to on/off control. 8-79 D4-454 PLC User Manual, 1st Edition, Rev. D...
- Page 488 SP, depending on the particular mode change. Velocity Algorithm: The control output is calculated to represent the rate of change (velocity) for the PV to become equal to the SP. 8-80 D4-454 PLC User Manual, 1st Edition, Rev. D...
- Page 489 Process Control, Third Edition Instrument Engineer’s Handbook Process Measurement and Analysis, Third Edition Instrument Author (Editor-in-Chief): Bela G. Liptak Engineer’s Handbook Publisher: Chilton ISBN 0–8019–8242–1 Author (Editor-in-Chief): Bela G. Liptak Publisher: Chilton ISBN 0–8019–8197–2 8-81 D4-454 PLC User Manual, 1st Edition, Rev. D...
- Page 490 Chapter Chapter Chapter aintenance and roubleshooting In This Chapter... Hardware System Maintenance ................9-2 Diagnostics ......................... 9-3 CPU Status Indicators ....................9-8 Communications Problems ..................9-12 I/O Point Troubleshooting ..................9-13 Noise Troubleshooting .................... 9-15 Machine Startup and Program Troubleshooting ........... 9-16...
- Page 491 Chapter 9: Maintenance and Troubleshooting Hardware System Maintenance Standard Maintenance No regular or preventative maintenance is required for this product (there are no internal batteries); however, a routine maintenance check (about every one or two months) of your PLC and control system is good practice, and should include the following items: •...
- Page 492 Chapter 9: Maintenance and Troubleshooting Diagnostics Your D4-454 PLC performs many predefined diagnostic routines with every CPU scan. The diagnostics can detect various errors or failures in the PLC. The two primary error classes are fatal and non-fatal. Fatal Errors Fatal errors are errors which may cause the system to function improperly, perhaps introducing a safety problem.
- Page 493 Chapter 9: Maintenance and Troubleshooting V-memory Error Code Locations The following table names the specific memory locations that correspond to certain types of error messages. Diagnostic Error Class Error Category V-memory Battery Voltage V7746 Minor 10ms calendar timer V7747 System Error code used with FAULT instruction V7751 User-Defined...
- Page 494 Chapter 9: Maintenance and Troubleshooting Special Relays (SP) Corresponding to Error Codes The special relay table also includes status indicators which can indicate errors. For a more detailed description of each of these special relays refer to the Special Relays Appendix. CPU Status Relays Accumulator Status Relays SP11...
- Page 495 Chapter 9: Maintenance and Troubleshooting I/O Module Codes Each system component has a code identifier. This code identifier is used in some of the error messages related to the I/O modules. The following tables list these codes. Code Code Component Type Component Type (Hex) (Hex)
- Page 496 Chapter 9: Maintenance and Troubleshooting Program Error Codes The System error log contains 32 of the most recent errors that have been detected. The errors that are trapped in the error log are a subset of all the error messages which the D4-454 system generates.
- Page 497 Chapter 9: Maintenance and Troubleshooting CPU Status Indicators The D4-454 PLCs have indicators on the front to help you determine potential problems with the system. In normal runtime operation only, the RUN and PWR indicators are on. The table below is a quick reference to potential problems. Indicator Status Potential Problems 1.
- Page 498 Chapter 9: Maintenance and Troubleshooting PWR Indicator In general there are four reasons for the CPU power status LED (PWR) to be OFF: 1. Power to the unit is incorrect or is not applied. 2. PLC power supply is faulty. 3.
- Page 499 Chapter 9: Maintenance and Troubleshooting If the power supply operates normally, you probably have either a shorted device or a shorted cable. If the power supply does not operate normally, then test for a module causing the problem by following the steps below: Turn off power to the CPU.
- Page 500 Chapter 9: Maintenance and Troubleshooting CPU Indicator If the CPU indicator is on, a fatal error has occurred in the CPU. Generally, this is not a programming problem but an actual hardware failure. You can power cycle the system to clear the error. If the error clears, you should monitor the system and determine what caused the problem.
- Page 501 Chapter 9: Maintenance and Troubleshooting Many other specialty modules also have indicators. The manuals for those products contain information on the indicators and status LEDs. If the modules are not providing any clues to the problem, run the I/O diagnostics in the DirectSOFT programming software. This will provide the base number, the slot number and the problem with the module.
- Page 502 Chapter 9: Maintenance and Troubleshooting I/O Point Troubleshooting Possible Causes If you suspect an I/O error, there are several things that could be causing the problem. • I/O configuration error on modules such as: Analog I/O, High Speed Counters, Specialized Communications, etc. •...
- Page 503 Chapter 9: Maintenance and Troubleshooting Testing Output Points Output points can be set on or off in the D4-454 CPUs. If you want to do an I/O check-out independent of the application program, follow the procedure below: Step Action Change the CPU mode switch to TERM. Use DirectSOFT programming software to communicate online to the PLC.
- Page 504 Chapter 9: Maintenance and Troubleshooting Noise Troubleshooting Electrical Noise Problems Noise is one of the most difficult problems to diagnose. Electrical noise can enter a system in many different ways and falls into one of two categories, conducted or radiated. It may be difficult to determine how the noise is entering the system but the corrective actions for either of the types of noise problems are similar.
- Page 505 Chapter 9: Maintenance and Troubleshooting Machine Startup and Program Troubleshooting The DL405 PLCs provide several features that can help you debug your program before and during machine startup. This section discusses the following topics which can be very helpful. • Program Syntax Check •...
- Page 506 Chapter 9: Maintenance and Troubleshooting Duplicate I/O Check You can check for multiple uses of the same output coil. For example, you can use the PLC Diagnostics menu option within DirectSOFT to select Execute Duplicate I/O Check (PLC -> Diagnostics -> Execute Duplicate I/O Check). Diagnostic Window indicating a duplicate coil was found: If you get a Duplicate Reference error, correct the problem and continue running the Duplicate Reference check until no duplicate references are found.
- Page 507 Chapter 9: Maintenance and Troubleshooting Special Debug Instructions There are several instructions that can be used to help you debug your program during machine startup operations. • • PAUSE • STOP END Instruction: If you need a way to quickly disable part of the program, just insert an END statement prior to the portion that should be disabled.
- Page 508 Chapter 9: Maintenance and Troubleshooting Normal Program STOP puts CPU in Program Mode ST OP In the example shown above, you could trigger X7 which would execute the STOP instruction. The CPU would enter Program Mode and all outputs would be turned off. 9-19 D4-454 User Manual, 1st Edition, Rev.
- Page 509 Chapter 9: Maintenance and Troubleshooting Run Time Edits The D4-454 CPU allows you to make changes to the application program during Run Mode. These edits are not “bump-less.” Instead, CPU scan is momentarily interrupted (and the outputs are maintained in their current state) until the program change is complete. This means if the output is off, it will remain off until the program change is complete.
- Page 510 Chapter 9: Maintenance and Troubleshooting Forcing I/O Points There are many times, especially during machine startup and troubleshooting, that you need the capability to force an I/O point to be either on or off. Before you use a programming device to force any data type, it is important to understand how the D4-454 CPUs process the forcing requests.
- Page 511 Chapter 9: Maintenance and Troubleshooting The following diagrams show how the bit override works for both input and output points. The example uses a simple rung, but the concepts are similar for any type of bit memory. Program Rung Override holds previous state and disables image register update by CPU override enabled...
- Page 512 Chapter 9: Maintenance and Troubleshooting Bit Override Forcing It is possible to Force a bit On/Off by using the Override Editor or using Data View. Remember that when using the Bit Override feature, the CPU will retain the forced value until you disable the Bit Override or until you remove the force.
- Page 513 Chapter 9: Maintenance and Troubleshooting To set an Override Bit, double-click on the respective Override button with the letter “O”. Double-clicking on the Blank button will turn the Override feature Off. The letter “O” in the status column indicates the Override Bit is set for that bit. NOTE: For more information on using and setting up Data View, refer to the DirectSOFT programming software user manual, PC-DSOFT6-M, Chapter 10.
- Page 514 Chapter 9: Maintenance and Troubleshooting Reset the PLC to Factory Defaults NOTE: Resetting to factory defaults will not clear any password stored in the PLC. Resetting a DirectLogic PLC to Factory Defaults is a two-step process. Be sure to have a verified backup of your program using “Save Project to Disk”...
- Page 515 Chapter 9: Maintenance and Troubleshooting The PLC has now been reset to factory defaults and you can proceed to program the PLC. 9-26 D4-454 User Manual, 1st Edition, Rev. D...
- Page 516 Appendix Appendix Appendix D4-454 E rror oDEs In This Appendix... D4-454 Error Codes ........................A-2...
- Page 517 Overlapping addresses have been assigned while manually configuring the I/O. Correct the address E261 assignments using DirectSOFT programming software, from the PLC menu, select the Configure I/O I/O ADDRESS CONFLICT menu option. SP45 will be on and the error code will be stored in V7755. D4-454 PLC User Manual,1st Edition, Rev. D...
- Page 518 A LBL that corresponds to a GOTO instruction must not be programmed after the end statement such as in a subroutine. SP52 will be on and the error code will be stored in V7755. INVALID JUMP (GOTO) ADDRESS D4-454 PLC User Manual, 1st Edition, Rev. D...
- Page 519 A rung of ladder logic is not terminated properly. MISSING CKT E471 DUPLICATE COIL Two or more OUT instructions reference the same I/O point. REFERENCE E472 DUPLICATE TMR Two or more TMR instructions reference the same number. REFERENCE D4-454 PLC User Manual,1st Edition, Rev. D...
- Page 520 An invalid or out of range address was entered into the handheld programmer. BAD ADDRESS E503 An invalid command was entered into the handheld programmer. BAD COMMAND E504 An invalid value or reference number was entered with an instruction. BAD REF/VAL D4-454 PLC User Manual, 1st Edition, Rev. D...
- Page 521 DATA MISSING E604 A search function was performed and the reference was not found. REFERENCE MISSING E610 The application program has referenced an I/O module as the incorrect type of module. BAD I/O TYPE D4-454 PLC User Manual,1st Edition, Rev. D...
- Page 522 Appendix Appendix Appendix pecial elayS In This Appendix... D4-454 PLC Special Relays..................B-2 Startup and Real-Time Relays ��������������������������������������������������������������������������������������������������������� B-2 CPU Status Relays ������������������������������������������������������������������������������������������������������������������������������� B-2 System Monitoring ������������������������������������������������������������������������������������������������������������������������������ B-3 Accumulator Status ���������������������������������������������������������������������������������������������������������������������������� B-3 Communication Monitoring Relay ������������������������������������������������������������������������������������������������� B-4...
- Page 523 This relay will be on if the actual scan time is in excess of the scan time set in SP37 Scan control error fixed or limit scan modes. The relay contact may be useful in program error recovery. D4-454 PLC User Manual, 1st Edition, Rev. D...
- Page 524 On anytime a floating point math operation results in an underflow error. SP75 Data error On if a BCD number is expected and a non–BCD number is encountered. SP76 Load zero On when any instruction loads a value of zero into the accumulator. D4-454 PLC User Manual, 1st Edition, Rev. D...
- Page 525 SP136 SP156 SP176 SP216 Slot 7 Slot 7 Slot 7 Slot 7 Comm error Comm error Comm error Comm error SP137 SP157 SP177 SP217 Slot 7 Slot 7 Slot 7 Slot 7 D4-454 PLC User Manual, 1st Edition, Rev. D...
- Page 526 Appendix Appendix Appendix roduct eights In This Appendix... Product Weight ......................C-2...
- Page 527 9.5 oz (270g) D4-DCM 8.2 oz (233g) D4-32TD1 6.7 oz (190g) Networking Weight D4-32TD1-1 6.7 oz (190g) F4-MAS-MB 8.9 oz (252g) D4-32TD2 6.7 oz (190g) H4-ECOM100 6.4 oz (182g) D4-64TD1 7.4 oz (210g) D4-454 PLC User Manual, 1st Edition, Rev. D...
- Page 528 D4-RSDC 26.8 oz (760g) H4-EBC 25.3oz (718g) H4-ERM100 6.4oz (192g) Specialty Weight F4-16PID) 7.3 oz (207g F4-8MPI 12.3 oz (350g) F4-4LTC 12.7 oz (361g) H4-CTRIO 8.8 oz (250g) D4-FILL 4.0 oz (357g D4-454 PLC User Manual, 1st Edition, Rev. D...
- Page 529 Appendix Appendix Appendix ASCII T Able In This Appendix... ASCII Conversion Table ................D-2...
- Page 530 Appendix D: ASCII Table ASCII Conversion Table DECIMAL TO HEX TO ASCII CONVERTER ASCII ASCII ASCII ASCII space “ & ‘ < > D4-454 PLC User Manual, 1st Edition, Rev. D...
- Page 531 Binary Coded Decimal (BCD) Numbering System .............E-5 Real (Floating Point) Numbering System ................E-5 BCD/Binary/Decimal/Hex/Octal - What is the Difference? ..........E-6 Data Type Mismatch ........................E-7 Signed vs. Unsigned Integers ....................E-8 AutomationDirect.com Products and Data Types .............E-9 DirectLOGIC PLCs ........................E-9 C-more / C-more Micro-Graphic Panels ................E-9...
- Page 532 + 1*2 +1*2 or 128 10 + 64 10 + 16 10 + 4 10 + 1 10 ). Binary/Decimal Bit Pattern Bit # Power Decimal Bit Value Max Value 65535 Table 2 D4-454 PLC User Manual, 1st Edition, Rev. D...
- Page 533 “h” at the end is just a label to make sure we know that it is a hex number. Also, D8AF can be written with a labeling prefix as “0xD8AF”. D4-454 PLC User Manual, 1st Edition, Rev. D...
- Page 534 0 x 8 = 0 x 3 x 8 = 3 x 7 x 8 = 7 x 64 = 448 4 x 8 = 4 x 512 = 2048 2520 decimal equivalent D4-454 PLC User Manual, 1st Edition, Rev. D...
- Page 535 The sign bit is either “0” for positive or “1” for negative; • The exponent uses base 2; • The first bit of the mantissa is typically assumed to be “1.fff”, where “f” is the field of fraction bits. D4-454 PLC User Manual, 1st Edition, Rev. D...
- Page 536 The unfortunate side effect is that unless the data type is documented, it’s difficult to know what the data type is unless it contains the letters A-F. D4-454 PLC User Manual, 1st Edition, Rev. D...
- Page 537 Look at the following example and note the same value represented by the different numbering systems. Decimal Decimal 0110 0111 0100 0110 0110 0000 0100 0011 Binary 0001 0010 0011 0100 Binary Octal Octal D4-454 PLC User Manual, 1st Edition, Rev. D...
- Page 538 Table 12). Basically, 1’s are being changed to 0’s and all 0’s are being changed to 1. Two’s Compliment Decimal Binary 0000 0000 0110 0100 -100 1111 1111 1001 1100 Table 12 More information about 2’s complement can be found on the Internet. D4-454 PLC User Manual, 1st Edition, Rev. D...
- Page 539 “BCD int 16”. Binary format is either “Unsigned int 16” or “Signed int 16” depending on whether or not the value can be negative. Real number format is “Floating PT 32”. More available formats are, “BCD int 32”, “Unsigned int 32” and “Signed int 32”. D4-454 PLC User Manual, 1st Edition, Rev. D...
- Page 540 Appendix Appendix Appendix nsUpported ardware In This Appendix... Unsupported Hardware ......................F-2 D4-450 and D4-454 Differences .....................F-3...
- Page 541 0, 1, or 2 may not work with the D4-454. We suggest that any hardware older than ten years and not currently sold on the AutomationDirect.com website, be upgraded to a newer version. D4-454 PLC User Mv`anual, 1st Edition, Rev. D...
- Page 542 "DirectNet (master/slave), K-sequence, Non-procedure, Port 2 Protocol Non-procedure Modbus RTU (master/slave)" Firmware Update Port 1 only Supported from all ports Unsupported Hardware – See previous page NOTE: D4-454 will only support D4-HSC module firmware v2.3. D4-454 PLC User Manual, 1st Edition, Rev. D...
Need help?
Do you have a question about the D4-454 PLC and is the answer not in the manual?
Questions and answers