Advertisement
Overview

Write down the MAC address: 12 digit alphanumeric code located on the bottom of the timer.
Installing the Batteries
Insert two AA (1.5V) alkaline batteries (not included) and replace the tray.
Note: Firmly replace the battery tray to ensure water resistance and increase battery life. You will know the battery tray is fully inserted if it does not pull out easily.
 Replace batteries when low battery icon appears on display.
 Used up or dead batteries must be removed from the timer and disposed of properly. Do not dispose of batteries in fire. Batteries may explode or leak. Remove batteries when storing timer.
PROGRAMMING THE TIMER WITH BLUETOOTH
Open the B-hyve App
Log into your B-hyve account and tap "My B-hyve". Go to "devices" then "add device". Select the B-hyve XD timer.
The app will walk you through the rest of the process.


For new users, search apps for "B-hyve" and download the free Android or iOS app. Create an account to begin setup.
The Bluetooth® icon on the display should be flashing indicating the timer is in pairing mode.
If at any time you need to re-pair or do a factory reset, turn the dial so the arrow is pointing to OFF, press and hold the dial for 5 seconds.
Note: When the display shows a full screen of symbols release the dial. The display will show 12:00 pm in the AUTO/MANUAL mode verifying the reset has been completed. Resetting the timer will erase all programs and it will need to reprogrammed to your desired watering schedule.
Note: Your display will show lock icon to indicate that the timer is using the B-hyve app to program your timer.

PROGRAMMING THE TIMER AT THE FAUCET
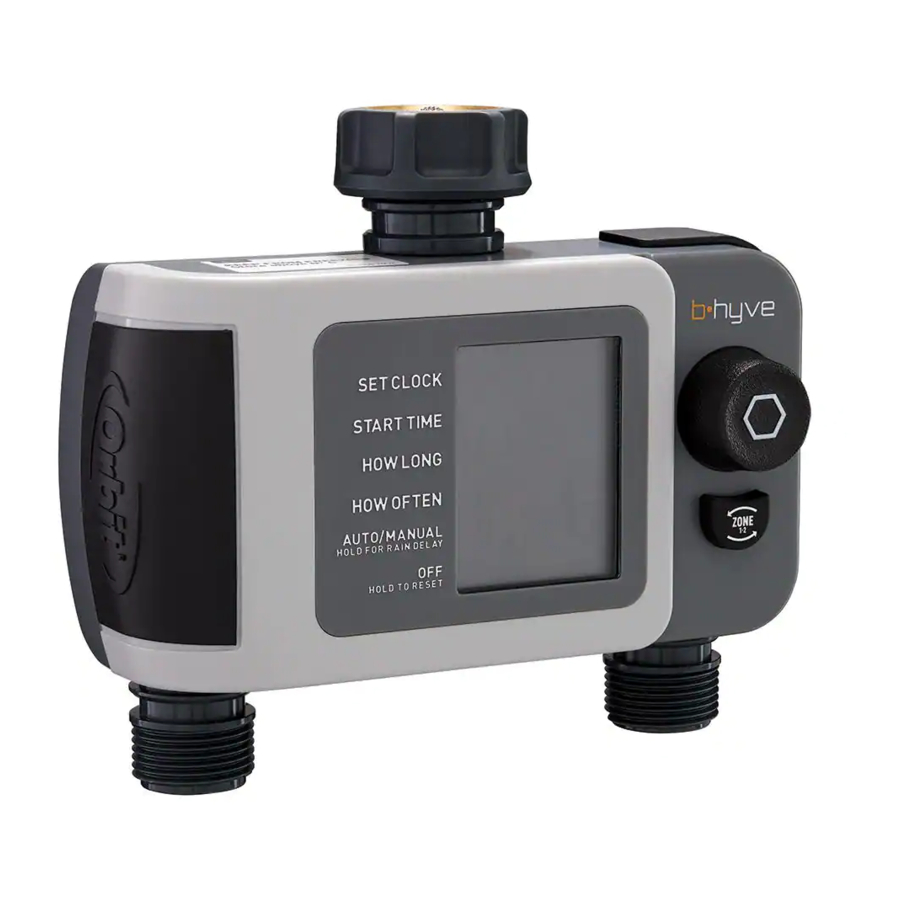
Set Clock
- Turn the dial so the arrow is pointing to SET CLOCK.
- Press the dial to confirm the selection, the hour will begin to flash.
- Turn the dial until the current hour is displayed including the correct AM or PM, then press the dial to confirm the selection. The minutes will begin to flash indicating the next step in the process.
- Turn the dial until the current minutes are displayed, then press the dial to confirm the selection.
Start Time
- Turn the dial so the arrow is pointing to START TIME.
- Verify zone 1 is selected, noted by the zone number on the display. To switch zones, press the zone button.
- Press the dial to confirm the selection, the time slot will begin to flash.
- Turn the dial until the desired start time hour is displayed including the correct AM or PM, then press the dial to confirm the selection. The minutes will begin to flash, indicating the next step in the process.
- Turn the dial until the desired minutes are displayed, then press the dial to confirm the selection.
How Long
- Turn the dial so the arrow is pointing to HOW LONG.
- Press the dial to confirm the selection, the time slot will begin to flash.
- Turn the dial until the desired number of minutes are displayed. Press the dial to confirm the selection.
How Often
- Turn the dial so the arrow is pointing to HOW OFTEN.
- Press the dial to confirm the selection, the number slot will begin to flash.
- Turn the dial until the desired interval is displayed, then press the dial to confirm the selection.
Note: 1 day is every day, 2 days is every other day, etc.
Zone 1 is now programmed! You can now follow the steps to program Zone 2, or you can skip to the Auto Mode Section.
Programming Zone 2
- Turn the dial so the arrow is pointing to Start Time.
- Press the Zone Button to select zone 2.
- With zone 2 now selected, repeat the steps for Start Time, How Long, and How Often.
AUTO MODE
- Turn the dial so the arrow is pointing to AUTO/MANUAL.
- Press the dial to confirm the selection, the arrow will stop flashing and you are now in AUTO mode.
Congratulations!
Your timer is now programmed. The display will flash between the current time and how long until the next start time.
While watering is in process, the dial at the timer will deactivate and will not scroll until the current watering cycle is finished. To stop activate watering press the dial.
ADDITIONAL FEATURES
Rain Delay
Rain delay allows you to postpone your watering schedule for a set period of time. To access the rain delay feature at the timer, follow the steps below.
- With the timer in the AUTO mode, press and hold the dial for 3 seconds.
- The rain delay icon will appear and the number slot will begin to flash.
- Turn the dial until the desired amount of time to delay watering is displayed, then press the dial to confirm the selection.
- The display will flash between the current time and how long until the rain delay ends.
To remove a rain delay, press and hold the dial for 3 seconds. The rain delay icon will turn off and your timer will resume its programmed watering schedule.
Manual/Hand Watering
This feature allows you to water without interrupting your programmed watering schedule. To access this feature, follow the steps below.
- With the timer in AUTO mode, press the dial once quickly to access the MANUAL feature.
- Manual will appear on the display and the time slot will begin to flash. Verify the zone you want to water from is selected, if not press the zone button.
- Turn the dial until the desired number of minutes are displayed, then press the dial to confirm selection.
- The watering icon will appear on the display and the display will begin to flash between the current time and the remaining manual watering minutes.
Note: There may be a slight delay between the time the dial is pressed and when manual watering begins.
To stop manual watering, press the dial. The watering icon will disappear and your timer will resume its programmed watering schedule.
If the manual watering feature will overlap a programmed watering scheduled, the timer will delay that program until the manual watering feature is done.

VideosSetting Up Orbit B-hyve XD Bluetooth 2 Outlet Hose Faucet Timer Video
Documents / Resources
References
Download manual
Here you can download full pdf version of manual, it may contain additional safety instructions, warranty information, FCC rules, etc.
Download Orbit B-hyve XD Bluetooth 2 Outlet Hose Faucet Timer Quick Start
Advertisement


Need help?
Do you have a question about the B-hyve XD Bluetooth 2 Outlet Hose Faucet Timer and is the answer not in the manual?
Questions and answers