Advertisement
Quick Links
E XP ERIM E NT MANUAL
Ultra
Bionic
Blaster
Franckh-Kosmos Verlags-GmbH & Co. KG, Pfizerstr. 5-7, 70184 Stuttgart, Germany | +49 (0) 711 2191-0 | www.kosmos.de
Thames & Kosmos, 89 Ship St., Providence, RI, 02903, USA | 1-800-587-2872 | www.thamesandkosmos.com
Thames & Kosmos UK LP, 20 Stone Street, Cranbrook, Kent, TN17 3HE , UK | 01580 713000 | www.thamesandkosmos.co.uk
ASSEMBLY VIDEO
&
StEp-BY-StEp guiDE
Scan this QR code
for a step-by-step
assembly video and
manual guide.
Advertisement

Related Manuals for Thames & Kosmos Ultra Bionic Blaster


Summary of Contents for Thames & Kosmos Ultra Bionic Blaster
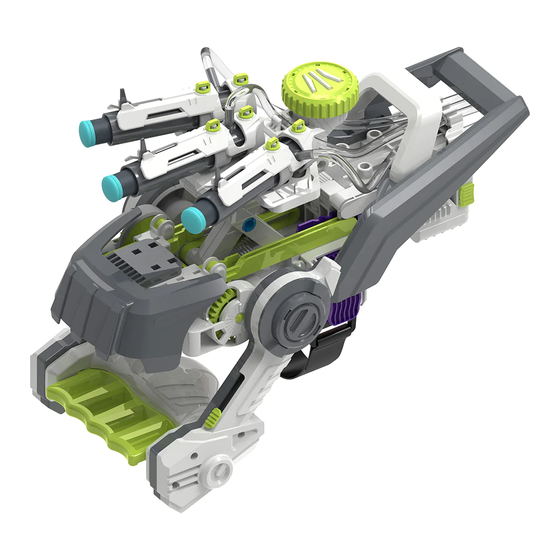
- Page 1 E XP ERIM E NT MANUAL Ultra Bionic Blaster ASSEMBLY VIDEO & StEp-BY-StEp guiDE Scan this QR code for a step-by-step assembly video and manual guide. Franckh-Kosmos Verlags-GmbH & Co. KG, Pfizerstr. 5-7, 70184 Stuttgart, Germany | +49 (0) 711 2191-0 | www.kosmos.de Thames &...
- Page 2 Good to know! KIT CONTENTS Do you have any questions or are you missing any parts? Our tech support team will be happy to help you! support@thamesandkosmos.com What’s inside your experiment kit: or 1-800-587-2872 Pull t handl the sh platfo trigge the p autom...
- Page 3 Choking hazard — small parts may be swallowed or inhaled. Strangulation ASSEMBLY STARTS ON PAGE 2 hazard — long tubes and belts may Ultra Bionic Blaster Assembly ........2 become wrapped around the neck. Testing the cylinder ............ 6 Keep the packaging and instructions as Operating Instructions ..........20...
- Page 4 ULTRA BIONIC BLASTER ASSEMBLY medium spring Slide E17 and E18 into the slots of G6. The teeth of E8 face down. Flip over. This is subassembly A. Squeeze the trigger. It should spring back smoothly. Apply oil all around the teeth of E12, as shown by the yellow arrows.
- Page 5 Assembling the Ultra Bionic Blaster Note: C3 is labeled with an R. Move the green slider back and forth. The movement should be smooth. 1. Apply a small amount of oil to the teeth of E11. 2. Orient parts E11 and G1 so that both of the L letters are face up.
- Page 6 Press Assemble in order. Apply oil all A13 in all around the the way. groove of A15 as shown. The two tabs of A13 fit into the slots of A15. large O-ring Make sure the sticky side faces up. Top view Bottom view Apply oil to the outside of the...
- Page 7 Assembling the Ultra Bionic Blaster Press down so that Press subassembly D A16 hooks around the all the way in, aligning metal rod. the four notches into the grooves of A10. Pull up on Make sure the subassembly E to...
- Page 8 Apply oil to the O-ring. Line up the opening in A11 with this line. Secure A11 with four screws. STOP Perform cylinder tests A and B before continuing to step 31. CYLINDER TEST Make sure the piston rod has been installed correctly. 1.
- Page 9 Assembling the Ultra Bionic Blaster Make sure the air wheel (A18) is in the correct position. 1. Place the notch of B7 all the way into the groove of the cylinder. 2. Slide the notch of B7 along the groove as shown.
- Page 10 Note the difference between the parts: Make sure to insert G5 parallel to G2. Rotate the E13 parts 90° to lock. Side view Align the three lines. Rotate the green dial 180° clockwise. The cylinders should spread open. Press all the way down until you hear a click.
- Page 11 Assembling the Ultra Bionic Blaster Make sure the fuzzy side faces out. IMPORTANT! Do not cut the tabs off of the D3 parts. They are not burrs. Fold over the strap so that the rough side sticks to the fuzzy side.
- Page 12 1. Place subassembly L into 2. Slide it back to A9 as shown. lock it in place. Flip over. 3. Place the Before After other loop of the spring (B8) over the hook on the bottom of A9. Push the lower sections of both purple Place A4 as shown.
- Page 13 Assembling the Ultra Bionic Blaster Hold the assembly in your hand while Press subassembly F all the way in you place subassembly F. until you hear a click. The cylinder will lock automatically. click Installing the Cylinder Check out the...
- Page 14 Press E4 all the Slide back until you way in. hear a click. click Top view You may need to push Press E3 all the the piston rod in so that way onto E9. the holes lines up. 1. Notice there are 2.
- Page 15 Assembling the Ultra Bionic Blaster Align gears exactly as shown. Turn the axle so that the line in the center is vertical and aligned as Side view shown. Place the gear E1 so that the line is on the bottom, vertical, 1.
- Page 16 Fasten, but do not tighten the screws all the way. Make sure E8 is pulled out all the way Apply oil to the teeth of while assembling. subassembly A on both sides. Align gears exactly as shown. Turn the axle to so that the line in the center is Side view vertical and aligned as...
- Page 17 Assembling the Ultra Bionic Blaster After installing subassemblies A, B, and C, test the trigger. > When the trigger is at rest, both green sliders should be all the way down, and there should be no gap between the trigger and the handle.
- Page 18 1. Place subassembly G, 2. To lock in place, slide back making sure to align the until you hear a click. Before grooves as shown. Side view After click Side view Notice there are R (right) and L (left) letters on the parts. 1.
- Page 19 Assembling the Ultra Bionic Blaster 1. Line up the three holes on the right 3. Use both hands to push subassembly side of subassembly J as shown. J back until you hear a click. 2. Line up the other three holes and press down all the way.
- Page 20 Start Use the ruler above to cut two pieces of tube to a length of 25 cm, and one piece of tube to 28.5 cm. 25 cm x2 28.5 cm x1 1. Place one end of a 25-cm tube on the right-most nozzle.
- Page 21 Testing the Cylinder 1. Place one end of the other 25-cm tube on the left-most nozzle. 2. Clip the tube into the left-most clip. 3. Place the other end of the tube on the top left nozzle at the back of the blaster. 25 cm Connect the tube to the top left...
- Page 22 OPERATING INSTRUCTIONS trouble shooting? If your blaster is not working properly, don’t panic! We’re here to help. Scan this QR code to access troubleshooting resources. Engineering is all about figuring stuff out!
- Page 23 Once the er is pressed, latform will ExpEriMEntS AnD matically rise SciEncE infO! Scan this QR code to see awesome experiments you can do with your Ultra Bionic Blaster! Plus learn about pneumatics and devices that use air to perform work.
- Page 24 2nd Edition © 2022 Thames & Kosmos, LLC, Providence, RI, USA Thames & Kosmos® is a registered trademark of Thames & Kosmos, LLC. This work, including all its parts, is copyright protected. Any use outside the specific lim- its of the copyright law is prohibited and punishable by law without the consent of the publisher.
Need help?
Do you have a question about the Ultra Bionic Blaster and is the answer not in the manual?
Questions and answers
I lost some screws, so what type of screws come with the toy?