Table of Contents
Advertisement
Quick Links
Advertisement
Table of Contents

Related Manuals for Parklio BRAIN


Summary of Contents for Parklio BRAIN
- Page 1 PARKLIO™ BRAIN USER MANUAL...
- Page 2 Statement of Conditions In the interest of improving internal design, operational function, and/or reliability, Parklio™ reserves the right to make changes to the products described in this doc- ument without notice. Parklio does not assume any liability that mayoccur due to...
- Page 3 Parklio Brain. Please read this manual first! Dear Customers, We hope that all your expectations of this product will be fulfilled. Parklio™ Chain is manufactured using the latest technologies and has undergone rigorous quality control procedures.
-
Page 4: Table Of Contents
TABLE OF CONTENTS Table of Contents....................4 Package Contents....................5 Features........................6 Hardware Overview....................7 Technical Specification..................8 Hardware Setup.......................9 Before You Begin...........................9 Input/output list..........................9 Connecting steps..........................9 Dimensions.......................10 Reset and Add Parklio Brain................11 Installing the application..................12... -
Page 5: Package Contents
2.4 GHz Antenna Table 1.1 - Package Contents If any of the parts are incorrect, missing, or damaged, contact your Parklio™ deal- er. Keep the carton, including the original packing materials, in case you need to return the product for repair. -
Page 6: Features
Parklio™ can now be integrated with your existing parking products. Parklio™ brain is a universal and unique electronic model so it can fit all your out- dated products. You will be able to control your existing parking products with your smartphone and enjoy all the functionalities the system is providing. -
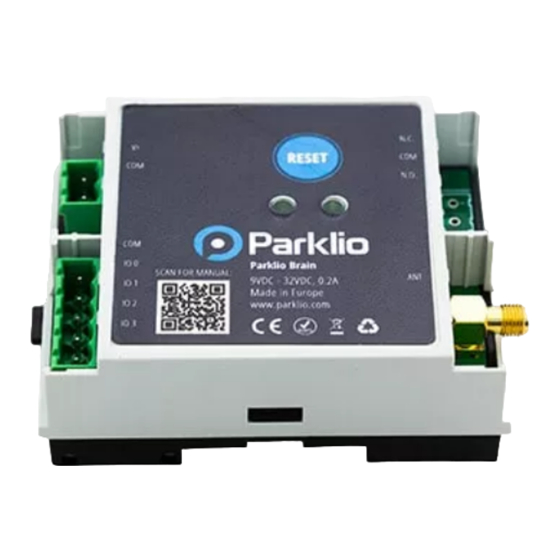
Page 7: Hardware Overview
Figure 3.1 - Status and connection board Power terminal Connectors for powering the Parklio Brain Input terminals Input terminals for receiving info about the device controlled by Parklio Brain Output terminals for providing open/close command to the device controlled Relay terminals by Parklio Brain SMA female connector for connecting the 2.4 GHz antenna provided with the Parklio... -
Page 8: Technical Specification
4. Technical Specification Parameter Value Input Voltage 8 VDC ~ 32 VDC ~20 mA normal operation, add 2 mA for each active pullup DC Current (Typ.) maximum 100 mA Inrush current 0.5 A Working temperature range e -20 °C - +60 °C Working humidity Up to 90 % RH Operating altitude... -
Page 9: Hardware Setup
Input/output terminal, can be configured through the mobile application IO 3 Table 5.1 - Input/output list 5.2. Connecting steps Connect the V+ terminal on the Parklio Brain to the VDC (9-32VDC) terminal on the control Step 1 unit. Step 2 Connect the COM terminal on the Parklio Brain to the COM terminal on the control unit. -
Page 10: Dimensions
6. Dimensions 88.6... -
Page 11: Reset And Add Parklio Brain
Reset and Add Parklio Brain To reset the Brain, Press and hold a Reset button on the Parklio Brain until the Green light turns on. To add the Parklio Brain, click to add a new device through the Parklio Connect mobile application, and search for the device with the name stated on your Parklio Brain or scan the QR code from the Parklio Brain. -
Page 12: Installing The Application
Installing the application This section will provide detailed instructions on how to connect the mobile appli- cation with a product and how to control a product using the free Parklio connect mobile application. The application can be downloaded by scanning the following QR codes:... - Page 13 7.1. Register and login To use Parklio Connect the user needs to be logged in. An user may login with an existing Google account, an Apple account, or the user may create and use a Parklio account with their email.
- Page 14 To add a product to the account press the + button on the top right corner of the dashboard. The Add parking product screen opens and the smartphone starts scanning for nearby Parklio devices. This step should be done in close proximity to the Parklio device you are adding.
- Page 15 PARKLIO LOWERED - Indicates your product is down (open) • PARKLIO EXTENDED - Indicates your product is up (closed) • PARKLIO EXTENDING - Indicates your product is moving up (closing) • PARKLIO LOWERING - Indicates your product is moving down (opening) •...
- Page 16 Change the device name Parklio devices allow the user to change their name, so they can be more easily identified. To change the device name click on the DEVICE TITLE in the settings. Change the name of the device and click SAVE. The new name will now be dis- played.
- Page 17 Key sharing An important feature of all Parklio products is the option for key sharing. The appli- cation allows the owner of the device to share the digital key of his device. To use this feature an internet connection is required. It is not required to be connected to a barrier via bluetooth.
- Page 18 If it is necessary to remove access from a user to whom a key was shared it is pos- sible to do this from the Parklio Connect application. To use this feature an internet connection is required. It is not required to be connected your product via bluetooth.
- Page 19 Product information Product information such as the Barrier ID and Firmware version is displayed at the bottom of the settings screen. Removing your product In order to remove a product from your account or to delete a key which was shared to you enter the Device Settings screen and press the garbage can icon.
Need help?
Do you have a question about the BRAIN and is the answer not in the manual?
Questions and answers