
Related Manuals for Digi SM-5300


Summary of Contents for Digi SM-5300
- Page 1 All manuals and user guides at all-guides.com USER MANUAL SM-5300 PC SCALE PRINTER Edition 2 M o d e l S M - 5 3 0 0 U s e r M a n u a l COPYRIGHT © 2016 TERAOKA WEIGH-SYSTEM PTE. LTD.
-
Page 2: Table Of Contents
Notice ........................3 Safety Information ....................4 Safety Regulation ....................5 Product Information ....................7 1.1 Specification ......................7 1.2 Overall View of SM-5300 ..................9 1.2.1 SM-5300 Bench Type ..................9 1.2.2 SM-5300 Pole Type ..................10 1.3 Product Layout ....................11 1.3.1... - Page 3 All manuals and user guides at all-guides.com Table of Content –––––––––––––––––––––––––––––––––––––––– Model: SM-5300 3.2.1 PLU Report ....................60 3.2.2 Dept Report ....................62 3.2.3 Clerk Report ....................64 3.2.4 Clerk LOG ...................... 66 3.2.5 Terminal Report ..................... 68 3.2.6 Store Summarized Report ................70 3.2.7...
-
Page 4: Notice
All manuals and user guides at all-guides.com Notice ––––––––––––––––––––––––––––––––––––––––––––––––––––––––––––– Model: SM-5300 Notice DIGI® The material contained in this document is proprietary and for information only and is subject to change without notice. Teraoka Weigh-System assumes no responsibility for any errors or damages arising from misinterpretation of any procedure. -
Page 5: Safety Information
All manuals and user guides at all-guides.com Safety Information –––––––––––––––––––––––––––––––––––––– Model: SM-5300 Safety Informati o n The operator of the equipment shall comply with the safety and warning indications and procedures outlined in this document. Teraoka Weigh - System Pte Ltd assumes no responsibility or liability for failure to comply with these requirements. -
Page 6: Safety Regulation
All manuals and user guides at all-guides.com Safety Regulation –––––––––––––––––––––––––––––––––––––––– Model: SM-5300 Safety Regul a ti o n Federal Communication Commission Interference Statement This equipment has been tested and found to comply with the limits for a Class B digital device, pursuant to Part 15 of the FCC Rules. - Page 7 All manuals and user guides at all-guides.com Safety Regulation –––––––––––––––––––––––––––––––––––––––– Model: SM-5300 IDA Label M o d e l S M - 5 3 0 0 U s e r M a n u a l...
-
Page 8: Product Information
All manuals and user guides at all-guides.com Product Information –––––––––––––––––––––––––––––––––––– 1.1 Specification Product Informati o n 1.1 Specification Variation : Description Model Dimension (D x W x H in mm) Bench SM5300LL 472 (adjustable) x 360 x 136 SM5300B 472 (adjustable) x 360 x 136 Pole SM5300LL 500 (adjustable) x 360 x 542... - Page 9 All manuals and user guides at all-guides.com Product Information –––––––––––––––––––––––––––––––––––– 1.1 Specification Operation Humidity : 15% to 85%RH : ARM Cortex A9 (iMX6 Solo) Single Core 1GHz System Memory : Built-in NAND Flash 1GB Storage : 512MB DDR3 : LINUX I/O Interface : 1 x Ethernet 10/100 Base T : 4 x USB Ports...
-
Page 10: Overall View Of Sm-5300
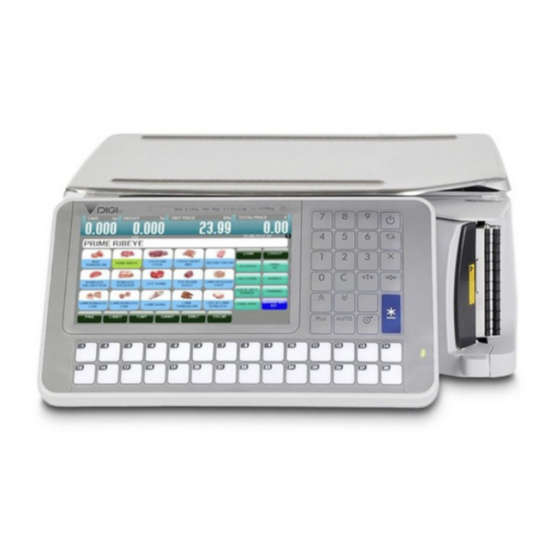
All manuals and user guides at all-guides.com Product Information –––––––––––––––––––––––––––––––––––– 1.2 Overall View of SM-5300 1.2 Overall View of SM-5300 1.2.1 SM-5300 Bench Type M o d e l S M - 5 3 0 0 U s e r M a n u a l... -
Page 11: Sm-5300 Pole Type
All manuals and user guides at all-guides.com Product Information –––––––––––––––––––––––––––––––––––– 1.2 Overall View of SM-5300 1.2.2 SM-5300 Pole Type M o d e l S M - 5 3 0 0 U s e r M a n u a l... -
Page 12: Product Layout
All manuals and user guides at all-guides.com Product Information –––––––––––––––––––––––––––––––––––– 1.3 Product Layout 1.3 Product Layout 1.3.1 Overall Layout SM-5300LL 1. Front and Back View 2. Left and Right Side View 3. Top View Display M o d e l S M - 5 3 0 0 U s e r M a n u a l | 11... -
Page 13: Overall Layout Of Sm-5300P
All manuals and user guides at all-guides.com Product Information –––––––––––––––––––––––––––––––––––– 1.3 Product Layout 1.3.2 Overall Layout of SM-5300P 1. Front View 2. Left and Right Side View Display M o d e l S M - 5 3 0 0 U s e r M a n u a l | 12... -
Page 14: Overall Layout Of Sm-5300Ssp 19
All manuals and user guides at all-guides.com Product Information –––––––––––––––––––––––––––––––––––– 1.3 Product Layout 1.3.3 Overall Layout of SM-5300SSP 19” 1. Front View 2. Left and Right Side View M o d e l S M - 5 3 0 0 U s e r M a n u a l | 13... -
Page 15: Interface
All manuals and user guides at all-guides.com Product Information –––––––––––––––––––––––––––––––––––– 1.3 Product Layout 1.3.4 Interface 1.3.5 Indicator Display 1. Registration Mode Screen Area /Function USAGE Preset Tare Display Display Preset Tare Weight Display Display Weight value Unit Price Display Display Unit Price amount Date and Time Display Current Date And Time Total Price Display... - Page 16 All manuals and user guides at all-guides.com Product Information –––––––––––––––––––––––––––––––––––– 1.3 Product Layout REMARKS: 1. PREV & NEXT keys will appears when there's more than 1 page of Preset/Function keys. 2. When in Prepack Mode, the Clerk/Function keys at the bottom of the screen will not be shown.
-
Page 17: Keys & Key Function
All manuals and user guides at all-guides.com Product Information –––––––––––––––––––––––––––––––––––– 1.3 Product Layout 1.3.6 Keys & Key Function Panel Key *Actual legends and symbols may differ depending on local regulations and requirements. Key Function Turn on/off the display. Enter numeric data. ... -
Page 18: Printer Setting
All manuals and user guides at all-guides.com Product Information –––––––––––––––––––––––––––––––––––– 1.4 Printer Setting 1.4. Printer Setting 1.4.1 Receipt, Label and Linerless Specification Outer diameter of rolls Maximum 105mm Inner diameter of rolls Minimum 40mm Wide of receipt roll Maximum 60mm Wide of label roll Maximum 60mm LABEL TYPE... -
Page 19: Character Size & No. Of Characters Available For Label Printing
All manuals and user guides at all-guides.com Product Information –––––––––––––––––––––––––––––––––––– 1.4 Printer Setting 1.4.2 Character Size & No. of Characters available for Label Printing 10 kinds of letter sizes are available as follows: The number of letters per line for Commodity name depends on the label format: Label Format: A and C S1 --- the smallest, 45 letters M1 --- middle size, 27 letters... -
Page 20: Receipt, Label And Linerless Setting
All manuals and user guides at all-guides.com Product Information –––––––––––––––––––––––––––––––––––– 1.4 Printer Setting 1.4.3 Receipt, Label and Linerless Setting CAUTION There is a cutter at the printer door near the dispenser. Take care not to touch or cut your fingers against the cutter during this process. 1. - Page 21 All manuals and user guides at all-guides.com Product Information –––––––––––––––––––––––––––––––––––– 1.4 Printer Setting 4. Insert a new label/receipt roll and then setting cassette For SM5300P a. Set the cassette a label, receipt or linerless as per diagram below: Note: Can skip this step if have set the cassette Label: (∆...
- Page 22 All manuals and user guides at all-guides.com Product Information –––––––––––––––––––––––––––––––––––– 1.4 Printer Setting c. For linerless , take the end of the linerless stock and run it through guide [1] and pull the receipt paper up to the dispenser [2] without rolling it to the reel. Refer to the diagram below: d.
- Page 23 All manuals and user guides at all-guides.com Product Information –––––––––––––––––––––––––––––––––––– 1.4 Printer Setting 5. Push back the cassette into the main unit until a lock sound is heard, For SM5300LL insert new linerless roll then pull linerless point to thermal head. SM5300P SM5300LL Push the...
-
Page 24: Typical Operation
All manuals and user guides at all-guides.com Typical Operation ––––––––––––––––––––––––––––––––––––––––– 2.1 Product Setup Typi c al Operati o n 2.1 Product Setup 1. Place product on a firm and level surface. 2. Set scale leveling by adjusting the stands (Refer to Pictures 1). 3. -
Page 25: Date And Time Setup
All manuals and user guides at all-guides.com Typical Operation –––––––––––––––––––––––––––––––––––––––– 2.2 Date and Time Setup 2.2 Date and Time Setup The built-in clock automatically works once they are set: Date (Month/Day/Year) ------- 2 digits for each part. Time -------------------------------- 4 digits (24 Hours). - Page 26 All manuals and user guides at all-guides.com Typical Operation –––––––––––––––––––––––––––––––––––––––– 2.2 Date and Time Setup OPERATION DISPLAY Touch [TIME] tab Then enter current Time by numeric keypad. (e. g. 1130 = 11:30 AM) Touch [SAVE] key or press [PLU] button to save the programming data and time and the screen will return to MAINTENANCE MODE.
-
Page 27: Registration Mode
All manuals and user guides at all-guides.com Typical Operation ––––––––––––––––––––––––––––––––––––––––– 2.3 Registration Mode 2.3 Registration Mode 2.3.1 PLU Call Up To call up programmed PLU for weighing. Manual PLU Call Up. Automatic PLU Call By Registration Mode Preset Keys. Note: The machine will display the following error messages if incorrect operation is performed. - Page 28 All manuals and user guides at all-guides.com Typical Operation –––––––––––––––––––––––––––––––––––––––– 2.3 Registration Mode Automatic PLU Call Up Automatic PLU Call up also can use the scanner to scan the barcode. Wherever the Barcode has programmed in PLU Program and Barcode programming (Please refer to PLU Program and Barcode Programming on SM5300 Operation Manual (Part 1 - Main) –...
- Page 29 All manuals and user guides at all-guides.com Typical Operation –––––––––––––––––––––––––––––––––––––––– 2.3 Registration Mode PLU Call Up by Preset Key of Registration Mode To enable this function, the PLU must assign on the Preset Key of Registration Mode in advance (Please refer to PLU Program and Barcode Programming on SM5300 Operation Manual (Part 1 - Main) –...
-
Page 30: Item Label Printing In Manual Mode
All manuals and user guides at all-guides.com Typical Operation –––––––––––––––––––––––––––––––––––––––– 2.3 Registration Mode 2.3.2 Item Label Printing in Manual Mode You can use this operation to print out item labels for a PLU or Non-PLU of Weighing Item or Non- weighing Item. - Page 31 All manuals and user guides at all-guides.com Typical Operation –––––––––––––––––––––––––––––––––––––––– 2.3 Registration Mode 2. Label Printing for Non-PLU Item It is possible to print item label for Non-PLU Item at Manual Mode. The Non-PLU Item will be cleared if a PLU is called up or [CLEAR] key is pressed. Note: 1) SPEC 141D002 "Manual Price Entry"...
-
Page 32: Total Label Or Receipt Printing
All manuals and user guides at all-guides.com Typical Operation –––––––––––––––––––––––––––––––––––––––– 2.3 Registration Mode 2.3.3 Total Label or Receipt Printing This operation is used for printing total label or receipt for counter sales in Manual Mode. For SM5300P, make sure cassette is set to LABEL for Total Label Printing or set to RECEIPT for Receipt Printing or set to LINERLESS setting for Total Label and Receipt Printing. - Page 33 All manuals and user guides at all-guides.com Typical Operation –––––––––––––––––––––––––––––––––––––––– 2.3 Registration Mode OPERATION DISPLAY Touch [MARIA] key to add the sales data. Touch [MARIA] key again to go into the Accumulation Mode. Note: 1. After printing of Total Label or Receipt, display will return to Registration Mode.
- Page 34 All manuals and user guides at all-guides.com Typical Operation ––––––––––––––––––––––––––––––––––––––––– 2.3 Registration Mode 2. [Price Discount] Function Key in Accumulation Mode This is used to discount the total price by the following formula. PRICE TO PAY = ORIGINAL TOTAL PRICE - ENTERED DISCOUNT VALUE Note: [PRICE DISC] function key must be assigned in advance, please refer to preset key programming in Operation Manual Advance Example: Giving Price Discount of $10.00 for buying 2.5kg of CABBAGE.
- Page 35 All manuals and user guides at all-guides.com Typical Operation ––––––––––––––––––––––––––––––––––––– 2.3 Registration Mode OPERATION DISPLAY Press [PRINT] key to issue a Label and then remove product from platter. M o d e l S M - 5 3 0 0 U s e r M a n u a l | 34...
- Page 36 All manuals and user guides at all-guides.com Typical Operation –––––––––––––––––––––––––––––––––––––––– 2.3 Registration Mode 3. [Unit Price % Disc] Function Key in Accumulation Mode This is used to discount the total price by the following formula. PRICE TO PAY = ORIGINAL TOTAL PRICE x (100% - ENTERED %) Note: [%PRICE DISC] function key must be assigned in advance, please refer to preset key programming in Operation Manual Advance Example: Giving % Price Discount of 25% for buying 2.5kg of IRISH BACON.
- Page 37 All manuals and user guides at all-guides.com Typical Operation –––––––––––––––––––––––––––––––––––––––– 2.3 Registration Mode OPERATION DISPLAY Press [PRINT] key to issue a Label and then remove product from platter. M o d e l S M - 5 3 0 0 U s e r M a n u a l | 36...
-
Page 38: Data Correction
All manuals and user guides at all-guides.com Typical Operation –––––––––––––––––––––––––––––––––––––––– 2.3 Registration Mode 2.3.4 Data Correction The data correction during accumulating operation is to correct sales transaction data when customer canceled the purchases or operators make a mistake before issuing Total Label or Receipt. - Page 39 All manuals and user guides at all-guides.com Typical Operation –––––––––––––––––––––––––––––––––––––––– 2.3 Registration Mode OPERATION DISPLAY Call Up PLU of MANGO and Place the product on the platter (e.g. 1.500kg) Touch [SANDRA] key to add the sales data. Remove the product from the platter and Call up PLU of WATER MELON and place the product on platter (e.g.
- Page 40 All manuals and user guides at all-guides.com Typical Operation ––––––––––––––––––––––––––––––––––––––– 2.3 Registration Mode OPERATION DISPLAY Select transaction item (e.g. Touch the 1st accumulated item MANGO). Note: Item No. 1 MANGO will be highlighted. Touch [VOID ITEM] key to cancel the selected Item.
- Page 41 All manuals and user guides at all-guides.com Typical Operation ––––––––––––––––––––––––––––––––––––––– 2.3 Registration Mode 2. Void by PLU Number Correction This function is to void the specified item during an accumulating operation, by specifying a PLU Number in the accumulating operation mode. All transaction data of the PLU number will be canceled.
- Page 42 All manuals and user guides at all-guides.com Typical Operation –––––––––––––––––––––––––––––––––––––––– 2.3 Registration Mode OPERATION DISPLAY Touch [SANDRA] key to add the sales data. Call up PLU of GRAPES again, then press [X] key to enter multiply mode and enter the sell Qty (e.g.
- Page 43 All manuals and user guides at all-guides.com Typical Operation ––––––––––––––––––––––––––––––––––––––– 2.3 Registration Mode OPERATION DISPLAY Then touch [VOID PLU] key to entry Transaction Correction Mode Enter the PLU number of GRAPES by numeric keypad. (e.g. Touch [ENTER] key Note: [ESC] key used to abort the transaction All the transaction data of PLU2 (GRAPES) will be canceling.
-
Page 44: Item Label Printing In Prepack Mode
All manuals and user guides at all-guides.com Typical Operation ––––––––––––––––––––––––––––––––––––––– 2.3 Registration Mode 2.3.5 Item Label Printing in Prepack Mode Pre-pack Mode can be switched from Manual mode by pressing [AUTO] key on keypad. In this mode, the following functions are available for: (1) For weighing item, label is automatically issued (without pressing [PRINT] key) after the weight of the item gets stable. - Page 45 All manuals and user guides at all-guides.com Typical Operation ––––––––––––––––––––––––––––––––––––––– 2.3 Registration Mode OPERATION DISPLAY Remove the product from the platter and take the label off. Repeat the above step 2 and 3 to weigh the next pack, until the last packed is weighed. Then call up a PLU of BANANA Press [PRINT] key to start issue the first label.
- Page 46 All manuals and user guides at all-guides.com Typical Operation ––––––––––––––––––––––––––––––––––––––– 2.3 Registration Mode 1. Item Label Issue for Non-PLU Item It is possible to print item label for Non-PLU Item at Pre-pack Mode. The Non-PLU Item will be cleared if a PLU is called up or [CLEAR] key is pressed. OPERATION DISPLAY In PREPACK MODE, enter the Price for Non-...
-
Page 47: Tare Operation
All manuals and user guides at all-guides.com Typical Operation ––––––––––––––––––––––––––––––––––––––– 2.3 Registration Mode 2.3.6 Tare Operation There are 2 ways to set Tare Weight at Registration Mode: (1) One Touch Tare (Weight Tare) (2) Digital Tare Tare value subtracted will be displayed on "TARE" window. The following operation examples show 2 ways of subtracting the Tare weight of a 20g tray. - Page 48 All manuals and user guides at all-guides.com Typical Operation ––––––––––––––––––––––––––––––––––––––– 2.3 Registration Mode OPERATION DISPLAY Press [TARE] key to clear the Tare value. M o d e l S M - 5 3 0 0 U s e r M a n u a l | 47...
- Page 49 All manuals and user guides at all-guides.com Typical Operation ––––––––––––––––––––––––––––––––––––––– 2.3 Registration Mode 2. Digital Tare This function can be used when tare weight is decided in advance. The knowing tare value (weight of the tray) can be entering by numeric keys. SPEC: SPEC 142B002 "Digital Tare"...
- Page 50 All manuals and user guides at all-guides.com Typical Operation ––––––––––––––––––––––––––––––––––––––– 2.3 Registration Mode 3. Tare Value Exchange There are two ways to do tare value exchange, Tare Accumulation and Tare Subtraction. One Touch Tare and Digital Tare can be used to do Tare Accumulation or Tare Subtraction. 1.
- Page 51 All manuals and user guides at all-guides.com Typical Operation –––––––––––––––––––––––––––––––––––––––– 2.3 Registration Mode OPERATION DISPLAY Press [TARE] key to subtract the tare weight Remove all weight from the platter and press [TARE] key to clear the tare. M o d e l S M - 5 3 0 0 U s e r M a n u a l | 50...
- Page 52 All manuals and user guides at all-guides.com Typical Operation ––––––––––––––––––––––––––––––––––––––– 2.3 Registration Mode 2. Tare Subtraction SPEC 142B005 "One Touch Tare subtraction" must be set to "Allow" in advance, to enable this function. OPERATION DISPLAY In REGISTRATION MODE, put weight on the platter e.g.
- Page 53 All manuals and user guides at all-guides.com Typical Operation ––––––––––––––––––––––––––––––––––––––– 2.3 Registration Mode OPERATION DISPLAY Remove the balance weight and press [TARE] key to clear the tare weight. M o d e l S M - 5 3 0 0 U s e r M a n u a l | 52...
-
Page 54: Self Service Mode
All manuals and user guides at all-guides.com Typical Operation ––––––––––––––––––––––––––––––––––––––– 2.4 Self Service Mode 2.4 Self Service Mode SPEC: Spec 146A017 Self Service “set to YES, to active the Self service mode in Menu mode. SPEC: Spec 141D072 Tenkey for Self Service Mode, to select the self service mode using which tenkey. - Page 55 All manuals and user guides at all-guides.com Typical Operation ––––––––––––––––––––––––––––––––––––––– 2.4 Self Service Mode OPERATION DISPLAY After issue out the label will prompt out message "PEEL LABEL". Take out the label,the message will be back to “PLEASE INPUT PLU CODE” and can continue next transaction.
-
Page 56: Mechanical Tenkey
All manuals and user guides at all-guides.com Typical Operation ––––––––––––––––––––––––––––––––––––––– 2.4 Self Service Mode 2.4.2 Mechanical Tenkey This Mechanical Tenkey function also used for weight item only, this mechanical tenkey self service mode we can see the image of the item product. SPEC: SPEC141D143 Self Service Preset Group, this spec depends on our own setting, for example we set to 1. - Page 57 All manuals and user guides at all-guides.com Typical Operation ––––––––––––––––––––––––––––––––––––––– 2.4 Self Service Mode OPERATION DISPLAY After issue out label will direct prompt out message "PEEL LABEL". Note: Please take out the label before continue to do next transaction. Press [MENU] button will back to Original MENU mode.
-
Page 58: Report Mode
All manuals and user guides at all-guides.com Report Mode ––––––––––––––––––––––––––––––––––––––––––––––––– 3.1 Report Mode Description Report Mode 3.1 Report Mode Description Report mode function is to view and print out various kinds of sales transaction reports for analysis. The following reports are available. Report Type Report Type PLU Report... - Page 59 All manuals and user guides at all-guides.com Report Mode ––––––––––––––––––––––––––––––––––––––––––––––––– 3.1 Report Mode Description ORDER TYPE ASCENDING : Ascending order print. DESCENDING : Descending order print. PRINT TYPE TRUNK : Printing Grand Total of Main Group. BOUGH : Printing Grand Total of Main Group and PLU Total. PRINT LIMIT For setting the report range, Department Number, Main Group Number, PLU Number, Clerk number to start and finish is to be entered.
- Page 60 All manuals and user guides at all-guides.com Report Mode ––––––––––––––––––––––––––––––––––––––––––––––––– 3.2 Entry to Report Mode OPERATION DISPLAY In MENU MODE screen. Touch [REPORT] key to enter to REPORT GENERATOR screen Note: 1. Touch [MENU] key o to exit REPORT GENERATOR screen. 2.
-
Page 61: Plu Report
All manuals and user guides at all-guides.com Report Mode ––––––––––––––––––––––––––––––––––––––––––––––––– 3.2 Entry to Report Mode 3.2.1 PLU Report PLU Report is used to view/print transaction data separated by PLU number. On PLU Report, Sales transaction report is printed depending on the date range selection. Example: Printing report for PLU Report (LAST 7 DAYS). - Page 62 All manuals and user guides at all-guides.com Report Mode ––––––––––––––––––––––––––––––––––––––––––––––––– 3.2 Entry to Report Mode OPERATION DISPLAY Touch [PRINT] key to print out the report. Note: 1. Touch [MENU] key, to back to Menu Mode display. Sample: PLU Report M o d e l S M - 5 3 0 0 U s e r M a n u a l | 61...
-
Page 63: Dept Report
All manuals and user guides at all-guides.com Report Mode ––––––––––––––––––––––––––––––––––––––––––––––––– 3.2 Entry to Report Mode 3.2.2 Dept Report Department Total Report is used to view/print transaction data separated by Department number. On Department Total Report, Sales transaction report is printed depending on the date range selection. - Page 64 All manuals and user guides at all-guides.com Report Mode ––––––––––––––––––––––––––––––––––––––––––––––––– 3.2 Entry to Report Mode OPERATION DISPLAY Touch [PRINT] key to print out the report. Note: 1. Touch [MENU] key, to back to Menu Mode display. Sample: Department Report M o d e l S M - 5 3 0 0 U s e r M a n u a l | 63...
-
Page 65: Clerk Report
All manuals and user guides at all-guides.com Report Mode ––––––––––––––––––––––––––––––––––––––––––––––––– 3.2 Entry to Report Mode 3.2.3 Clerk Report Clerk Report is used to view/print transaction data separated by Clerk Number. On Clerk Report, Sales transaction report is printed depending on the date range selection. Example: Printing report for Clerk Report (TODAY). - Page 66 All manuals and user guides at all-guides.com Report Mode ––––––––––––––––––––––––––––––––––––––––––––––––– 3.2 Entry to Report Mode OPERATION DISPLAY Touch [PRINT] key to print out the report. Note: 1. Touch [MENU] key, to back to Menu Mode display. Sample: Clerk Report M o d e l S M - 5 3 0 0 U s e r M a n u a l | 65...
-
Page 67: Clerk Log
All manuals and user guides at all-guides.com Report Mode ––––––––––––––––––––––––––––––––––––––––––––––––– 3.2 Entry to Report Mode 3.2.4 Clerk LOG Clerk Report is used to view/print all transaction that had done by CLERK Example: Printing report for Clerk LOG Report (TODAY). OPERATION DISPLAY In REPORT GENERATOR screen. - Page 68 All manuals and user guides at all-guides.com Report Mode ––––––––––––––––––––––––––––––––––––––––––––––––– 3.2 Entry to Report Mode OPERATION DISPLAY Touch [PRINT] key to print out the report. Note: 1. Touch [MENU] key, to back to Menu Mode display. Sample: Clerk Log M o d e l S M - 5 3 0 0 U s e r M a n u a l | 67...
-
Page 69: Terminal Report
All manuals and user guides at all-guides.com Report Mode ––––––––––––––––––––––––––––––––––––––––––––––––– 3.2 Entry to Report Mode 3.2.5 Terminal Report Terminal Report is used to view/print transaction data separated by Terminal Number. On Terminal Report, Sales transaction report is printed depending on the date range selection. Example: Printing report for Terminal Report (TODAY). - Page 70 All manuals and user guides at all-guides.com Report Mode ––––––––––––––––––––––––––––––––––––––––––––––––– 3.2 Entry to Report Mode OPERATION DISPLAY Touch [PRINT] key to print out the report. Note: 1. Touch [MENU] key, to back to Menu Mode display. Sample: TERMINAL REPORT M o d e l S M - 5 3 0 0 U s e r M a n u a l | 69...
-
Page 71: Store Summarized Report
All manuals and user guides at all-guides.com Report Mode ––––––––––––––––––––––––––––––––––––––––––––––––– 3.2 Entry to Report Mode 3.2.6 Store Summarized Report Store Summarized Report is used to view/print transaction data separated by Store. On Store Summarized Report, Sales transaction report is printed depending on the date range selection. Example: Printing report for Store Summarized Report (LAST 7 DAYS). - Page 72 All manuals and user guides at all-guides.com Report Mode ––––––––––––––––––––––––––––––––––––––––––––––––– 3.2 Entry to Report Mode OPERATION DISPLAY Touch [PRINT] key to print out the report. Note: 1. Touch [MENU] key, to back to Menu Mode display. Sample: Store Summarized Report M o d e l S M - 5 3 0 0 U s e r M a n u a l | 71...
-
Page 73: Hour Report
All manuals and user guides at all-guides.com Report Mode ––––––––––––––––––––––––––––––––––––––––––––––––– 3.2 Entry to Report Mode 3.2.7 24 Hour Report 24 Hour Report is used to view/print transaction data separated by 24 hour transaction. On 24 Hour Report, Sales transaction report is printed depending on the date range selection. Example: Printing report for 24 Hour Report (TODAY). - Page 74 All manuals and user guides at all-guides.com Report Mode ––––––––––––––––––––––––––––––––––––––––––––––––– 3.2 Entry to Report Mode OPERATION DISPLAY Touch [PRINT] key to print out the report. Note: 1. Touch [MENU] key, to back to Menu Mode display. Sample: 24 Hour Report M o d e l S M - 5 3 0 0 U s e r M a n u a l | 73...
-
Page 75: Void Report
All manuals and user guides at all-guides.com Report Mode ––––––––––––––––––––––––––––––––––––––––––––––––– 3.2 Entry to Report Mode 3.2.8 Void Report Void Report is used to view/print transaction data separated by Void transaction. On Void Report, Sales transaction report is printed depending on the date range selection. Example: Printing report for Void Report (TODAY). - Page 76 All manuals and user guides at all-guides.com Report Mode ––––––––––––––––––––––––––––––––––––––––––––––––– 3.2 Entry to Report Mode OPERATION DISPLAY 4. Touch [PRINT] key to print out the report. Note: 1. Touch [MENU] key, to back to Menu Mode display. Sample: Void Report (Today) M o d e l S M - 5 3 0 0 U s e r M a n u a l | 75...
-
Page 77: Tax Report
All manuals and user guides at all-guides.com Report Mode ––––––––––––––––––––––––––––––––––––––––––––––––– 3.2 Entry to Report Mode 3.2.9 Tax Report Tax Report is used to view/print Label data separated by Tax. On Tax Report, Sales transaction report is printed depending on the date range selection. Example: Printing report for Tax Report (TODAY). - Page 78 All manuals and user guides at all-guides.com Report Mode ––––––––––––––––––––––––––––––––––––––––––––––––– 3.2 Entry to Report Mode OPERATION DISPLAY Touch [PRINT] key to print out the report. Note: 1. Touch [MENU] key, to back to Menu Mode display. Sample: Tax Report M o d e l S M - 5 3 0 0 U s e r M a n u a l | 77...
-
Page 79: Queue Report
All manuals and user guides at all-guides.com Report Mode ––––––––––––––––––––––––––––––––––––––––––––––––– 3.2 Entry to Report Mode 3.2.10 Queue Report Queue Report is used to view/print Label data separated by Queue. On Queue Report, Sales transaction report is printed depending on the date range selection. Example: Printing report for Queue Report (LAST 7 DAYS) OPERATION... - Page 80 All manuals and user guides at all-guides.com Report Mode ––––––––––––––––––––––––––––––––––––––––––––––––– 3.2 Entry to Report Mode OPERATION DISPLAY Touch [PRINT] key to print out the report. Note: 1. Touch [MENU] key, to back to Menu Mode display. Sample: Queue Report (Today) M o d e l S M - 5 3 0 0 U s e r M a n u a l | 79...
-
Page 81: Store Report
All manuals and user guides at all-guides.com Report Mode ––––––––––––––––––––––––––––––––––––––––––––––––– 3.2 Entry to Report Mode 3.2.11 Store Report Store Total Report is used to view/print transaction data separated by store. On Store Total Report, Sales transaction report is printed depending on the date range selection. Example: Printing report for Store Total Report (LAST 7 DAYS). - Page 82 All manuals and user guides at all-guides.com Report Mode ––––––––––––––––––––––––––––––––––––––––––––––––– 3.2 Entry to Report Mode OPERATION DISPLAY Touch [PRINT] key to print out the report. Note: 1. Touch [MENU] key, to back to Menu Mode display. Sample: Store Total Report M o d e l S M - 5 3 0 0 U s e r M a n u a l | 81...
-
Page 83: Mg Report
All manuals and user guides at all-guides.com Report Mode ––––––––––––––––––––––––––––––––––––––––––––––––– 3.2 Entry to Report Mode 3.2.12 MG Report MG Report is used to view/print transaction data separated by MG number. On MG Report, Sales transaction report is printed depending on the date range selection. Example: Printing report for PLU Total Report (TODAY). - Page 84 All manuals and user guides at all-guides.com Report Mode ––––––––––––––––––––––––––––––––––––––––––––––––– 3.2 Entry to Report Mode OPERATION DISPLAY Touch [PRINT] key to print out the report. Note: Touch [MENU] key, to back to Menu Mode display. Sample: MAIN GROUP Total Report M o d e l S M - 5 3 0 0 U s e r M a n u a l | 83...
-
Page 85: Inventory Report
All manuals and user guides at all-guides.com Report Mode ––––––––––––––––––––––––––––––––––––––––––––––––– 3.2 Entry to Report Mode 3.2.13 Inventory Report Inventory Report is used to view/print transaction data separated by Inventory. On Inventory Report, inventory transaction report is printed depending on the date range selection. In Registration mode use Inventory function key to select type of mode (Normal Sales, Inventory, Garbage, Ordering and Reception) and do operation. - Page 86 All manuals and user guides at all-guides.com Report Mode ––––––––––––––––––––––––––––––––––––––––––––––––– 3.2 Entry to Report Mode OPERATION DISPLAY Touch [PRINT] key to print out the report. Note: Touch [MENU] key, to back to Menu Mode display. Sample: Inventory Report M o d e l S M - 5 3 0 0 U s e r M a n u a l | 85...
-
Page 87: Traceability Report
All manuals and user guides at all-guides.com Report Mode ––––––––––––––––––––––––––––––––––––––––––––––––– 3.2 Entry to Report Mode 3.2.14 Traceability Report Traceability Report is used to view/print transaction data separated by Traceability. Traceability Report, Sales transaction report is printed depending on the SPEC setting. Example: Printing report for Traceability Report. - Page 88 All manuals and user guides at all-guides.com Report Mode ––––––––––––––––––––––––––––––––––––––––––––––––– 3.2 Entry to Report Mode OPERATION DISPLAY Touch [PRINT] key to print out the report. Note: Touch [MENU] key, to back to Menu Mode display. Sample: Traceability Report M o d e l S M - 5 3 0 0 U s e r M a n u a l | 87...
-
Page 89: Prepack Report
All manuals and user guides at all-guides.com Report Mode ––––––––––––––––––––––––––––––––––––––––––––––––– 3.2 Entry to Report Mode 3.2.15 Prepack Report Prepack Report is used to view/print transaction data separated by Prepack Mode transaction. On Prepack Report, Sales transaction report is printed depending on the date range selection. Example: Printing report for Prepack Total Report (TODAY). - Page 90 All manuals and user guides at all-guides.com Report Mode ––––––––––––––––––––––––––––––––––––––––––––––––– 3.2 Entry to Report Mode OPERATION DISPLAY Touch [PRINT] key to print out the report. Note: Touch [MENU] key, to back to Menu Mode display. Sample: Prepack Total Report M o d e l S M - 5 3 0 0 U s e r M a n u a l | 89...
-
Page 91: Grand Total Report
All manuals and user guides at all-guides.com Report Mode –––––––––––––––––––––––––––––––––––––––––––––––––– 3.2 Entry to Report Mode 3.2.16 Grand Total Report Grand Total Report is used to view/print transaction data separated by Grand Total Transaction. On Grand Total Report, Sales transaction report is printed depending on the date range selection. Example: Printing report for Grand Total Report (TODAY). - Page 92 All manuals and user guides at all-guides.com Report Mode –––––––––––––––––––––––––––––––––––––––––––––––––– 3.2 Entry to Report Mode OPERATION DISPLAY Touch [PRINT] key to print out the report. Note: Touch [MENU] key, to back to Menu Mode display. Sample: Grand Total Report M o d e l S M - 5 3 0 0 U s e r M a n u a l | 91...
-
Page 93: Abc Analysis Report
All manuals and user guides at all-guides.com Report Mode –––––––––––––––––––––––––––––––––––––––––––––––––– 3.2 Entry to Report Mode 3.2.17 ABC Analysis Report ABC Analysis Report is used to view/print transaction data separated by ABC Analysis. On ABC Analysis Report, Sales transaction report is printed depending on the date range selection. ABC Report is used to check the sales situation of every MG or PLU. - Page 94 All manuals and user guides at all-guides.com Report Mode ––––––––––––––––––––––––––––––––––––––––––––––––– 3.2 Entry to Report Mode OPERATION DISPLAY Touch [PREVIEW] key to view the report. Note: 1. Touch [UP] or [DOWN] key, to view continues of report. 2. Touch [EXIT] key to exit view PLU Total Report.
-
Page 95: Void Label Report
All manuals and user guides at all-guides.com Report Mode ––––––––––––––––––––––––––––––––––––––––––––––––– 3.2 Entry to Report Mode 3.2.18 Void Label Report Void Label Report is used to view/print Label data separated by Void Label. On Void Label Report, Sales transaction report is printed depending on the date range selection. Example: Printing report for Void Report (TODAY). - Page 96 All manuals and user guides at all-guides.com Report Mode –––––––––––––––––––––––––––––––––––––––––––––––––– 3.2 Entry to Report Mode OPERATION DISPLAY Touch [PRINT] key to print out the report. Note: 1. Touch [MENU] key, to back to Menu Mode display. Sample: Void Label Report M o d e l S M - 5 3 0 0 U s e r M a n u a l | 95...
-
Page 97: Batch Report
All manuals and user guides at all-guides.com Report Mode –––––––––––––––––––––––––––––––––––––––––––––––– 3.2 Entry to Report Mode 3.2.19 Batch Report Batch Report is used to view/print transaction data separated by setting done in Batch Report Programming. On Batch Report, Sales transaction report is printed depending on the setting done in BATCH REPORT PROGRAMMING under Programming Mode [SETUP]. - Page 98 All manuals and user guides at all-guides.com Report Mode –––––––––––––––––––––––––––––––––––––––––––––––– 3.2 Entry to Report Mode Sample: Batch Report of STORE TOTAL REPORT in REPORT MODE M o d e l S M - 5 3 0 0 U s e r M a n u a l | 97...
-
Page 99: Product Maintenance
All manuals and user guides at all-guides.com Product Maintenance –––––––––––––––––––––––––––––––––– 4.1 Thermal Head Cleaning Product Mai n tenance 4.1 Thermal Head Cleaning To maintain good quality print-outs and long life span for the thermal print head, regular cleaning of the thermal print head is required. Please use the cleaning kit supplied with the product. Instruction (1) Turn OFF Scale by Main Power Switch. - Page 100 All manuals and user guides at all-guides.com Product Maintenance –––––––––––––––––––––––––––––––––– 4.1 Thermal Head Cleaning (9) Turn ON the scale, and depress [FEED] key to feed label/receipt. M o d e l S M - 5 3 0 0 U s e r M a n u a l | 99...
-
Page 101: Appendices
All manuals and user guides at all-guides.com Appendices ––––––––––––––––––––––––––––––––––––––––––––––––––– 5.1 Error Message Appendi c es 5.1 Error Messages The machine beeps and following error messages appear on touch screen, if incorrect operation is performed on Registration Mode. Some error message appears is: Error Message Causes Printer Head Open... - Page 102 All manuals and user guides at all-guides.com Typical Operation –––––––––––––––––––––––––––––––––––––––– 2.3 Registration Mode Error Message Causes Not allowed in self-service Some functions are not allowed in Self-Service Mode. Prepack is disabled Not allow to go to the Prepack Mode. Manual is disabled Not allow to go to the Manual Mode Use in PREPACK mode Some functions only valid in Prepack Mode.
- Page 103 All manuals and user guides at all-guides.com Typical Operation –––––––––––––––––––––––––––––––––––––––– 2.3 Registration Mode Error Message Causes Display when use Allergen Search function key, but Search Name can’t be Empty the search name is empty. Please insert the name want to search. Half Price Already Activated Display when repeat to use Half Price function key.
-
Page 104: Release Note
All manuals and user guides at all-guides.com Release Note –––––––––––––––––––––––––––––––––––––––––––––– SM-5300 Rel e ase Note Serial No. Date Description of Changes Remarks 21 Dec 2015 1. Page 8 Edit Specification add SM5300-SSP 19” Edition 2 spec 2. Page 14 Add Overall Layout of SM-5300SSP 19”...
Need help?
Do you have a question about the SM-5300 and is the answer not in the manual?
Questions and answers