Philips AVENT SCD603 - Baby Monitor Manual
- User manual (25 pages) ,
- Manual (18 pages)
Advertisement
Introduction
To fully benefit from the support that Philips AVENT offers, register your product at www.philips.com/welcome.
The Philips AVENT video monitor provides you with round-the-clock support and it allows you to see your baby day and night from anywhere in the house. The latest digital technology guarantees clear sound and the clearest image of your baby. This gives you an additional sense of security without entering your baby's room and disturbing its sleep.
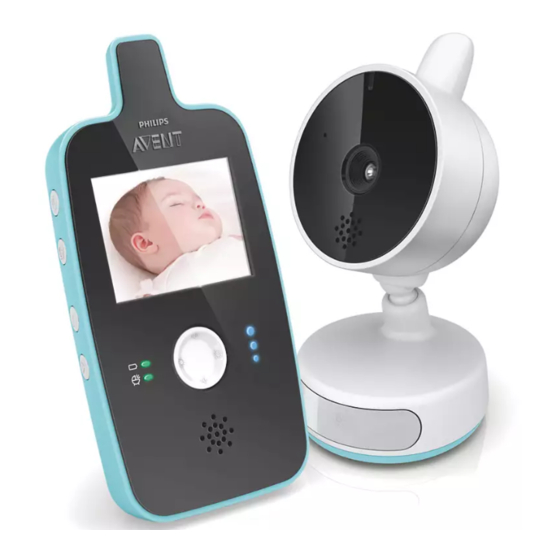
General description
(Fig. 1)

I Parent unit
- Antenna
- Battery/power-on light
- Voice activation light
- Brightness adjustment buttons
- Video display - icon explanation
- Parent unit and baby unit are not linked
- Battery status
- Signal strength symbol
- Volume level bar
- Brightness level bar
- Lullaby numbers
- 'Repeat lullaby' symbol
- Voice activation symbol
- Volume muted symbol
- Volume up and down buttons
- Sound level lights
- Socket for appliance plug
- Loudspeaker
- Battery compartment lid
- Belt clip/stand
- On/off button
- Voice activation button
- Lullaby play/stop button
- Next lullaby button
- Rechargeable battery
- Adapter
- Appliance plug
II Baby unit
- Antenna
- Power-on light
- Microphone
- Lens
- Loudspeaker
- Base
- Nightlight and nightlight button
- Wall-mounting holes
- Battery compartment lid
- Socket for appliance plug
- On/off switch
- Appliance plug
- Adapter
Preparing for use

Read the important safety instructions carefully before you use the video baby monitor and keep them for future reference.
Baby unit
Always operate the baby unit connected to an electrical outlet. To guarantee automatic power backup in case of a power failure, we advise you to insert non-rechargeable batteries.
Connecting the baby unit
- Put the appliance plug in the baby unit and insert the adapter into an electrical outlet (Fig. 2).

Placing the non-rechargeable batteries
In case of a power failure, the baby unit can run on four 1.5V R6 AAA alkaline batteries (not included). Do not use rechargeable batteries. The baby unit does not have a charging function and rechargeable batteries discharge slowly when they are not in use.

Unplug the baby unit and make sure your hands and the unit are dry when you insert nonrechargeable batteries.
Note: The baby unit has an operating time of 3 hours when you use it on non-rechargeable alkaline
- Remove the battery compartment lid. (Fig. 3)

- Insert four non-rechargeable alkaline batteries. (Fig. 4)
Note: Make sure the + and - poles point in the right direction.

- Reattach the lid. (Fig. 5)


Parent unit
Operation on rechargeable battery
Unplug the parent unit and make sure your hands and the unit are dry when you insert the rechargeable battery.
- The parent unit comes with a rechargeable Li-ion polymer 1100mAh battery.
- Charge the parent unit before you use it for the first time or when the parent unit indicates that the battery is low.
- The battery is low when the empty battery symbol flashes on the video display and the battery/power-on light on the parent unit flashes red. (Fig. 6)


Note: If the battery is completely empty, the parent unit automatically turns off and loses contact with the baby unit.
- Slide down the battery compartment lid to remove it. (Fig. 7)

- Insert the rechargeable battery (Fig. 8).
Note: Make sure the + and - poles point in the right direction.

- Reattach the lid (Fig. 9).

- Insert the appliance plug into the parent unit and insert the adapter into an electrical outlet (Fig. 10).


- The battery/power-on light on the parent unit lights up green and the animated battery charging image appears at the top of the video display. (Fig. 11)

- When the battery is fully charged, the battery symbol at the top of the video display is full.

- When you charge the parent unit for the first time or after a long period of disuse, turn it off and let it charge continuously for at least 4 hours.
- Charging normally takes 2.5 hours, but it takes longer when the parent unit is turned on during charging. To keep the charging time as short as possible, turn off the parent unit during charging.
- When the rechargeable battery is fully charged, the parent unit can be used cordlessly for approx. 7 hours if it is in voice activation mode. If the video display is on continuously, the parent unit can be used cordlessly at default setting for approx. 5.5 hours.
Note: When the parent unit is charged for the first time, the operating time is less than 7 hours. The rechargeable battery only reaches its full capacity after four discharging and charging cycles.
Note: The battery gradually discharges, even when the parent unit is turned off.
Note: We advise you to use the parent unit connected to the mains during the whole night. If the parent unit runs out of battery, the low battery alert beeps and this may wake you up.
Using the appliance
- Place the parent unit and the baby unit in the same room to test the connection (Fig. 12). Make sure the baby unit is at least 1.5 meters (5 feet) away from the parent unit.

- Set the on/off switch on the baby unit to the ON position (Fig. 13).

- The green power-on light goes on. (Fig. 14)
Note: The power-on light always lights up green, even when there is no connection with the parent unit.

- The green power-on light goes on. (Fig. 14)
- Press and hold the on/off button on the parent unit. (Fig. 15)

- The video display goes on and the linking image appears on the display (Fig. 16).

- When a connection has been established, the baby is shown on the video display and the signal strength symbol appears (Fig. 17).

Tip: Find out what the best position is for the parent unit by looking at the signal strength symbol.
The number of stripes indicates the quality of the connection. - If no connection can be established, the parent unit beeps and the out-of-range image appears on the display. (Fig. 18)

- The video display goes on and the linking image appears on the display (Fig. 16).


Positioning the baby monitor
Keep the baby unit out of the reach of the baby. Never place the baby unit inside or mount it on the baby's bed or playpen.
Note: If you use a cordless phone, wireless video, Wi-Fi network, microwave oven or Bluetooth on 2.4Ghz and you experience interference on either the parent unit or baby unit, move the parent unit further away until there is no more interference.
- For optimal sound detection, place the baby unit at least 1 meter (3.5 feet) away from your baby, but no further than 1.5 meters (5 feet) away (Fig. 19).

- There are two ways to position the baby unit:
- Place the baby unit on a stable, level and horizontal surface.
- Mount the baby unit to the wall as shown in the figure with the screws supplied. (Fig. 20)

Tip: Use the provided template, to mark the exact location of the screw holes on the wall.
Tip: Position the baby unit at a higher level to get a good overview of the baby's bed or playpen.
- Adjust the baby unit in a way that ensures the best visibility of your baby (Fig. 21).
Do not position the baby unit with the microphone pointing too far down, as this may prevent the microphone from picking up sounds properly.

- Place the parent unit within the operating range of the baby unit. Make sure it is at least 1.5 meters (5 feet) away from the baby unit to avoid acoustic feedback (Fig. 12).
For more information on the operating range, see section 'Operating range' below.


Operating range
The operating range of the baby monitor is 150 meters (490 feet) in open air and line of sight. Indoors the operating range is up to 30 meters (98 feet). Depending on the surroundings and other disturbing factors, this range may be smaller.
For wet and moist materials, the range loss may be up to 100%.
| Dry materials | Material thickness | Loss of range |
| Wood, plaster, cardboard, glass (without metal, wires or lead) | < 30cm (12in) | 0-10% |
| Brick, plywood | < 30cm (12in) | 5-35% |
| Reinforced concrete | < 30cm (12in) | 30-100% |
| Metal grilles or bars | < 1cm (0.4in) | 90-100% |
| Metal or aluminum sheets | < 1cm (0.4in) | 100% |
Features
Adjusting loudspeaker volume
You can adjust the loudspeaker volume of the parent unit to the level you prefer.
- Press the volume up or down button to adjust the volume. (Fig. 22)

- The volume bar appears on the display to show the selected volume (Fig. 23).
Note: If the volume is set to a high level, the parent unit consumes more power.

- The volume bar appears on the display to show the selected volume (Fig. 23).


Adjusting display brightness
You can adjust the display brightness of the parent unit to the level you prefer.
- Press the brightness adjustment buttons on the parent unit to adjust the brightness of the video display (Fig. 24).

- The display brightness bar appears on the display to show the selected display brightness (Fig. 25).

Note: If the brightness is set to a high level, the parent unit consumes more power.
- The display brightness bar appears on the display to show the selected display brightness (Fig. 25).


Sound level lights
The parent unit continuously monitors the sound level in your baby's room and the sound level lights let you know if there is any activity. If your baby cries, the blue sound level lights light up on the parent unit.
- As long as no sound is detected, the sound level lights are out.
- When the baby unit picks up a sound, one or more sound level lights on the parent unit go on. The number of lights that go on depends on the loudness of the sound picked up by the baby unit. The sound level lights also go on when the parent unit is set to a low volume or when the voice activation mode is activated (see section 'Voice activation' below) (Fig. 26).


Voice activation
The parent unit continuously monitors the sound level in your baby´s room. When the voice activation mode is activated, the video display only turns on when the baby unit picks up a sound. As long as no sound is detected, the video display is off to save power.
- To activate the voice activation mode, press the voice activation button on the parent unit. (Fig. 27)

- The voice activation light on the parent unit goes on and the voice activation image appears on the video display (Fig. 28).

- When the baby unit detects a sound, the video display on the parent unit automatically goes on to show the baby. When no new sound is detected for 20 seconds, the video display goes out again.
- The voice activation light on the parent unit goes on and the voice activation image appears on the video display (Fig. 28).
- To deactivate the voice activation mode, press the voice activation button on the parent unit again. The voice activation light goes out and the voice activation off image appears on the display.


Nightlight
- Press the nightlight button on the base of the baby unit to turn on the nightlight. (Fig. 29)

- The nightlight on the base of the baby unit goes on. (Fig. 30)

- The nightlight on the base of the baby unit goes on. (Fig. 30)
- Press the nightlight button again to turn off the nightlight.


Lullaby function
- Press the lullaby play/stop button on the parent unit to play a lullaby (Fig. 31).

- The lullaby starts to play on the baby unit and is repeated continuously for approx. 15 minutes. On the video display you see which lullaby number is played and repeated. This number is shown in a blue square.
- To select another lullaby, press the lullaby button. Continue pressing the 'next lullaby' button until you hear the lullaby you prefer. (Fig. 32)

Note: You can also select the repeat symbol to play all lullabies repeatedly in a loop (Fig. 33).

- Press the lullaby play/stop button on the parent unit to play the lullaby selected.
- The lullaby starts to play on the baby unit and is repeated continuously.
Note: If you have selected the repeat mode, all three lullabies are played repeatedly in a loop.
- The lullaby starts to play on the baby unit and is repeated continuously.
- To stop the lullaby, press the lullaby play/stop button again.


Out-of-range alert
When the parent unit is out of range of the baby unit, the parent unit beeps every 20 seconds and the out-of-range image appears on the video display.
Note: The out-of-range alert is also active when the baby unit is turned off.
Night vision
The camera has infrared lights that allow you to see your baby clearly, even in a dark room. When the camera detects low light levels, the infrared lights are turned on automatically. Place the baby unit 1 to 1.5 meters (3.5 to 5 feet) away from the baby to ensure a clear view.
Note: The display is black and white when the infrared lights are on. However, sometimes it is possible to see a greenish image. This is normal due to external light sources.
Belt clip/stand
- If the rechargeable battery of the parent unit is sufficiently charged, you can take the unit with you inside and outside the house by attaching the unit to your belt or waistband with the belt clip. This allows you to monitor your baby while you are moving around (Fig. 34).

- To use the belt clip as a stand, turn it downwards until the parent unit can rest on it (Fig. 35).


Auto mute feature
When the baby unit detects a low sound level, e.g. the sleeping sound of the baby, the parent unit automatically mutes the sound output so that you will not hear this sound. When the baby starts to cry, the parent unit automatically turns on the volume again to let you hear the crying sound.
Reset feature
This feature allows you to reset the settings of parent unit. You can use this function if problems occur that you cannot solve by following the suggestions in chapter 'Frequently asked questions'.
- Press and hold the on/off button on the parent unit to turn it off.
- Press and hold the volume down button and simultaneously press and hold the on/off button until a beep is heard. The parent unit turns on again.
- The parent unit has now been reset to default factory settings.
Default settings
- Loudspeaker volume: 3
- Voice activation: off
- Display brightness: 4
Assistance
For assistance call 1-800-54-AVENT (1-800-542-8368) or visit our website: www.philips.com/AVENT.
Warranty
Full two year warranty
Philips Electronics North America Corporation(USA) and Philips Electronics Ltd (CANADA) warrant each new Philips AVENT product, model SCD603, against defects in materials or workmanship for a period of two years from the date of purchase, and agree to repair or replace any defective product without charge.
This warranty does not cover damage resulting from accident, misuse or abuse, lack of reasonable care, or the affixing of any attachment not provided with the product. NO RESPONSIBILITY IS ASSUMED FOR ANY SPECIAL, INCIDENTAL OR CONSEQUENTIAL DAMAGES. In order to obtain warranty service, simply call toll-free 1-800-54-AVENT (1-800-542-8368).
Frequently asked questions
This chapter lists the questions most frequently asked about the appliance. If you cannot find the answer to your question, visit www.philips.com/support for more frequently asked questions or contact the Consumer Care Center in your country.
| Question | Answer |
Turning on/connecting the units | |
| Why don't the poweron light of the baby unit and the parent unit go on when I turn on the units? | Perhaps the rechargeable battery of the parent unit is empty and the parent unit is not connected to the electrical outlet. Insert the appliance plug into the parent unit and insert the adapter into an electrical outlet. Then press and hold the on/off button to turn on the parent unit and to establish connection with the baby unit. |
| Perhaps the baby unit is not connected to an electrical outlet and the non-rechargeable batteries in the baby unit are empty or there are no non-rechargeable batteries in the baby unit at all. Connect the baby unit to an electrical outlet or put new non-rechargeable batteries in the baby unit. Then set the on/off switch of the baby unit to ON position to establish connection with the parent unit. | |
| Why doesn't the parent unit charge when I plug it in? | The rechargeable battery may have reached the end of its life. Replace the rechargeable battery. |
| Perhaps the adapter is not plugged in properly. Make sure the adapter is plugged into an electrical outlet properly. | |
| Why doesn't the baby unit charge when I plug it in? | The baby unit does not have a charging function. Put new non-rechargeable batteries in the baby unit if you want to use the baby unit cordlessly. |
| Why can't I establish a connection? Why is the connection lost every now and then? Why are there sound interruptions? | The baby unit and the parent unit are probably close to the outer limits of the operating range or there is interference from other 2.4GHz wireless devices. Try a different location, decrease the distance between the units or turn off other 2.4GHz wireless devices. Please note that it takes about 5 seconds each time before a connection between the units is re-established. |
| If you have two video baby monitors, keep them at least 1.5 meters (5 feet) away from each other to prevent interference. | |
| Perhaps the baby unit is not connected to an electrical outlet and the non-rechargeable batteries in the baby unit are empty or there are no non-rechargeable batteries in the baby unit at all. Connect the baby unit to an electrical outlet or put new non-rechargeable batteries in the baby unit. Then set the on/off switch of the baby unit to ON position to establish connection with the parent unit. | |
| What happens during a power failure? | As the parent unit works on a rechargeable battery, it continues to work if the battery is sufficiently charged. If you have placed non-rechargeable batteries in the baby unit, the camera continues to work and you can see your baby. |
| Why do the nonrechargeable batteries of the baby unit run low quickly? | The baby unit consumes a lot of energy when you have the video display turned on continuously, when you play lullabies or when the nightlight is turned on. We recommend to always operate the baby unit while connected to electricity and to use the batteries for back-up purpose only. Do not place rechargeable batteries in the baby unit, as they discharge slowly even when they are not in use. |
| Why does the charging time of the parent unit exceed 2.5 hours? | The parent unit may be turned on during charging. Turn off the parent unit during charging. |
| Why do I need to keep the baby unit and its cord at least 1 meter (3.5 feet) from my baby? | To avoid strangulation with the cord and for optimal sound detection, always place the baby unit and its cord at least 1 meter (3.5 feet) away from the baby. |
Indications on the parent unit | |
| Why doesn't the battery status symbol appear on the video display of the parent unit when I start to charge the parent unit? | It may take a few minutes before the battery symbol appears on the video display of the parent unit when you charge the parent for the first time or after a long period of disuse. |
| Why do the battery/ power-on light and the battery symbol on the video display flash red? | If the battery/power-on light and the battery symbol on the video display flash red, the rechargeable battery of the parent unit is low. Connect the parent unit to an electrical outlet to recharge the battery (see chapter 'Preparing for use'). |
| Why does the parent unit beep? | If the parent unit beeps while the out-of-range image appears on the video display, the connection with the baby unit is lost. Move the parent unit closer to the baby unit. |
| If the parent unit beeps while the battery/power-on light and the battery symbol on the video display flash red, the rechargeable battery of the parent unit is low. Connect the parent unit to an electrical outlet to recharge the battery (see chapter 'Preparing for use'). | |
| The baby unit may be turned off. Turn on the baby unit. | |
Noise/sound | |
| Why does the video monitor produce a high-pitched noise? | The units may be too close to each other. Make sure the parent unit and the baby unit are at least 1.5 meters (5 feet) away from each other and set the volume to a lower level. |
| The volume of the parent unit may be set too high. Decrease the volume of the parent unit. | |
| Can I increase the volume of the lullaby on the baby unit? | No, you can't. |
| Why don't I hear a sound/Why can't I hear my baby cry? | The volume of the parent unit may be set too low or may be turned off. Press the volume up button to increase the volume level. |
| Perhaps you did not remove the protective foil from the microphone. Make sure all protective foil has been removed. | |
| Perhaps you have turned on the voice activation. If the voice activation is activated, the video display only turns on when the baby unit picks up a sound. As long as no sound is detected, the video display is off to save power. | |
| Perhaps the baby monitor is in auto mute. When the baby unit detects a low sound level, e.g. the sleeping sound of the baby, the parent unit automatically mutes the sound output so that you do not hear this sound. When the baby starts to cry, the parent unit automatically turns on the volume again to let you hear the crying sound. | |
| The baby unit may be too far away from your baby. Make sure the baby unit is not further than 1.5 meters (5 feet) from your baby, but not closer than 1 meter (3.5 feet) to avoid a strangulation hazard. | |
| Why does the parent unit react too quickly to other sounds? | The baby unit also picks up other sounds than those of your baby. Move the baby unit closer to the baby (but observe the minimum distance of 1 meter (3.5 feet)). |
| Why does the parent unit make a buzzing sound? | Interference may occur when the parent unit is out of range of the baby unit. Interference may also occur if there are too many walls or ceilings between the parent unit and the baby unit or when other 2.4GHz wireless devices are turned on (e.g. microwave, Wi-Fi router). Put the parent unit in a different place, closer to the baby unit, or turn off other wireless devices. |
| The rechargeable battery of the parent unit may need to be charged. | |
Operating time/operating range | |
| The specified operating range of the baby monitor is up to 150 meters (490 feet) outdoors and up to 30 meters (98 feet) indoors. Why does my baby monitor manage a much smaller distance than that? | The specified operating range of 150 meters (490 feet) is only valid outdoors in open air and in the line of sight. Depending on the surroundings and other disturbing factors, the operating range may be smaller. Inside your house, the operating range is limited by the number and type of walls and/ or ceilings between the parent unit and the baby unit |
| The operating time of the parent unit is supposed to be at least 5.5 hours. Why is the operating time of my parent unit shorter? | When the parent unit has been charged for the first time, the operating time is shorter because the battery has not reached its full capacity yet. The rechargeable battery only reaches its full capacity after four discharging and charging cycles. After this, the operating time is 5.5 hours if the voice activation is not deactivated and 7 hours if the voice activation mode is activated. |
| The parent unit consumes a lot of energy when the video display is turned on continuously. Activate the voice activation mode to increase the operating time (see chapter 'Features', section 'Voice activation'). | |
| The volume of the parent unit may be set too high, which causes the parent unit to consume a lot of energy. Decrease the volume of the parent unit. | |
| As any other rechargeable electronic device, the battery capacity decreases after a long period of usage. If you have any questions you can always contact consumer care. To purchase a new rechargeable battery, visit our Philips online shop www.shop.philips.com/service. | |
| Why do I get interference on the parent unit? | Interference may occur when the parent unit is out of range of the baby unit. Interference may also occur if there are too many walls or ceilings between the parent unit and the baby unit or when other 2.4GHz wireless devices are turned on (e.g. microwave, Wi-Fi router). Put the parent unit in a different place, closer to the baby unit, or turn off other wireless devices. |
Output video display | |
| Why does the video display flicker? | Interference may occur when the parent unit is out of range of the baby unit. Interference may also occur if there are too many walls or ceilings between the parent unit and the baby unit or when other 2.4GHz wireless devices are turned on (e.g. microwave, Wi-Fi router). Put the parent unit in a different place, closer to the baby unit, or turn off other wireless devices. |
| The rechargeable battery of the parent unit may need to be charged. | |
| Why isn't there any image on the video display when the battery/ power-on light is on? | The parent unit may be in the voice activation mode. Press the voice activation button again to turn on the video display. |
| Why isn't the image on the video display clear? | The display brightness may be set too low. Increase the display brightness (see chapter 'Features', section 'Adjusting display brightness'). |
| Perhaps you did not remove the protective foil from the video display. Remove the protective foil. | |
| Why doesn't the parent unit work in the voice activation mode? | The distance between the baby and the baby unit may be too large to pick up sounds from the baby. Make sure that the baby unit is placed 1 to 1.5 meters (3.5 to 5 feet) away from the baby. |
| Why isn't the image on the video display clear in night vision? | The distance between the baby and the baby unit may be too large. Make sure that the baby unit is placed 1 to 1.5 meters (3.5 to 5 feet) away from the baby. |
| Sometimes it is possible to see a greenish image when the infrared lights are on. This is normal due to external factors. |


Documents / Resources
References
![www.philips.com]() Product registration | Philips
Product registration | Philips![www.philips.com]() Baby Products, Accessories and Newborn Essentials | Philips Avent
Baby Products, Accessories and Newborn Essentials | Philips Avent![www.philips.com]() Support Home | Philips
Support Home | Philips![www.shop.philips.com]() Philips - United States | Philips
Philips - United States | Philips
Download manual
Here you can download full pdf version of manual, it may contain additional safety instructions, warranty information, FCC rules, etc.
Advertisement


Need help?
Do you have a question about the AVENT SCD603 and is the answer not in the manual?
Questions and answers