Table of Contents
Advertisement
Quick Links
Version: 2019.04.01
All the rights to this manual are reserved, especially reproduction, publication and translation rights. No portion of this manual may be
reproduced by no means (photocopy, microfilm or other methods) without previous written authorization from ECLERIS. Neither can it
be reproduced, multiplied or published through any electronic data processing form.
The information contained in this manual may be modified or broaden without previous notification, without it representing any
responsibility to ECLERIS.
EUSA GLOBAL Llc.
11801 NW 100th Rd
Suite 17
Medley, FL 33178, U.S.A.
Phone: +1 786 483 7490
INMANUUIN158 Rev.2019.04.01 / ENG
USER MANUAL
MICROSTAR SERIE OM-100
MICROSCOPE
ABOUT THIS MANUAL
Year: 2019
Language: English
CMC Medical Devices & Drugs S.L.
C/ Horacio Lengo Nº18, CP29006, Málaga,
Spain
Ph. +34951214054
Email: info@cmcmedicaldevices.com
Advertisement
Table of Contents

Related Manuals for Ecleris MICROSTAR OM-100


Summary of Contents for Ecleris MICROSTAR OM-100
- Page 1 All the rights to this manual are reserved, especially reproduction, publication and translation rights. No portion of this manual may be reproduced by no means (photocopy, microfilm or other methods) without previous written authorization from ECLERIS. Neither can it be reproduced, multiplied or published through any electronic data processing form.
-
Page 2: Table Of Contents
USER MANUAL – MICROSTAR TABLA OF CONTENT SYMBOLS ..........................4 SAFETY INFORMATION ......................4 WARNINGS .......................... 4 DESCRIPTION......................... 5 INTENDED USE ........................5 INTENDED USER ........................ 5 DESCRPTION AND COMPONENTS ................... 5 3.3.1 FLOOR STAND MODEL (OM-100F) ................5 3.3.2 WALL-MOUNTED MODEL (OM-100W)................. - Page 3 USER MANUAL – MICROSTAR ROTATIONAL MOVEMENT OF THE HEAD ..............24 HEAD ROTATION AXIL ..................... 24 HEAD TILT ......................... 24 SHIPMENT ......................... 24 MAINTENANCE ........................25 CLEANING ......................... 25 7.1.1 CLEANING THE EXTERNAL SURFACES ..............25 7.1.2 CLEANING OF OBJECTIVE LENS AND EYEPIECES ..........25 ELECTRICAL CONNECTIONS ..................
-
Page 4: Symbols
The Ecleris Microstar OM-100 Microscope is grounded through a conductor of the AC interlock cable. This essential cable grounding is provided for a safe operation of the equipment. -
Page 5: Description
The availability of different models of the ECLERIS MICROSTAR Series OM-100 Microscope together with the compatibility of all its accessories allows this device to achieve all the necessary characteristics for different specialties. -
Page 6: Wall-Mounted Model (Om-100W)
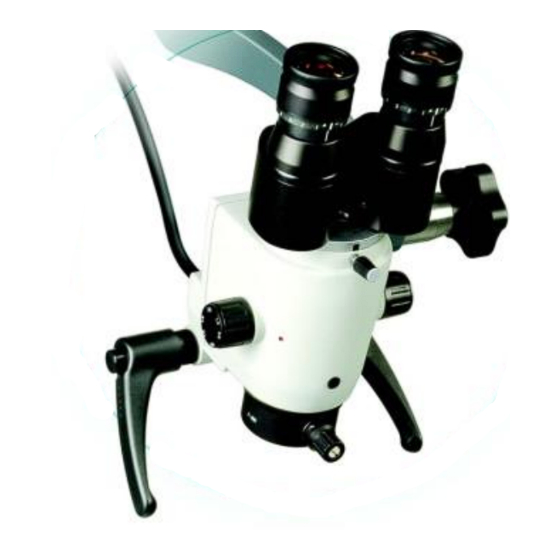
USER MANUAL – MICROSTAR 1. Wheels with brake 8. Parallelogram arm brake 2. Base 9. Parallelogram arm 3. Column 10. Weight compensation command 4. Head 11. Fiber optic cable 5. Binocular 12. Forearm 6. Eye piece 13. Double light source 7. -
Page 7: Ceiling-Mounted Model (Om-100C)
USER MANUAL – MICROSTAR 1. Double light source 6. Eye piece 2. Forearm 7. Binocular 3. Parallelogram arm 8. Head 4. 60º angled piece 9. Wall mount 5. Head fork pole 3.3.3 CEILING-MOUNTED MODEL (OM-100C) Components: 1 Ceiling mount ... - Page 8 USER MANUAL – MICROSTAR 1. Double light source 5. Telescopic column (external 2. Forearm sheath) 3. Ceiling-mount 6. Parallelogram arm 4. Telescopic column (inside 7. 60º angled piece tube) 8. Head 3.3.4 TABLE-MOUNTED MODEL (OM-100T) Components: 1 Table mount ...
-
Page 9: Complete Head Body
USER MANUAL – MICROSTAR 1. Table-mount 5. Parallelogram arm 2. Column 6. Head 3. Double light source 7. Forearm 4. 60º angled piece 3.3.5 COMPLETE HEAD BODY 1. Micro focus adjustment 7. Head fork pole 2. Objective lens 8. Balance movement control 3. -
Page 10: Light Source
3.3.6 LIGHT SOURCE 3.3.6.1 LED LIGHT SOURCE See the manual of the LED light source EVERLUX ECLERIS 3.3.6.2 XENON LIGHT SOURCE See the manual of the xenon light source XENOLUX ECLERIS. 3.3.6.3 HALOGEN LIGHT SOURCE 1. Fiber optic cable connector 8. -
Page 11: Installation And Set Up
Eyepieces 10X Digital capturing and documentation 200 mm Objective lens system – Ecleris ENDODIGI 250 mm Objective lens 300 mm Objective lens 4. INSTALLATION AND SET UP Additionally to the provided tools, for the installation of the floor-stand (OM-100F) you will need 13 mm and 27 mm wrenches or an adjustable wrench. - Page 12 USER MANUAL – MICROSTAR 3) Tighten the 27mm bolt to the column as shown in the picture using a socket, fixed or adjustable wrench. 4) Loosen the 3 Allen screws at the column’s receiving end by using the 3/16’’ Allen key provided.
- Page 13 USER MANUAL – MICROSTAR 6) Place the binocular in the matching binocular support, verifying that the marks are aligned. Adjust the binocular screw to achieve the best possible seat. 7) Attach the eyepieces to the binocular. Unfold the rubber protectors surrounding the eyepieces.
-
Page 14: Light Source
If you detect any abnormality before you start operating the microscope, please contact the technical department of your local distributor or nearest ECLERIS office prior to using the microscope on patients. -
Page 15: Focal Lens Mounting
USER MANUAL – MICROSTAR 2) Set the guide lugs in the holes on the upper cover of the light source. 3) Slide the light power supply backwards and then tighten the 4mm Allen screws. Lamps may move during the shipment of the microscope. Before turning on the light source please verify the correct positioning of the lamps and their alignment with the fiber optic cable connector. - Page 16 6) The wall-mount should remain firm. Verify it by testing its resistance loading a weight eight (8) times heavier than the total weight of the microscope. ECLERIS is not responsible for any physical or equipment damage that may occur due to the incorrect fixation of the wall-mount.
-
Page 17: Ceiling-Mounted Model - Om100C
4.5 CEILING-MOUNTED MODEL – OM100C ECLERIS does not provide the materials nor the instructions for the ceiling support installation and is not responsible for its incorrect attachment or any physical or equipment damage that may occur due to incorrect fixation. - Page 18 USER MANUAL – MICROSTAR 7) If you have acquired a column extension you should install it now. Loosen the Allen screws at the column’s end, place the column extension and tighten the Allen screws back. 8) Loosen the 3 screws at the column’s end using a 3/16’’ Allen key. 9) Place the microscope’s arm as shown in the picture.
-
Page 19: Beam Splitter And Camera Installation
USER MANUAL – MICROSTAR 10) Follow steps 5 thru 9 from 4.4 section for head, binocular, eye pieces and lamp source installation. 4.6 TABLE-MOUNTED MODEL – OM-100T Before beginning the microscope’s installation on the table be sure that it is capable of withstanding at list eight (8) times the microscope’s weight. - Page 20 USER MANUAL – MICROSTAR Do not over tight the video camera to the beam splitter in order to avoid mechanism damage. 3) Place the beam splitter with the camera verifying that the marks are aligned. Adjust the beam splitter screw to achieve the best possible seat. 4) The same way, place the binocular on top of the beam splitter.
-
Page 21: Image Orientation
USER MANUAL – MICROSTAR 15) Looking through binoculars, focus the image using the micro-focus knob until all magnifications are in focus (parafocusing). 16) Adjust the oculars dioptrics to correct eyesight deviations, until the visualized image gets comfortable and sharp. 17) After the optical image is parafocused (all magnifications in focus), adjust the camera position until its image reaches the same orientation as the optical image (see image orientation). -
Page 22: Revision
USER MANUAL – MICROSTAR 4.8 REVISION Once installation is over and before starting-up the Ecleris Microstar OM-100 Microscope, please go through the following check list: Check that the voltage to be used is the same as the one stated on the back of the light source. -
Page 23: Interpupillary Distance Adjustment
USER MANUAL – MICROSTAR Optionally, the Ecleris Xenolux180 with a 180 Watts xenon lamp or the Ecleris Everlux that has a LED (Light-Emitting Diode) illumination module could also be used as main light source instead of the Halolux 150 DUO. -
Page 24: Parallelogram Arm Movement
Avoid maximum rotation angles to prevent damages to the fiber optic cable. 6.6 SHIPMENT The Ecleris Microstar OM-100 Microscope has been designed to be moved over short distances within a doctor’s office or room. If it is necessary to move the microscope over larger distances, special attention should be paid to the following recommendations: ... -
Page 25: Maintenance
By following these recommendations accidents during transportation and any further damage to the microscope due to incorrect handling will be avoid. 7. MAINTENANCE To maintain optimum operation of the Ecleris Microstar OM-100 Microscope, it is recommended to perform a simple revision of the equipment once a year. This procedure should include: ... -
Page 26: Lamp Change
USER MANUAL – MICROSTAR Oxide corrosion in connection pins. 7.3 LAMP CHANGE Before you change a lamp, disconnect the light source of the microscope from the electrical network and check that the device and lamp are both cold. 1) Turn the light source off.. 2) Remove the cabinet lid, exposing the lamp to be changed. -
Page 27: Fiber Optic Cable Change
6) Connect the ac interlock cable to the microscope, and then to the local electrical network. 7) Select the desired lamp. 8) Turn the light source on. 8. TECHNICAL ESPECIFICATIONS MICROSTAR OM-100 MICROSCOPE Composed of apochromatic lenses with a OPTICAL SYSTEM fungus-resistant coating STEREO BINOCULAR TUBES 45º... - Page 28 USER MANUAL – MICROSTAR Ø 11-70 mm (for f: 300 mm) Ø 15-94 mm (for f: 400 mm) 45º Inclined: 55 – 80mm Straight: 45 – 80mm INTERPUPILAR DISTANCE Inclinable: 50 – 85mm FILTER Green (Orange optional) ILLUMINATION LED LIGHT SOURCE Coaxial illumination through 7 mm fiber optic TYPE OF ILLUMINATION light guide cable...
- Page 29 USER MANUAL – MICROSTAR FIBER OPTIC CONNECTOR Built-in revolving turret with multiple adapters REFRIGERATIÓN Forced through fans POWER SUPPLY VOLTAGE 110 / 220V, 50-60 Hz Nº OF PHASES 1 (single-phase) CLASS TYPE PROTECTION LEVEL AGAINST IPX0 CONSUMPTION 400 Watts PANTOGRAPH ARM TYPE WBS-Weight Balance System ROTATION MOVEMENTS...
-
Page 30: Troubleshooting
Place the lamp cables in such source way that they do not touch the If the problem cannot be solved, please contact your local distributor or the closest ECLERIS office and request technical service. TECHNICAL SERVICE The Ecleris Microstar OM-100 Microscope must be repaired and/or maintained exclusively by authorized ECLERIS technical services. -
Page 31: Warranty
Problem’s description 4) Send the microscope for repair or replacement. The Ecleris Microstar OM-100 Microscope shall be sent in its original packaging so that it is not damaged during transportation. ECLERIS shall not be liable for damages that may occur during transportation, caused by deficient packaging.
Need help?
Do you have a question about the MICROSTAR OM-100 and is the answer not in the manual?
Questions and answers