Table of Contents
Advertisement
Quick Links
Introduction
Our 3D printers are capable of taking 3D models and printing them using PLA plastic. The process
isn't the fastest and we do limit the time it takes to print your 3D model to the hours the library is
open. But these machines can create one of a kind custom objects.
Introduction
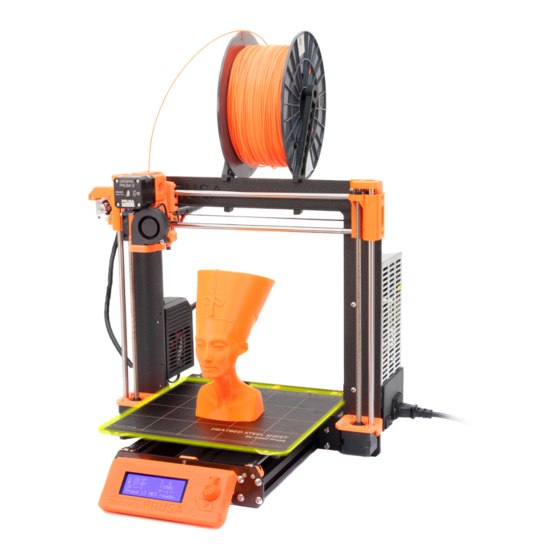
Prusa MK3S and MINI
3D Printers
Table of Contents
1
3
3
4
7
8
8
9
10
10
12
Advertisement
Table of Contents

Related Manuals for Original Prusa MK3S


Summary of Contents for Original Prusa MK3S
-
Page 1: Table Of Contents
Table of Contents Introduction 1. General 3D Printing 2. Parts of the printer 3. PrusaSlicer 4. Slicing 5. Miscellaneous Information 6. Starting a print (Prusa MK3S) 7. Starting a print (Prusa MINI) 8. Removing a print 9. Maintenance 10. Managing �lament... -
Page 3: General 3D Printing
1. General 3D Printing Where to �nd designs Many times patrons will download ready to print 3D models from various websites. No need to reinvent the wheel if the project you’re looking to make already exists. Regardless of where you �nd your model, it needs to be in an .STL (preferred) or .OBJ �le type. -
Page 4: Prusaslicer
3. PrusaSlicer PrusaSlicer is the software we use to convert a 3D model into the code read by the printer. This section assumes you have an STL �le ready to go and will not cover the design process. To begin, we’ll look at the various toolbars and describe a bit of what they do. 3.1 Modes In the top right corner of the PrusaSlicer window, you’ll see three modes, simple, advanced, and expert. - Page 5 Click on the gear and add a compatible �lament from the list. We have two models of printer, the Prusa MK3S and the Prusa MINI. When setting up your design, ensure the printer you intend to use is the one selected in the list.
- Page 6 In�ll generally does not need adjusted unless you want to print your project more solid. This will increase the printing time and weight, but can add increased structure to the print. The last item is Brim. This adds several rings of �lament to the print bed around the outside of your model.
-
Page 7: Slicing
4. Slicing 1. From a computer, double click on an STL �le to open it in PrusaSlicer. Once the software loads you’ll see your model in the center of the build plate in green. 2. Modify it’s placement and size using the sidebar listed above. 3. -
Page 8: Miscellaneous Information
To correct this, scale the model by 2540%. 6. Starting a print (Prusa MK3S) 1. Take the G-CODE from the last section and put it onto one of the SD cards attached to the printer. -
Page 9: Starting A Print (Prusa Mini)
6. The printer will now begin calibration and then printing. 7. Starting a print (Prusa MINI) 1. Take the G-CODE from the last section and put it onto one of the USB �ash drives attached to the printer. 2. Turn on the 3D printer using the switch in the back right of the machine. 3. -
Page 10: Removing A Print
Occasionally the nozzle may get covered in �lament if a print fails or excess �lament curls back onto it. To clean the nozzle follow these steps. (Images in this section are from the MK3S but the settings options remain the same on the MINI.) 1. - Page 11 2. Enter the settings menu and navigate to Temperature. Change the nozzle temperature to 250. 3. Once it has fully heated, take a brass bristle brush and gently brush the nozzle until the excess �lament has been cleaned away and the nozzle looks clean. 4.
-
Page 12: Managing �Lament
You can do this with the �ush cut pliers beside the printer. MK3S loading 1. From the menu �nd Load Filament. Press the knob to select. 2. Scroll to the appropriate type of �lament being used (PLA is most common). Press the knob to select. - Page 13 2. Select the �lament type currently loading onto the machine. The printer will heat up. 3. Once the machine beeps, press the control knob to remove the �lament. MK3S runs out of �lament mid-print 1. When the �lament runs out the machine will stop printing and begin beeping. Press the knob to eject any remaining �lament from the extruder.
- Page 14 MINI loading 1. From the menu �nd Filament. Press the knob to select. Then �nd Load Filament from this menu. 2. Scroll to the appropriate type of �lament being used (PLA is most common). Press the knob to select. 3. Insert the �lament into the end of the PTFE tube coming from the right side of the printer near the power switch.
- Page 15 5. Check the color. If it is not the desired color, select no and it will continue to extrude �lament. Repeat this step until the color is as intended and then select Yes. MINI unloading 1. From the menu select Unload Filament. The printer will automatically heat up to the appropriate temperature.
Need help?
Do you have a question about the MK3S and is the answer not in the manual?
Questions and answers