
Related Manuals for Olympus I 100 AF


Summary of Contents for Olympus I 100 AF
- Page 1 INSTRUCTIONS Read this manual carefully before using your camera.
- Page 2 WARNING Indicates circumstances under which mishandling resulting from ignoring this symbol could result in personal injury or property damage. KEEP THE BATTERIES AWAY FROM FIRE. NEVER TRY TO DISASSEMBLE, RECHARGE, OR SHORT-CIRCUIT BATTERIES. KEEP THE BATTERY OUT OF THE REACH OF CHILDREN. IF A CHILD SWALLOWS A BATTERY, CONTACT A DOCTOR IMMEDIATELY.
- Page 3 THE CAMERA; IT CONTAINS A HIGH- VOLTAGE CIRCUIT. IF THE INTERNAL PARTS OF THE CAMERA ARE EXPOSED DUE TO DROPPING OR DAMAGE, REMOVE THE BATTERIES IMMEDIATELY TO PREVENT FURTHER USAGE. IN CASE OF MALFUNCTION, CONSULT YOUR NEAREST OLYMPUS DEALER OR OLYMPUS SERVICE CENTER.
-
Page 4: Table Of Contents
Names of parts ... 5 Viewfinder display/LCD panel ... 7 Cartridge ... 8 Loading the battery ... 9 Checking the battery ... 10 Loading the cartridge film ... 12 Taking pictures ... 13 Unloading the cartridge film ... 14 Setting the print type ... 15 Print area on film ... -
Page 5: Names Of Parts
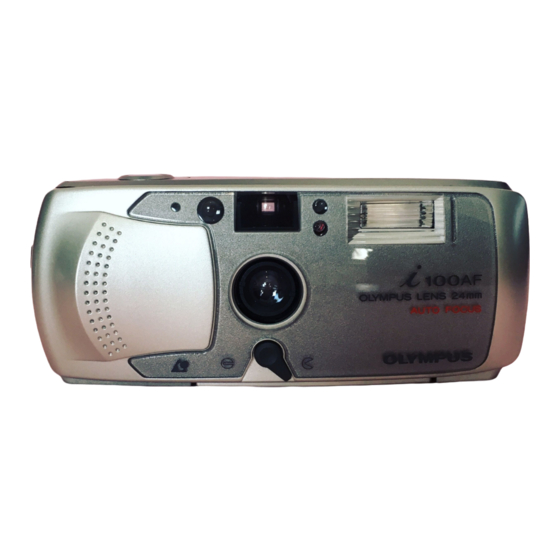
NAMES OF PARTS Camera body Shutter release button AE light sensor* Autofocus window* Viewfinder Red-eye reduction lamp/selftimer signal Flash* Lens* Lens barrier switch Cartridge cover release *Do not soil as this can cause blurred pictures. Wipe clean with a soft cloth. - Page 6 Print type selector switch Green lamp (ready-to-shoot indicator) Viewfinder LCD panel Strap eyelet Cartridge cover Selftimer button Flash mode button Mid-roll rewind button Tripod socket Battery compartment cover Battery compartment cover release Strap ring tip ATTACHING THE STRAP The camera strap ring tip can be used to press the mid-roll rewind button.
-
Page 7: Viewfinder Display/Lcd Panel
VIEWFINDER DISPLAY/ LCD PANEL Viewfinder Green lamp (ready-to-shoot indicator) Picture frame Autofocus frame LCD panel Fill-in mode (Forced Activation mode) Flash-Off mode Night Scene Flash mode Exposure counter Battery check Cartridge mark Film wind/rewind mark Red-Eye Reduction Flash mode Selftimer mode Auto Flash mode Notes: •... -
Page 8: Cartridge
CARTRIDGE IX240 Cartridge Film Visual Exposure Indicator • Only cartridges with the (unexposed) visual exposure indicator can be used with this camera. • When a cartridge with other than the visual exposure indicator is loaded, the camera will rewind the film and set the cartridge to (exposed). -
Page 9: Loading The Battery
LOADING THE BATTERY Use one 3V lithium battery (CR2). 1. Slide the battery compartment cover release and open the cover 2. Load the battery and align the ends correctly. 3. Turn the lens barrier switch turn on the camera. Check the battery power on the LCD panel (p. -
Page 10: Checking The Battery
CHECKING THE BATTERY Turn the lens barrier switch to turn on the camera. Display: lights. Meaning: Battery is OK. You can shoot. Display: lights. Meaning: Battery power is low and should be replaced with a new battery. Display: blinks. Meaning: Battery power is dead and should be replaced with a new battery. - Page 11 Battery Handling • Observe the precautionary remarks written on the batteries. • When the camera is not used for an extended period of time, remove the battery. • Keep spare batteries on hand when going on a long trip or to a cold area. •...
-
Page 12: Loading The Cartridge Film
LOADING THE CARTRIDGE FILM Use unexposed negative-color IX240 cartridge film (ISO 100~400). 1. Make sure that is displayed on the camera's exposure counter. Turn the cartridge cover release to open the cartridge cover 2. Insert a cartridge with the (unexposed) visual exposure indicator and close the cartridge cover , The film will automatically advance to the... -
Page 13: Taking Pictures
TAKING PICTURES 1. Turn the lens barrier switch tto turn on the camera. 2. Look through the viewfinder and position the autofocus frame on your subject. 3. Press the shutter release button halfway to make sure the flash green lamp lights. -
Page 14: Unloading The Cartridge Film
UNLOADING THE CARTRIDGE FILM 1. The film will be rewound automatically when the end of the roll is reached 2. Wait until the motor stops and "E" and the cartridge mark start blinking in the exposure counter. Then open the cartridge cover 3. -
Page 15: Setting The Print Type
SETTING THE PRINT TYPE Set the print type selector switch to the desired type: C, H or P. Print type selector switch C type viewfinder H type viewfinder P type viewfinder Always keep the print type selector switch set correctly. The print type setting is optically recorded on the film. -
Page 16: Print Area On Film
PRINT AREA ON FILM Print Type Setting Configuration Print type Aspect ratio C type Approx. 2:3 H type Approx. 9:16 P type Approx. 1:3... -
Page 17: Using The Flash
USING THE FLASH Press the flash mode button select the appropriate mode for the shooting conditions or your require- ments. 1. AUTO Auto Flash: This mode is used normally. The flash fires auto- matically in dark places. 2. AUTO Red-Eye Reduction: Mini- mizes the effect which causes eyes to appear red in pictures. - Page 18 • In the Flash Off and Night Scene Flash modes, use a tripod to prevent camera-shake. • When the flash mark is displayed on the LCD panel and the green lamp blinks, the flash is being re- charged and the shutter does not release.
-
Page 19: Selftimer
SELFTIMER Attach the camera to a tripod or similar support. 1. Press the selftimer burton display 2. Aim at your subject, and press the shutter release button . The selft- imer signal will light, and the shutter will be released about 12 seconds later. -
Page 20: Care And Storage
CARE AND STORAGE 1. Do not leave the camera in any place exposed to excessive heat, humidity, or direct sunlight — for example, in a car or on the beach. 2. Do not expose the camera to formalin or naphthalene. 3. - Page 21 5. Do not leave the camera on or near a television, refrigerator, or other appliance with a magnetic field. 6. Do not expose the camera to dust or sand as this could cause serious damage. 7. Do not shake or shock the camera. •...
- Page 22 • When transporting the camera from a cold place to a warm place or in the event of a sudden temperature change, put the camera into a plastic bag. This allows the camera's temperature to change slowly. Once the camera has adjusted to the new temperature, you can remove it from the bag and use it.
- Page 23 • Avoid leaving the camera unused for long periods of time. This can cause mold to grow on the camera as well as other problems. Try to press the shutter release button and check the operation of the camera before use. •...
-
Page 24: Specifications
Film format: IX240 cartridge film. Image size: 16.7 x 30.2 mm. Print type: Selection between C, H and P print types. Lens: Olympus lens, 24 mm F7,3 elements in 3 groups. Shutter: Programmed electronic shutter (1/200 ~ 1/3 sec). Viewfinder: Albada viewfinder 0.33X magnification. - Page 25 Film loading: One-touch insertion, automatic loading (automatically advanced to first frame when cartridge cover is closed}. Film advance: Automatic film winding. Film rewind: Automatic rewind at end of roll. Mid-roll rewind also possible. Rash: Built-in flash. Flash modes: Auto Flash (automatic activation in low light), Red-Eye Reduction Flash, Flash-Off, Fill-in and Night Scene Flash.
- Page 26 OLYMPUS OPTICAL C O . , LTD San-Ei Building, 22-2, Nishi Shinjuku 1 -chome, Shinjuku-ku, Tokyo, Japan. Tel. 03-3340-2211 OLYMPUS AMERICA INC. Two Corporate Center Drive, Melville, NY 11747-3157, U.S.A. Tel. 1-800 "O" CAMERA(622-6372) OLYMPUS OPTICAL CO. (EUROPA) GMBH. (Premises/Goods delivery) Wendenstrasse 14-18, 20097 Hamburg, Germany. Tel. 040-237730 OLYMPUS SINGAPORE PTE.
Need help?
Do you have a question about the I 100 AF and is the answer not in the manual?
Questions and answers