Table of Contents
Advertisement
Quick Links
Advertisement
Table of Contents

Related Manuals for Ryobi R18XLMW54


Summary of Contents for Ryobi R18XLMW54
- Page 1 R18XLMW54 R18XLMW50...
-
Page 2: Intended Use
■ If operating a power tool in a damp location is IMPORTANT! unavoidable, use a residual current device (RCD) It is essential that you read the instructions in this manual protected supply. Use of an RCD reduces the risk of before assembling, operating, and maintaining the electric shock. -
Page 3: Lawnmower Safety Warnings
of parts and any other condition that may affect the ■ Thoroughly inspect the area for wildlife where the power tool’s operation. If damaged, have the power lawnmower is to be used. Wildlife may be injured by tool repaired before use. Many accidents are caused the lawnmower during operation. - Page 4 or bleach-containing products, etc., can cause a short ADDITIONAL SAFETY WARNINGS circuit. ■ The product must be started with the user behind the ■ Charge the battery pack in a location where the ambient handlebars in the operator safety zone. Never start the temperature is between 10°C and 38°C.
-
Page 5: Transporting Lithium Batteries
movement or falling to prevent injury to persons or ■ Turn the product on its side. Check its underside and the damage to the product. area around the blade. Carefully remove any blockages. Remember that the blade may move during cleaning. TRANSPORTING LITHIUM BATTERIES SYMBOLS ON THE PRODUCT Transport the battery in accordance with local and national... -
Page 6: Symbols In This Manual
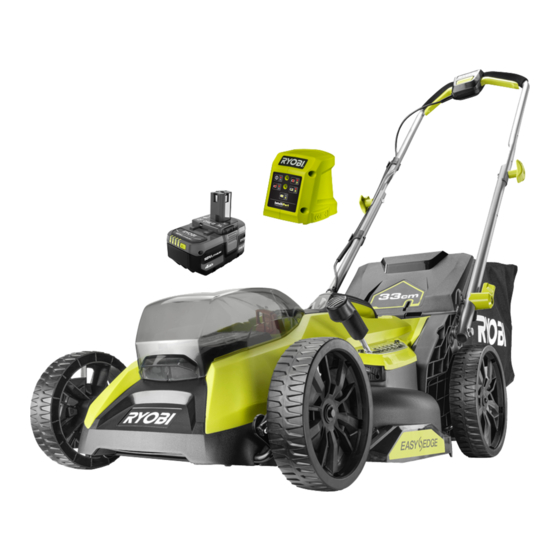
Waste electrical products should not be disposed of with household waste. Please recycle where facilities exist. Check with your local authority or retailer for recycling advice. SYMBOLS IN THIS MANUAL Note Warning Original Instructions... - Page 7 R18XLMW50 Start button On/off lever Motor control cable Top handle Operator's manual Handle knobs Bottom handle Grass catcher Height adjustment handle Spring pins Carry handle Rear wheel Battery door Front wheel Safety key Battery pack Charger R18XLMW54 Know your product...
- Page 8 Wear full eye protection, ear protection, Set the bottom handle to the operating Attach the top handle to the bottom non-slip heavy-duty gloves, substantial position. handle. Install and tighten the handle footwear, and long trousers at all times knobs to secure and lock the handles. NOTE: Make sure that the quick- while operating the product.
- Page 9 Insert the motor control cable into the motor control cable retainers. Clip the NOTE: Make sure that the handle locks retainers to the right-hand handle, securing the motor control cable. Ensure that are tight and secure. the motor control cable is properly routed along the handle. WARNING: Always make sure that the cable is never trapped, pinched, or damaged during assembly or when folding the handles.
- Page 10 Adusting the Using the grass Cleaning and p.13 p.11 p.17 cutting height catcher storing the product Cutting with EASY Emptying the grass p.14 p.13 p.16 Replacing the blade EDGE catcher...
-
Page 11: Using The Grass Catcher
USING THE GRASS CATCHER WARNING: Avoid holes, ruts, bumps, rocks, property stakes, or other hidden objects. WARNING: Do not operate the product on inclines greater than 15°. Mow across the face of slopes, never up and down. 1. Raise the rear door, and install the grass catcher, hooking it to the mower. - Page 12 3. Press the start button, then squeeze and hold either side of the on/off lever to turn on the product. Release the start button and keep holding the on/off lever to keep using the product. 4. Release the on/off lever to stop the product.
-
Page 13: Adjusting The Cutting Height
CUTTING WITH EASY EDGE EASY EDGE allows the product to easily cut the grass along walls or the edge of the lawn. NOTE: EASY EDGE pulls grass towards the blade when the product is running along a wall or the edge of the lawn. ADJUSTING THE CUTTING HEIGHT To adjust the deck height, pull the cutting height adjustment lever towards the wheel,... -
Page 14: Replacing The Blade
REPLACING THE BLADE 1. Open the battery door and remove the battery pack. Remove the safety key, and close the battery door. NOTE: Unhook the grass catcher from the product. Close the rear door. 2. Tilt the product on its side. WARNING: The blade on the product is sharp. - Page 15 4. Insert a piece of wood into the cutting deck to prevent the blade from spinning during loosening of the blade nut. Loosen the blade nut. 5. Remove the blade nut, spacer, and washer. Remove and properly dispose of the old blade. 6.
-
Page 16: Emptying The Grass Catcher
EMPTYING THE GRASS CATCHER NOTE: Stop mowing when the grass catcher is full. Empty the grass catcher before resuming operation. 1. Release the on/off lever to turn off the product. 2. Raise the rear door, and remove the grass catcher. 3. - Page 17 CLEANING STORING PRODUCT 1. Open the battery door. Remove the battery pack. Remove the safety key, and close the battery door. 2. Remove all foreign materials from the product. Clean the product with a soft, dry cloth or cleaning brush. WARNING: Do not use water to clean the product.
- Page 18 5. Fold down the bottom handle, resting it on top of the product. 6. Fold the grass catcher and place it on top of the product. 7. Store the product in a cool, dry, and well-ventilated place that is inaccessible to children.
-
Page 19: Product Specifications
Uncertainty of measurement K = 3 dB A-weighted sound power level = 91.18 dB(A) Uncertainty of measurement K = 3 dB 95 dB(A) BATTERY AND CHARGER Model R18XLMW54 R18XLMW50 Battery pack RB1840C Charger RC18115 Compatible RB18L13, RB18L13Z, RB18L15, battery packs... - Page 20 Techtronic Industries Australia Pty Ltd 31 Gilby Road, Mount Waverley, VIC 3149 Melbourne, Australia Techtronic Industries N.Z. Limited Unit C, 70 Business Parade South, Highbrook, Auckland 2013, New Zealand RYOBI is a trade mark of Ryobi Limited, and is used under license. 961479087-03...
Need help?
Do you have a question about the R18XLMW54 and is the answer not in the manual?
Questions and answers