Advertisement
Table of Contents
460 HORIZON DR. SUITE 400 | SUWANEE, GA 30024 | PHONE: 770-614-6101 | FAX: 770-614-6069 | info@omix-ada.com
H
I
A
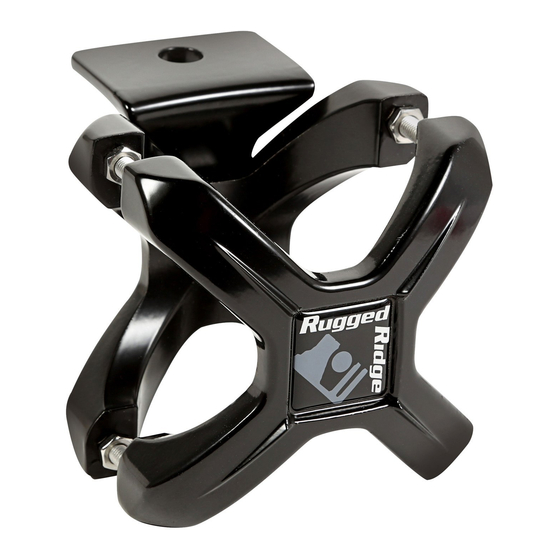
The X-Clamp from Rugged Ridge® features an innovative and unique adjustment
which allows mounting to tubes ranging from 2"-3" in diameter. Rotate the X-Clamp
to fit your tube, and pivot the mounting bracket to the desired position.
PHONE: M-F 8am - 5pm EST 1-800-449-6649 | EMAIL: techsupport@omix-ada.com
Rugged Ridge
B
Pivotal Fit Technology Explained
OMIX-ADA
TECHNICAL SUPPORT
®
FOR WARRANTY INFORMATION VISIT: www.Omix-Ada.com
Copyright © 2013 Omix-Ada
X-Clamp
®
PATENT PENDING
Contents:
• A- X-Clamp Front
• B- X-Clamp Back
• C- Mount Tab
• D- Short Cap Screw
• E- Medium Cap Screw
• F- Long Cap Screw
• G- Flat Head Screw
• H- Jam Nut
• I- Rugged Ridge Logo
F
, Inc.
®
C
G
E
D
Page 1/2
11030.01
11030.10
Advertisement
Table of Contents

Related Manuals for Omix-Ada Alloy Rugged Ridge X-Clamp


Summary of Contents for Omix-Ada Alloy Rugged Ridge X-Clamp
- Page 1 Page 1/2 11030.01 460 HORIZON DR. SUITE 400 | SUWANEE, GA 30024 | PHONE: 770-614-6101 | FAX: 770-614-6069 | info@omix-ada.com 11030.10 Rugged Ridge X-Clamp ® PATENT PENDING Contents: • A- X-Clamp Front • B- X-Clamp Back • C- Mount Tab • D- Short Cap Screw...
- Page 2 Page 2/2 11030.01 11030.10 460 HORIZON DR. SUITE 400 | SUWANEE, GA 30024 | PHONE: 770-614-6101 | FAX: 770-614-6069 | info@omix-ada.com Rugged Ridge X-Clamp ® PATENT PENDING 1. Disassemble the X-Clamp Front and X-Clamp Back by loosening the jam nuts then removing the 4 bolts and 8 jam nuts. 2. Determine the correct orientation to mount the X-Clamp by holding the X-Clamp Front and X-Clamp Back to the tube. Rotate the X-Clamp pieces 90° to make sure you have the correct orientation. 3” 2.5” 2” 3. Select appropriate bolt length for your tube diameter. 2.5” and 3” Keep jam nuts close diameter tubes require jam nuts.
Need help?
Do you have a question about the Alloy Rugged Ridge X-Clamp and is the answer not in the manual?
Questions and answers