Kohler K-682 Installation Manual
Six-port thermostatic valve
Hide thumbs
Also See for K-682:
- Homeowner's manual (21 pages) ,
- Homeowner's manual (33 pages) ,
- Installation manual (65 pages)
Table of Contents
Advertisement
Quick Links
Advertisement
Table of Contents
Troubleshooting

Related Manuals for Kohler K-682


Summary of Contents for Kohler K-682
- Page 1 Installation Guide Six-Port Thermostatic Valve K-682 M product numbers are for Mexico (i.e. K-12345M) Los números de productos seguidos de M corresponden a México (Ej. K-12345M) Français, page “Français-1” Español, página “Español-1” 1043183-2-B...
-
Page 2: Important Instructions
Kohler Co. shall not be liable under its warranty or otherwise for personal injury or damage caused by any such unauthorized modification. -
Page 3: Tools And Materials
We appreciate your commitment to Kohler quality. Please take a few minutes to review this manual before you start installation. If you encounter any installation or performance problems, please don’t hesitate to contact us. Our phone numbers and website are listed on the back cover. Thanks again for choosing Kohler Company. - Page 4 For optimum performance, 3/4″ dedicated water supply lines are recommended. A minimum 2″ (5.1 cm) drain or a drain system capable of handling a water flow of 20 gpm (76 lpm) is recommended for this installation. 1043183-2-B Kohler Co.
- Page 5 This valve complies with UL1951, ASME A112.18.1, ASSE 1016, CSA B125, and CSA C222 No. 218.2-93. This valve is listed with ASSE, CSA, IAPMO/UPC, and UL. Kohler Co. reserves the right to make revisions in the design of faucets without notice, as specified in the Price Book.
- Page 6 CAUTION: Risk of product damage. Do not mount the valve with the inlets located at the top. Vertical and horizontal mounting options are shown above. Do not mount the valve with the inlets pointing up or vertically with the inlets at the top. 1043183-2-B Kohler Co.
-
Page 7: Component Configurations
Correct: For an example with four installed bodysprays; one bodyspray to one valve outlet (1:1) using four valve outlets (Envelop). Incorrect: For an example with four installed bodysprays; two bodysprays each installed to one valve outlet (1:1) and the other two bodysprays installed to one valve outlet (2:1). Kohler Co. 1043183-2-B... - Page 8 = Constant on handshowers will not be included in the cycling pattern. For = On while cycling installations that include both body sprays and watertiles, the outlets designated as watertiles will not cycle. 3. Massage Cycling Configurations 1043183-2-B Kohler Co.
- Page 9 = Constant on handshowers will not be included in the cycling pattern. For = On while cycling installations that include both body sprays and watertiles, the outlets designated as watertiles will not cycle. 4. Massage Cycling Configurations Kohler Co. 1043183-2-B...
- Page 10 • Custom mode will allow the user to select a different water outlet as the primary showerhead, but it is not recommended. • In Custom mode, the bodysprays will cycle up the solenoid bank regardless of which port is the primary outlet. 1043183-2-B Kohler Co.
- Page 11 = Constant on handshowers will not be included in the cycling pattern. For = On while cycling installations that include both body sprays and watertiles, the outlets designated as watertiles will not cycle. 6. Massage Cycling Configurations Kohler Co. 1043183-2-B...
- Page 12 Refer to the ″Digital Interface Homeowners Guide.″ The numbers marked at each valve inlet must correspond to the appropriate showering component for the preprogrammed or custom showering experiences to function properly. Keep this in mind when determining your component layout routing the piping. 1043183-2-B Kohler Co.
-
Page 13: Prepare The Site
Install a 120 V GFCI electrical outlet, within the stud framing, in close proximity to the valve. Locate the outlet above the valve allowing ample space to mount the power supply in close proximity to the outlet. Kohler Co. 1043183-2-B... -
Page 14: Install The Valve
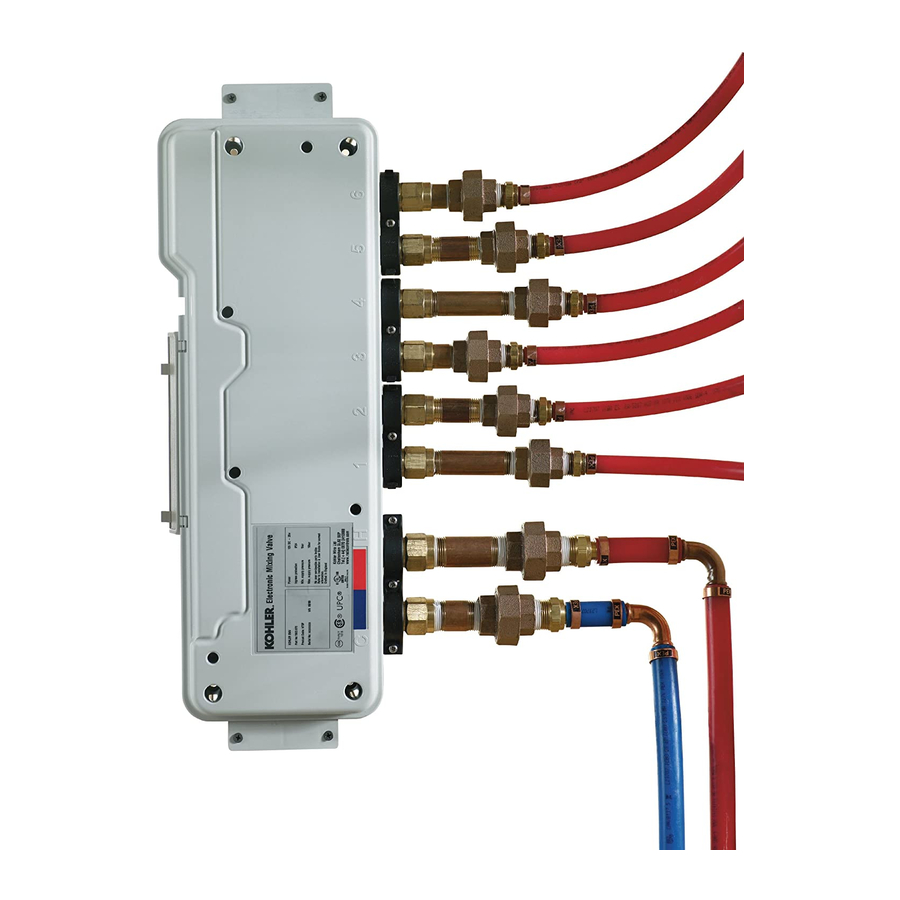
Connect the supply lines to the valve inlets. Verify that the hot and cold supplies are connected to the appropriate inlets. Hot is red and marked by a ″H,″ cold is blue and marked by a ″C.″ Secure all piping to the framing. 1043183-2-B Kohler Co. -
Page 15: Complete The Installation
Press the clips to release and open the door on the valve. Slide the hinge side of the door in either direction until one side slips free. Remove the door. Connect the interface cable(s) to the valve. Connect the power supply to the valve. Kohler Co. 1043183-2-B... -
Page 16: Installation Checkout
30 seconds at each extreme. Check Component Functions Using the user interface, turn on each component separately to verify that the selected component matches the component running. Make any corrections or adjustments as needed. Turn off the system. 1043183-2-B Kohler Co. -
Page 17: Troubleshooting
IMPORTANT! Turn off the power and water supply to the valve before performing any maintenance. It is recommended that any valve maintenance should be performed by an authorized Kohler service representative. This troubleshooting guide is for general aid only. For service and installation issues or concerns, call 1-800-4-KOHLER. - Page 18 B. If the above recommended B. Contact your Kohler Co. authorized action does not correct the service representative. symptom, the interface or valve requires servicing.
-
Page 19: Troubleshooting Table
Clean or replace the inlet screen. Refer to the Valve Homeowners Guide. C. If none of the recommended C. Contact your Kohler Co. authorized actions for the above issues service representative. correct the symptom, the valve requires servicing. -
Page 20: Renseignements Importants
Ne pas effectuer de modifications à la valve car celà pourrait en affecter la performance et annuler la garantie. Kohler Co. décline toute responsabilité sous ses garanties quant à toutes blessures ou dommages causés par des modifications non autorisées.
Need help?
Do you have a question about the K-682 and is the answer not in the manual?
Questions and answers