
Related Manuals for Rain Bird PC 506 Series


Summary of Contents for Rain Bird PC 506 Series
- Page 1 PC 506 SPRINKLER TIMER Installation, Programming, and Operation Guide RAIN BIRD IRRIGATION CORPORATION Technical Services: 800-247-3782 • http://www.rainbird.com...
- Page 2 * Additional discount not valid on clearance items, bundles or store specials. Discount applies to controller products only. Cannot be combined with other store discount codes. Valid at the Rain Bird Online Store only. Subject to change without notice. ® Registered trademark of Rain Bird Corporation.
-
Page 3: Table Of Contents
CONTENTS INTRODUCTION ......1 WINTERIZING THE SYSTEM ..33 Features & Benefits ....... 1 TROUBLESHOOTING ..... 34 Timer Stations ........2 Controls & Indicators ......3 INSTALL TIMER ....... 4 Select a Location ........4 Mount Timer ........... 5 Install Battery ......... 6 Connect Field Wiring ...... -
Page 4: Introduction
English INTRODUCTION • Ability to water up to six zones Thank you for choosing a Rain Bird PC-506 Series • Exclusive “new lawn” watering cycle for lawn Timer. PC-506 timers provide simple programming seed germination or sod and flexible schedules to meet your watering needs. -
Page 5: Timer Stations
English Timer Stations the first valve, which turns on the sprinklers connected to it. When these sprinklers have run for Most sprinkler systems divide the yard into their programmed time, the timer closes the first “stations” (also called “zones”). You can program valve and opens the second valve. -
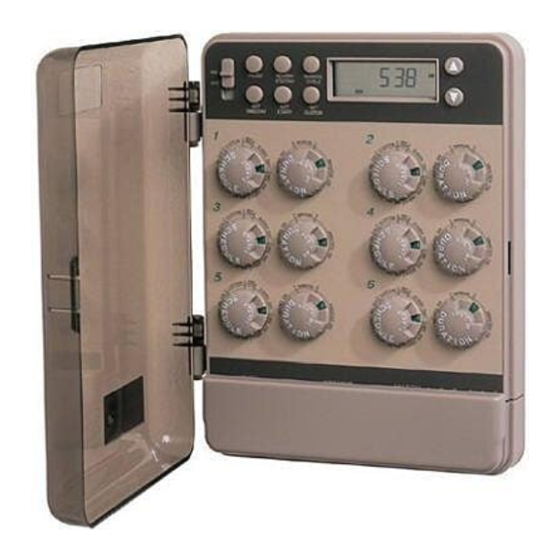
Page 6: Controls & Indicators
English Controls & Indicators Set Start button This illustration shows the programming controls on Manual Cycle button the face of the PC-506 Timer. These controls include: Set Custom button On/Off button LCD display Pause button Up/Down arrow buttons Set Time/Day button ➓... -
Page 7: Install Timer
INDOOR use only. If you must install it outdoors, use a water-resistant cabinet, • Two #10 screws and mounting anchors such as the Rain Bird Model TC-2 Timer Cabinet. The TC-2 is a heavy-duty, • Screwdriver weather-resistant plastic case that lets you convert any indoor-only timer to •... -
Page 8: Mount Timer
English Mount Timer Before securing your timer to the wall, make sure that there is enough room on the left side for the door to swing open. Screw two #10 screws into the wall 3 inches apart, leaving about ¼ inch of each screw head protruding from the wall. -
Page 9: Install Battery
English Install Battery NOTES: The battery serves as memory back-up only. You can program the timer During a power outage, the battery preserves your on battery power, but the system will not programmed watering schedules. A newly installed water without AC power. battery will hold information for up to 24 hours. -
Page 10: Connect Field Wiring
English To install the battery, remove the timer’s lower access cover by gently prying it out of the slots on the bottom corners of the timer. Place a 9-volt alkaline battery, with the “+” side facing up, in the slot directly below the fuse. DO NOT use a rechargeable battery. - Page 11 English Select Proper Wire For wire runs of less than 800 feet, use 18-gauge color-coded, multi-strand, direct burial wire. For longer runs, use 14-gauge wire of the same type. Choose wire that has one strand for each valve in your system, plus one for the common wire. For example, use five-strand wire if you have four valves, seven-strand wire for six valves, etc.
- Page 12 English NOTE: : : : : Make sure all wire connections are tight and in firm contact with the terminals. Use watertight splice connectors to prevent corrosion and avoid short circuits. Make sure ½” of wire extends from each strand. If not, use wire strippers to cut ½” of insulation from each strand.
- Page 13 English Insert the end of the wire into the terminal. Close the terminal by pushing the switch back down. CAUTION: DO NOT connect more than one valve wire to each terminal; this will damage the timer. If using more than one timer, DO NOT share the “common”...
- Page 14 If you are activating a pump from the timer, you must use a Pump Control Relay, such as Rain Bird’s PCR-1. The PCR-1 offers solid-state reliability and can activate most 120- or 240-volt pump motors up to two horsepower.
- Page 15 English Connect the color-coded “hot” wire from the master valve or pump start relay to the timer terminal marked “MV.” Connect the common wire from the master valve / pump start relay to the common wire coming from the station valves. This wire connects to the timer terminal marked “COM.”...
-
Page 16: Connect Transformer
English Connect Transformer After installing the battery and connecting the field wires, you are ready to connect the timer’s transformer. CAUTION: DO NOT plug in the transformer until you have completed and checked all wiring connections. Also, do not attempt to link two or more timers together with a single transformer. - Page 17 English c. Push the switches back down to hold the wire in place. NOTE: : : : : If the display does not come on, verify that the battery is new and securely connected. Plug the transformer into an electrical outlet. Turn the On/Off button to “On.”...
-
Page 18: Program Timer
English PROGRAM TIMER Programming is the process of telling the timer when There are two ways to program your timer: and how long you want to water each station. When The “basic dial” program lets you set watering you set a program, you schedule three things: days, times, and durations just by turning two Watering days —... -
Page 19: Set Current Time And Day
English Set Current Time and Day You must set the current time and day the first time you program the timer, and after any power interruption. Turn the “On/Off” button to ON. Make sure none none none none of the Duration dials are set to none “manual on.”... -
Page 20: Basic "Dial" Programming
English Basic “Dial” Programming On the front of your PC-506 timer, you will see six pairs of dials, numbered 1 through 6. Each pair of dials represents a watering station (or “zone”) in your irrigation system. NOTE: : : : : For more information about stations, see “Timer Stations”... - Page 21 English Watering Days and Number of Waterings Per Day (Schedule Dial) For each station in your irrigation system, use the Schedule dial to select a cycle (i.e., how many days should pass before the system waters), and how many times per day to water. The Schedule dial lets you choose between Normal Watering, New Lawn Cycling, or Custom Programs.
- Page 22 English New Lawn Cycling If you have a newly seeded lawn that requires frequent watering, turn the Schedule dial to “new lawn.” The New Lawn selection waters eight times a day, for up to 15 minutes at a time. The first cycle begins at 6:00 a.m. and repeats every two hours until 8:00 p.m.
- Page 23 English Watering Run Time (Duration Dial) The Duration dials let you do either of two things: Program the length of each watering period (“run time”) so that the timer will turn the sprinklers on and off automatically. Run the sprinklers manually for as long as you want. Automatic Operation By now, you have used the Schedule dial to tell the timer how often to turn the sprinklers on.
- Page 24 English Start Times timer will start Station 1 at 6:00 a.m. If Station 1 is set to OFF, the timer will start Station 2 instead. NOTE: : : : : Do not confuse start time numbers with station numbers. When you When the first station in your program finishes are setting Start Times, the word “Start”...
- Page 25 English Use Pre-Programmed Start Time(s) NOTE: : : : : Each “start time” you set affects all the watering stations. If you have questions about start times, be sure to read the explanation at the beginning of this section. Your timer comes with three pre-set start times: •...
-
Page 26: Custom Programming
English Press “Set/Start” again. START 2 will appear in the display. Use the buttons to adjust start times in 1/2 hour increments, as in step 2. Repeat the process for a third start time. Then press “Set Time/Day” to exit this function. (The display will automatically revert to normal time of day after approximately 15 seconds.) NOTE: : : : : The Schedule dial settings determine... - Page 27 English Set Custom Start Time(s) for Programs A and B Press the “Set/Start” button four times until the display shows START 1 CUSTOM AB in the upper left corner. Use the up & down buttons to adjust Start Times in 1/2 hour increments.
- Page 28 English Set Custom Program A Set Watering Start Time(s) The three custom start times you programmed in the previous section will affect both Programs A and B. Now you need to set Program A to accept or ignore each of those custom start times. Push the “Set Custom”...
- Page 29 English Repeat the process to assign the second and third custom start times. Set Watering Days Press “Set Custom” again to set specific days to water. (If the display has returned to the current time, press “Set Custom” twice.) The display will show CUSTOM A in the upper left corner, and the first day of the week will flash.
- Page 30 English Set Custom Program B Set Watering Start Time(s) The three custom start times you programmed affect both Programs A and B. Now you need to set Program B to accept or ignore each of these custom start times. Push the “Set Custom” button again immediately after setting Custom Program A.
- Page 31 English Repeat the process to assign the second and third custom start times. Setting Watering Days Press “Set Custom” again to set specific days to water. (If the display has returned to the current time, press “Set Custom” four times.) The display will show CUSTOM B in the upper left corner, and the first day of the week will flash.
- Page 32 English Assigning a Station to Program A or B To assign a station to Custom Program A or B, turn that station’s Schedule dial to “A” or “B.” For example, this illustration shows Station 1 assigned to Custom Program B. Setting the Watering Duration After you assign each station to Program A or B, use the Duration dials to set the length of time you want each...
-
Page 33: Operating The Timer
English OPERATING THE TIMER Manual Operation To operate a station manually, you can use the Manual Cycle button, the Pause button, or the Duration dial. Manual Cycle The “Manual Cycle” button lets you run all the stations immediately, in sequence (#1 through #6). Press “Manual Cycle.”... - Page 34 English Pause Function The “Pause” function temporarily suspends watering on all stations. This can come in handy when you need to do maintenance or other yard activities. Press “Pause” to interrupt watering immediately. The word PAUSE will appear in the lower left corner of the LCD display.
-
Page 35: Other Timer Features
English Other Timer Features ON / OFF Switch for Rainy Periods In this example, Station #1 is on the “Custom Program A” to run Monday through Saturday for two Your timer’s “On/Off” switch lets you stop watering minutes. The days listed across the bottom are the without erasing programmed information. -
Page 36: Winterizing The System
English WINTERIZING THE SYSTEM In cold-weather areas, you may want to turn off your In lightning-prone areas, Rain Bird recommends that timer during winter months. Before shutting down the you disconnect the field wires from the timer’s system for the winter, make sure to drain the water... -
Page 37: Troubleshooting
English TROUBLESHOOTING Symptom Cause Correction Electrical Issues LCD display is blank, Timer is off. Turn the switch at the top, left-hand corner of the says PO OFF, or timer to ON. flashes OFF and the time. Fuse is Remove the burned out fuse located just above the burned out. - Page 38 Replace as needed. more valves. Fuse blows as soon as Replace the transformer. Faulty transformer. the timer is plugged in. Electrical short in the Call the Rain Bird Technical Assistance timer. Hotline at 800-247-3782. PC-506 Series Sprinkler Timer Page 35...
- Page 39 English Symptom Cause Correction Watering Issues Automatic and Water source not Make sure the main water line and all supply Manual cycles do supplying water. lines are open and operating properly. not water. Wires not properly Make sure all field wires and master valve/pump connected.
- Page 40 If the surge did no permanent damage, the timer will accept programming and resume normal operation. If the timer still does not work, contact your Rain Bird distributor or the Technical Assistance Hotline (800-247-3782) for a service referral.
- Page 41 004-000-0034504. (Price is $2.00 postpaid.) or more of the following measures: Rain Bird Corporation Customer Support Center 6640 S. Bonney Ave. Tucson, AZ 85706 1-800-RAIN-BIRD (520) 434-6290 FAX © 2001 Rain Bird Sprinkler Mfg. Corp.
Need help?
Do you have a question about the PC 506 Series and is the answer not in the manual?
Questions and answers
Do I need a battery if the controller is plugged in?
The Rain Bird PC 506 Series controller does not require a battery if it is plugged in, but a 9-volt alkaline battery is recommended to retain programmed information in case of a power outage.
This answer is automatically generated