GAPOSA XQ 50 Manual
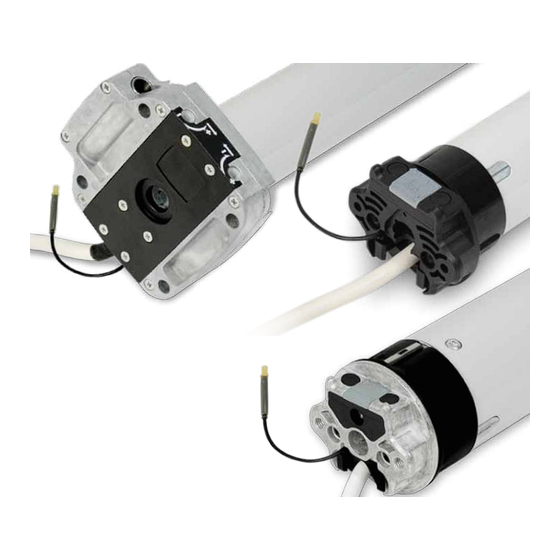
Tubular motors with mechanical limit switch, manual override and integrated receiver
Hide thumbs
Also See for XQ 50:
- Instructions manual (8 pages) ,
- Programming quick manual (7 pages) ,
- Manual (16 pages)

Subscribe to Our Youtube Channel
Related Manuals for GAPOSA XQ 50


Summary of Contents for GAPOSA XQ 50
- Page 1 Tubular motors with mechanical limit switch, manual override and integrated receiver Made in Italy...
- Page 2 INDEX SAFETY INSTALLATION ELECTRICAL CONNECTION PROGRAMMING TRANSMITTER ADDING TRANSMITTER CHECKING/CHANGING DIRECTION ERASING TRANSMITTER RESET MOTOR MEMORY LIMIT SWITCH SETUP MANUAL OVERRIDE...
- Page 3 SAFETY CAREFULLY FOLLOW THESE INSTRUCTIONS. IT IS VERY IMPORTANT FOR THE SAFETY OF PERSONS. SAVE THESE INSTRUCTIONS. IMPORTANT: • Check the shutter/awning in motion and keep persons far from it while in action. • Frequently check if any loss of balance, signs of wear or damaged wires are shown. • Do not use if any repairing or maintenance is needed. • In case of installation in awnings keep a distance of at least 0,4 m from it (completely open) and whatever fixed item in the nearby. • The device is not intended to be used by people (including children) whose physical, sensory or mental capabilities are reduced, or lacking experience or knowledge, unless they have been granted through the intermediary of a person responsible for their safety, supervision or instruction concerning the use of the device. • Children should be supervised to ensure they do not play with the device and / or with fix control devices. • The control devices installed in a fixed manner must be positioned in view.
-
Page 4: Installation
INSTALLATION To complete installation, the motor must be provided with a couple of adaptors (corresponding with the tube) and a fixing bracket. For a list of the available accessories, refer to the catalogue. WARNING: incorrect installation can cause serious injuries. Follow the installation instructions. - Page 5 INSTALLATION The fixing bracket must be fixed inside the box or on the awning frame so that the roller tube is perfectly horizontal and at a height not less than 1,8m. [FOR XQ50] Place the motor square pin on the bracket the cap at the opposite end of the tube on the fixing plate.
-
Page 6: Electrical Connection
ELECTRICAL CONNECTION Check that the mains voltage available on the system is as shown on the label. The motor mains connection should be executed according to the diagram on the next page, by qualified technicians able to operate in compliance with the rules. ATTENTION: The power supply must contemplate a switching device with an opening distance between contacts of at least 3mm. -
Page 7: Programming Transmitter
PROGRAMMING PROGRAMMING TRANSMITTER CAUTION: If more motors with receiver have to be installed, it is important to power up only one motor at time during the first programming session, in order to avoid any interferences with others. Power up the motor to be programmed. - Page 8 PROGRAMMING ADDING TRANSMITTER Press and Hold the PROG-TX but- ton of a transmitter already pai- red until the motor starts moving. Check the rotation of the motor, then release the PROG-TX button (the motor stops). Within 5 seconds press the cor- responding button (i.e.
- Page 9 PROGRAMMING CHECKING/CHANGING DIRECTION IMPORTANT: change direction must be performed before starting limit setting otherwise limits must be reset. Press UP or DOWN the motor should go UP or DOWN, otherwise to change direction: Press and hold the PROG-TX button until the motor starts moving Press STOP: The motor makes a brief jog.
- Page 10 OPTION 2 - Without an already programmed transmitter Switch the motor power supply OFF. Then switch it Within 8 seconds, using any Gaposa transmitter, press and hold both the PROG-TX and STOP buttons until the motor makes a long jog.
- Page 11 SETTING THE LIMITS SWITCHES Motors are supplied with pre-set limit switches, in order to allow two turns in both directions. IMPORTANT: Limit-switches setting procedures shown are valid for right and left side installation. IMPORTANT: The procedure shown is valid for shutters installed in internal boxes and for awnings with rear-motor winding.
- Page 12 SETTING THE LIMITS SWITCHES After installation and before fixing the shutter/awning at the tube, activate the motor downwards until it stops. ATTENTION: Check that the motor/tube turns in the right direction. Turn the lower screw to so that the tube reaches the best position for its connection with the shutter/ awning.
-
Page 13: Manual Override
• T he manual override device on the head of the motor (cardan- joint with eye or shaft with eye) must be fixed not higher than 1,8m. GAPOSA srl - via Ete, 90 63900 Fermo - Italy T. +39.0734.220701 - info@gaposa.com...
Need help?
Do you have a question about the XQ 50 and is the answer not in the manual?
Questions and answers