
Related Manuals for Dell Premier MS900


Summary of Contents for Dell Premier MS900
- Page 1 Dell Premier Rechargeable Mouse – MS900 User’s Guide Regulatory model: MS900/UD2301...
- Page 2 WARNING: A WARNING indicates a potential for property damage, personal injury, or death. © 2023 Dell Inc. or its subsidiaries. All rights reserved. Dell, EMC, and other trademarks are trademarks of Dell Inc. or its subsidiaries. Other trademarks may be trademarks of their respective owners.
-
Page 3: Table Of Contents
Features ........6 Dell Peripheral Manager......7 Setting up your wireless mouse . - Page 4 Environmental ......26 Wireless ......26 Statutory Information .
-
Page 5: What's In The Box
What’s in the box 1. Mouse 2. Dell Secure Link USB receiver 3. USB-C to USB-C charging cable 4. Documents What’s in the box │ 5... -
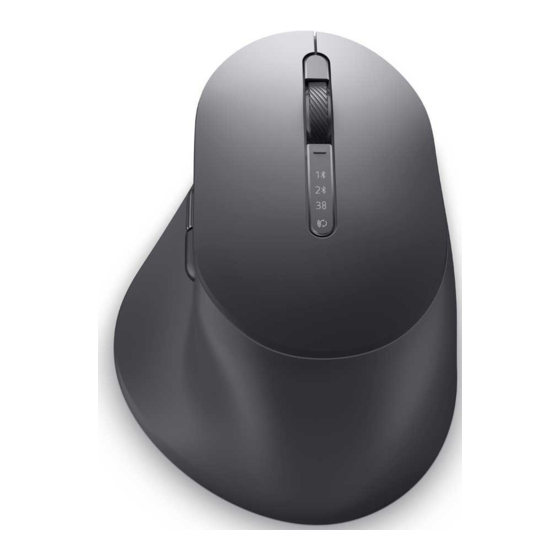
Page 6: Features
2. Vertical-scroll wheel 3. Horizontal-scroll wheel (Default: 4. Side button (Default: Back, Forward, programmable with programmable with Dell Peripheral Manager) Dell Peripheral Manager) 5. Right button 6. Scroll-speed toggle button 7. Bluetooth modes 8. RF 2.4 GHz mode (USB receiver) 9. -
Page 7: Dell Peripheral Manager
Dell Peripheral Manager The Dell Peripheral Manager is a software that enables you to set up and manage various Dell Peripherals connected to your computer. For Dell Premier Rechargeable Mouse, this software enables you to perform the following: • Assign actions to programmable buttons. -
Page 8: Setting Up Your Wireless Mouse
Setting up your wireless mouse Charging the battery NOTE: Your wireless mouse has a rechargeable battery. For best results, ensure that the battery is fully charged before using it for the first time. NOTE: To improve battery life, turn off the power switch when the wireless mouse is not in use. -
Page 9: Battery Indicator Colors
Battery indicator colors • Low power (≤5%): Amber pulsing for a period of 5 seconds regardless of the connection status. • Normal power (>5%): Battery indicator will remain off when mouse is turned on. • Charging: Breathing in white. • Fully charged: Static white for 10 seconds and then dims off. Turning on the wireless mouse Push the power switch down to turn on the wireless mouse. -
Page 10: Pairing Your Wireless Mouse
Pairing your wireless mouse Your Dell wireless mouse can be paired with devices using either the Dell Secure Link USB receiver or Bluetooth. You can pair and switch between a laptop, desktop, or any compatible mobile device. Download and install the Bluetooth Driver Bluetooth Drivers come pre-installed on all Dell computers. -
Page 11: User Interface
Bluetooth channel LED ( ) blinks white, indicating the Bluetooth pairing is initiated. 3. Dell Pair pops up a notification when a device supporting detection by Dell Pair, is turned on and brought close to the Bluetooth detection range of the computer for the first time. -
Page 12: Pairing Your Wireless Mouse Using Swift Pair
6. Press the connection-mode button for three seconds. Ensure that the first Bluetooth channel LED ( ) blinks white, indicating the Bluetooth pairing is initiated. 7. The New Dell MS900 found window appears. Click Connect and confirm the pairing process on both wireless mouse and your computer. -
Page 13: Pairing Your Wireless Mouse Using Bluetooth
1) Select Start > Settings > Bluetooth & other devices > Add Bluetooth or other device > Bluetooth. 2) Select Dell MS900 and then Done. NOTE: If Dell MS900 is not listed in your computer, check and ensure that the pairing mode is enabled on the mouse. Pairing your wireless mouse │ 13... - Page 14 4. Confirm the pairing process on both wireless mouse and your computer. The first Bluetooth channel LED ( ) turns solid white for a few seconds to confirm the pairing, and then the light turns off. After your mouse and computer pairing is completed, the mouse connects to the computer automatically when the Bluetooth is enabled and both devices are within the Bluetooth range.
-
Page 15: Pairing Device Two Using Bluetooth
NOTE: Ensure that the distance between your computer and mouse is within the Bluetooth reception range. NOTE: For Bluetooth pairing you can use Dell Pair, Swift Pair, or manual pair option. 1. In Windows Search, type Bluetooth. 2. Click Bluetooth and other devices settings. The Settings window appears. -
Page 16: Pairing With A Dell Secure Link Usb Receiver
NOTE: You can connect a device to your wireless mouse using the Dell Secure Link USB receiver. 1. Connect the Dell Secure Link USB receiver to the USB port on your computer. 2. Toggle the connection-mode button on your mouse until the USB connection is selected ( ). - Page 17 The mouse is now connected with your USB device. NOTE: The above image indicates the RF enabled device pairing. Pairing your wireless mouse │ 17...
-
Page 18: Switching Between Paired Devices
If you want to connect to another paired device, toggle the connection-mode button until the respective connection-mode light turns on. For example, if you want to connect to the wireless mouse using the Dell Secure Link USB receiver then press the connection-mode button until the connection-mode light ( ) is selected. -
Page 19: Changing The Scroll-Speed
Changing the scroll-speed Your Dell wireless mouse’s vertical-scroll wheel can be shifted between two scrolling modes, such as notched and fast. To toggle between these modes, press the scroll-speed toggle button. • Notched speed mode is suitable for scrolling precise items. -
Page 20: Troubleshooting
Troubleshooting Problems Possible solutions Mouse is not functioning 1. Ensure that the battery is fully charged. 2. Turn off the mouse, and then turn it on. Mouse buttons do not work 1. Ensure that the battery is fully charged. 2. Turn off the mouse, and then turn it on. 3. - Page 21 The Bluetooth channel LED blinks white to indicate the Bluetooth pairing is initiated. 8. Check if your computer is included in the list of selected Dell computers compatible with the mouse. For more information, see Dell.com/support. Wireless connection is lost 1.
- Page 22 • Move away from these devices. • Ensure that the distance between your laptop, desktop, or a compatible mobile device where the Dell Secure Link USB receiver is connected is within 1m. • Ensure that the USB-A port where the Dell...
- Page 23 3. Bluetooth is supported on the computer. It is turned ON under Windows settings. 4. The Bluetooth device supports detection by Dell Pair. 5. The Bluetooth device is placed close to the detection range of the computer. Lift the mouse and bring this closer to your computer.
- Page 24 USB-A port. 2. Ensure that the third connection mode is selected ( ). 3. If the Dell Secure Link USB receiver is still not working, restart the system or check the MS900 - Dell Peripheral Manager for errors.
-
Page 25: Specifications
Specifications General Model number MS900 Connection type • Wireless (2.4 GHz RF with Dell Secure Link Receiver) • Bluetooth 5.1 LE (supports Dell Pair and Microsoft Swift Pair) System requirement • Windows Server 2012; 2012 R2, 2016 (RF receiver only) •... -
Page 26: Physical Characteristics
Physical characteristics Weight (without dongle) 140±3 g (0.308 lb) Dimensions: Length 126.94 ±0.5 mm (4.99 in.) Width 89.70 ±0.5 mm (3.53 in.) Height 45.45 ±0.3 mm (1.78 in.) Environmental Temperature: Operating 0°C to 40°C (32°F to 104°F) Storage -40°C to 65°C (-40°F to 149°F) Storage humidity 20% to 90% relative humidity;... - Page 27 (which will apply between you and the retailer) and Dell’s end user contract terms. Dell may also provide an additional hardware warranty – full details of the Dell end user contract and warranty terms can be found by going to Dell.com/terms, selecting your country from the list at the bottom of the “home”...
Need help?
Do you have a question about the Premier MS900 and is the answer not in the manual?
Questions and answers