Table of Contents
Advertisement
Available languages
Available languages
SmarTemp Control 3.0
SmarTemp Control 3.0 Bluetooth
Digital Control Interface For
Air and Coolant Heaters
Installation / Operation Instructions
English .....................................................................................................................2
Français ..................................................................................................................15
ਪ ੰ ਜ ਾਬੀ ਲਈ ਇੱ ਥ ੇ ਕਿਲ ੱ ਕ ਕਰੋ
Haga clic aquí para español
Advertisement
Table of Contents

Subscribe to Our Youtube Channel
Related Manuals for Webasto SmarTemp Control 3.0


Summary of Contents for Webasto SmarTemp Control 3.0
- Page 1 SmarTemp Control 3.0 SmarTemp Control 3.0 Bluetooth Digital Control Interface For Air and Coolant Heaters Installation / Operation Instructions English ………………………………………………………………………………………………….…..2 Français ……………………………………………………………………………………………………15 ਪ ੰ ਜ ਾਬੀ ਲਈ ਇੱ ਥ ੇ ਕਿਲ ੱ ਕ ਕਰੋ Haga clic aquí para español...
-
Page 2: Operation
SmarTemp Control 3.0 Installation - Operating Instructions General Thank you for choosing Webasto to meet your heating needs. The Webasto SmarTemp Control 3.0 enables you to quickly and effortlessly operate Webasto air and coolant heaters specified in the compatibility section. -
Page 3: Electrical Connections
SmarTemp Control 3.0 Installation - Operating Instructions Electrical Connections This is a plug and play kit for all compatible heaters. Refer to the compatibility section for adapter part numbers. Connector Pin out SmarTemp side of connector Iso View Wire Insertion End... -
Page 4: Temperature Calibration
Installation - Operating Instructions Temperature Calibration Based on the installation location of the SmarTemp Control 3.0, multiple factors such as door openings can affect the SmarTemp Controls ambient temperature reading. If temperature offset adjustment is needed see “Offset” on page 7 for further details. - Page 5 Operation Using SmarTemp Panel Heater ON Example Press the Webasto button to turn heater on. Select heater model – SmarTemp 3.0 1. Using the selection button enter the menu. 2. Using the rotary dial and the selection button, select Heater.
- Page 6 SmarTemp Control 3.0 Installation - Operating Instructions Assign custom name to a heater – SmarTemp 3.0 Mobile App 1. From the home page tap the selection icon. 2. Select Heater Model from the settings menu, then select Heater name 3. You can now type in a heater name and add a custom image as well.
- Page 7 Mode functionality is still possible while in this mode. Manual – Manual Mode allows the heater to be operated via the Webasto button on Mode the SmarTemp Control fx 3.0. While in Manual Mode, all Auto Mode functionality is permanently disabled.
- Page 8 12:00PM the following day. Set time and date using the rotary knob and selection button. 12 (AM / PM) or 24-hour available. The Webasto button can be used to go back to the previous field if additional Time & Date changes are needed.
- Page 9 Status Indicator Lights - The Red status indicators (heater "ON") and LCD screen backlight turn off after 30 seconds. A touch of any button or a turn of the rotary knob will re-activate these lights. If the "Webasto" button is used to re-activate these lights, an additional press of this button is necessary to turn the heater off.
- Page 10 SmarTemp Control 3.0 Installation - Operating Instructions Operation from Mobile Application The SmarTemp 3.0 with Bluetooth connectivity can be controlled via a smartphone or other mobile device. After downloading the app, you will be asked to agree to Terms and Conditions and our Privacy Policy the first time you wish to use the application.
- Page 11 Installation - Operating Instructions Note: Heater cannot be turned on with SmarTemp 3.0, if equipped, when attempting to connect with Webasto Thermo Test (WTT) via the diagnostic connector. When WTT is connected, the heater must be operated through the WTT interface.
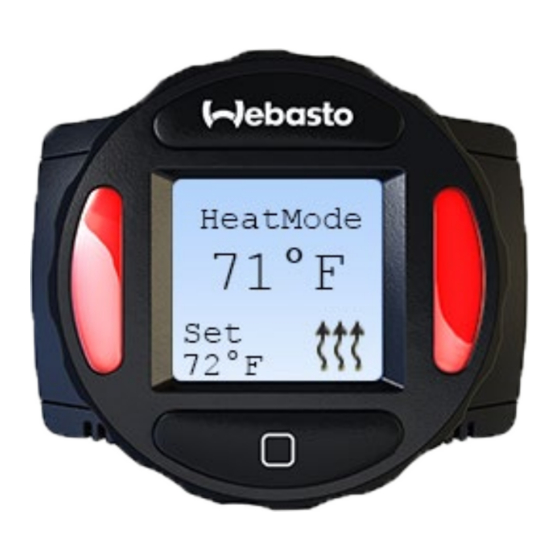
- Page 12 SmarTemp Control 3.0 Installation - Operating Instructions Battery voltage display. NOTE: The voltage displayed is voltage present at the SmarTemp connector. Ambient temperature measured at the SmarTemp (air heaters only). This is the temperature the SmarTemp is set to maintain (air heaters only).
- Page 13 SmarTemp Control 3.0 Installation - Operating Instructions Diagnostic Information SmarTemp When the heater detects a fault, a fault code message will be displayed on the SmarTemp 3.0 screen. This information can aid in diagnosing and rectifying the fault. Refer to the service information for the heater in question, found on www.techwebasto.com...
-
Page 14: Technical Information
Use the dimensions / template located in the back of this manual as a guide when installing and mounting the Webasto SmarTemp Control 3.0. NOTE: The Webasto SmarTemp Control 3.0 has an integrated ambient temperature sensor. To ensure this sensor properly measures the surrounding air, the unit must only be mounted in the vertical position. -
Page 15: Instructions D'installation Et D'utilisation
Webasto spécifiés dans la section de compatibilité. REMARQUE : les informations contenues dans ce document font référence à la fois au SmarTemp Control 3.0 et au SmarTemp Control 3.0 Bluetooth, sauf indication contraire. -
Page 16: Connexions Électriques
Remarque : assurez-vous toujours qu’il n’y a aucun obstacle derrière l’emplacement de montage avant de percer. 4. Fixez le Webasto SmarTemp Control 3.0 à l’aide des deux vis n° 4 fournies. Connexions électriques Il s’agit d’une trousse Plug & Play pour tous les chauffages compatibles. Reportez-vous à la section sur la compatibilité... -
Page 17: Étalonnage De La Température
Installation - Instructions d’utilisation Étalonnage de la température Selon l’emplacement d’installation du SmarTemp Control 3.0, de multiples facteurs tels que les ouvertures de porte peuvent affecter la lecture de la température ambiante de SmarTemp Controls. Si une compensation de la température est nécessaire, voir la section « Compensation »... - Page 18 Fonctionnement à l’aide du panneau SmarTemp Exemple de chauffage activé Appuyez sur le bouton Webasto pour allumer le chauffage. Sélectionnez le modèle de chauffage - SmarTemp 3.0 1. À l'aide du bouton de sélection, entrez dans le menu.
- Page 19 SmarTemp Control 3.0 Installation - Instructions d’utilisation Attribuer un nom personnalisé à un appareil de chauffage - Application mobile SmarTemp 3.0 1. Depuis la page d'accueil, appuyez sur l'icône de sélection. 2. Sélectionnez Heater Model dans le menu des paramètres, puis sélectionnez Heater name 3.
- Page 20 - Le mode manuel permet de faire fonctionner le radiateur via le bouton manuel Webasto sur le SmarTemp Control fx 3.0. En mode manuel, toutes les fonctionnalités du mode automatique sont désactivées en permanence. REMARQUE: En mode manuel, le radiateur continuera à fonctionner en fonction de la "durée"...
-
Page 21: Unité De Température
REMARQUE : cette fonction s’applique uniquement aux chauffages d’air. Le menu LVD « Low Voltage Disconnect » permet à l’utilisateur de régler le niveau de tension de la batterie à partir duquel le Webasto SmarTemp Control 3.0 arrêtera le chauffage. Un avertissement (DEL et message) apparaîtra après 8 minutes de basse tension. - Page 22 30 secondes. Une pression sur n’importe quel bouton ou un tour du bouton rotatif réactivera le voyant et le rétroéclairage de l’écran. Si le bouton Webasto est utilisé pour réactiver le voyant et l’écran, une pression supplémentaire est nécessaire pour éteindre le chauffage. Notez que lorsque le chauffage est allumé,...
- Page 23 SmarTemp Control 3.0 Installation - Instructions d’utilisation Utilisation à partir d’une application mobile Le SmarTemp 3.0 avec connectivité Bluetooth peut être contrôlé via un téléphone intelligent ou un autre appareil mobile. Après avoir téléchargé l'application, il vous sera demandé d'accepter les conditions générales et notre politique de confidentialité...
- Page 24 Remarque : Le chauffage ne peut pas être allumé avec SmarTemp 3.0, le cas échéant, lors d'une tentative de connexion avec Webasto Thermo Test (WTT) via le connecteur de diagnostic. Lorsque le WTT est connecté, l'appareil de chauffage doit être commandé via l'interface WTT.
- Page 25 SmarTemp Control 3.0 Installation - Instructions d’utilisation Le mode de ventilation (réchauffeurs d'air uniquement) est indiqué par une icône bleue. Le temps de fonctionnement restant s'affiche lorsque le fonctionnement minuté est sélectionné ; durée continue est affichée. Affichage de la tension de la batterie.
- Page 26 SmarTemp Control 3.0 Installation - Instructions d’utilisation Informations de diagnostic SmarTemp Lorsque le chauffage détecte une panne, un message de code de panne s’affiche sur l’écran du Smartemp 3.0. Ces informations peuvent aider à diagnostiquer et à rectifier la panne. Reportez-vous aux informations de service du chauffage en question à...
- Page 27 Commande SmarTemp Instruction d’installation – Mode d’emploi La liste des pannes affiche jusqu’à 5 pannes mémorisées ou actives qui ont été détectées par le module de commande du chauffage. Les pannes les plus récentes sont affichées au sommet. L’état de la panne, mémorisée et/ou actuelle, sera indiqué...
-
Page 28: Informations Techniques
Utilisez les dimensions/le gabarit situés au dos de ce manuel comme guide lors de l’installation et du montage du Webasto SmarTemp Control 3.0. REMARQUE : le Webasto SmarTemp Control 3.0 est doté d’un capteur de température ambiante intégré. Pour garantir que ce capteur mesure correctement l’air ambiant, l’appareil ne doit être monté qu’en position... -
Page 29: Connection Diagrams
Schémas de connexion Connection Diagrams AT 2000 STC SmarTemp 2.0 Direct Connection / AT 2000STC Connexion directe SmarTemp 2.0 AT 2000 STC Rheostat to SmarTemp 2.0 Retrofit / AT 2000STC Connexions de modernisation - rhéostat à 2.0... - Page 30 Schémas de connexion Connection Diagrams AT 2000 STC SmarTemp 2.0 Retrofit to SmarTemp 3.0 / AT 2000STC Connexions de modernisation - SmarTemp 2.0 à 3.0...
- Page 31 Schémas de connexion Connection Diagrams AT 2000 STC SmarTemp 2.0 Direct Connection to SmarTemp 3.0 / AT 2000STC SmarTemp 2.0 Connexion directe à SmarTemp 3.0 AT 2000STC SmarTemp 3.0 Direct Connection / Connexion directe AT 2000STC SmarTemp 3.0 AT 2000STC SmarTemp Rheostat to SmarTemp 3.0 Retrofit Connections / Rhéostat Air Top 2000STC vers SmarTemp 3.0...
- Page 32 Schémas de connexion Connection Diagrams AT EVO 40/55 SmarTemp 2.0 Direct Connection / Connexion directe Air Top EVO 40/55 SmarTemp 2.0 AT EVO 40/55 SmarTemp 2.0 Retrofit / Rhéostat Air Top EVO 40/55 vers SmarTemp 2.0...
- Page 33 Schémas de connexion Connection Diagrams AT EVO 40/55 SmarTemp 2.0 Retrofit to SmarTemp 3.0 / Air Top EVO 40/55 SmarTemp 2.0 Retrofit à Smartemp 3.0 AT EVO 40/55 SmarTemp 2.0 Direct Connection to SmarTemp 3.0 / AT EVO 40/55 SmarTemp 2.0 Connexion directe à Smartemp 3.0...
- Page 34 Schémas de connexion Connection Diagrams AT EVO 40/55 SmarTemp 3.0 Direct Connection / Connexion directe Air Top EVO 40/55 SmarTemp 3.0 AT EVO 40/55 Rheostat to SmarTemp 2.0 Retrofit / Rhéostat Air Top EVO 40/55 vers SmarTemp 3.0...
- Page 35 Schémas de connexion Connection Diagrams Thermo Top EVO SmarTemp 3.0 Direct Connection / Thermo Top EVO SmarTemp 3.0 Connexion directe Thermo Top EVO SmarTemp 2.0 to 3.0 Retrofit / Thermo Top EVO SmarTemp 2.0 à 3.0...
- Page 36 Webasto Thermo & Comfort N.A., Inc. 15083 North Road Fenton, MI 48430 USA Phone: 810-593-6000 Fax: 810-593-6001 Email: info-us@webasto.com Internet: http://www.webasto.us http://www.techwebasto.com Org. 12/2022 | Rev. 1/4/2023 | P/N: 5013872B...
Need help?
Do you have a question about the SmarTemp Control 3.0 and is the answer not in the manual?
Questions and answers