Table of Contents
Advertisement
Quick Links
General
Thank you for choosing Webasto to meet your heating needs. The Webasto SmarTemp Control fx 2.0 enables you to
preset start-up cycles of your Webasto heater 7 days a week with 4 individual times each day.
Operation
The Webasto SmarTemp Control fx 2.0 is controlled using a rotary dial around the outside of the unit to scroll
through menu options. Simply click the selection button (
each menu item and its default setting.
Compatibility
All Coolant Heaters; the SmarTemp Control fx 2.0 has an output of 1A for the heaters ON/OFF signal. Heaters
requiring a higher amperage signal will require a relay to accommodate different specifications. See electrical
connections for details. Note: Relay not included.
Mounting Procedure
1. Find a suitable mounting location (on a flat surface if possible) in a visible area.
CAUTION: Always install in an area protected from the effects of weather
and contamination.
2. Use the drilling dimensions to lightly mark the two mounting holes.
3. (Optional Step) To route wire harness through the mounting surface,
drill a 17mm hole as notated on the drilling dimensions image.
NOTE: Always make sure there are no obstacles behind the mounting
location prior to drilling.
4. Secure the Webasto SmarTemp Control fx 2.0 using the two supplied #4
screws.
5. Apply the supplied "Heater Off" warning sticker in a highly visible
location to the driver's area. Refer to the example sticker below.
6. Observe the Menu Descriptions section for proper menu setup.
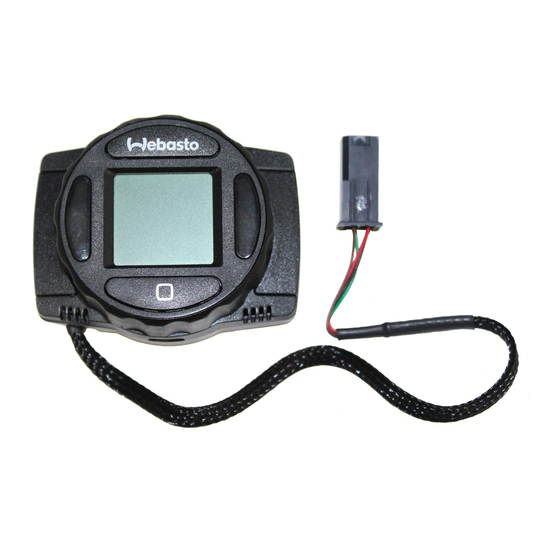
SmarTemp Control fx 2.0
Installation / Operation Instructions
a
) to make your choice. The following sections will define
1
a
Digital Timer Interface
a
Advertisement
Table of Contents

Related Manuals for Webasto SmarTemp Control fx 2.0


Summary of Contents for Webasto SmarTemp Control fx 2.0
- Page 1 Webasto heater 7 days a week with 4 individual times each day. Operation The Webasto SmarTemp Control fx 2.0 is controlled using a rotary dial around the outside of the unit to scroll through menu options. Simply click the selection button ( ) to make your choice.
-
Page 2: Relay Output
Status Indicator Light(s) LCD Screen Selection Button *Micro USB Service Port * The micro USB service port is not used for heater diagnostic purposes on SmarTemp Control fx 2.0. LCD Screen Legend Mode (Auto or Manual) Auto Mode Manual Mode... - Page 3 Error codes cannot be reset through the Webasto SmarTemp Control fx 2.0 on the heater, a Webasto PC Diagnostics tool is needed. Refer to the heater service manual for resetting an error code.
- Page 4 IMPORTANT - The Red status indicators (heater "ON") and LCD screen backlight turn off after 30 seconds. A touch of any button or a turn of the rotary knob will re-activate these lights. If the "Webasto" button is used to re- activate these lights, an additional press of this button is necessary to turn the heater off.
- Page 5 SmarTemp Control fx 2.0 Installation – Operation Instructions Technical Information Rated Voltage: 12 / 24V Operating Voltage Range: 9V - 32V Low Voltage Disconnect Range: 12V: 11 – 12.5V | 24V: 21 – 25.5V Operating Temperature: - 40° ... +185 °F (- 40° ... +85 °C) NOTE: Display visible to -22°F (-30°C)
- Page 6 SmarTemp Control fx Installation – Operation Instructions Notes:...
- Page 7 SmarTemp Control fx Installation – Operation Instructions Notes:...
- Page 8 Webasto Thermo & Comfort N.A., Inc. 15083 North Road Fenton, MI 48430 USA Phone: 810-593-6000 Fax: 810-593-6001 Email: info-us@webasto.com Internet: http://www.webasto.us http://www.techwebasto.com Org. 3/2015 Rev. 8/2018 Ver. 1.0...
Need help?
Do you have a question about the SmarTemp Control fx 2.0 and is the answer not in the manual?
Questions and answers