Table of Contents
Advertisement
Quick Links
Advertisement
Table of Contents

Related Manuals for HK Instruments PHM-V1


Summary of Contents for HK Instruments PHM-V1
- Page 1 PHM-V1 Micromanometer User guide 2021 ver. 2.0...
-
Page 2: Table Of Contents
Table of contents TECHNICAL SPECIFICATIONS . . . . . . . . . . . . . . . . . . . . . . . . . . . . . . . . . . . . . . . . . . . . . . . . . . . . . . 4 Technical specifications . - Page 3 PHM-V1 MANAGER -PROGRAM . . . . . . . . . . . . . . . . . . .
-
Page 4: Technical Specifications
TECHNICAL SPECIFICATIONS TECHNICAL SPECIFICATIONS Measurement range: -250 … 2550 Pa Accuracy*: 1 .4 % from reading Maximum overpressure: 30 kPa Compatible mediums: Air and non-aggressive gases Power supply: 4 x AAA batteries or rechargeables Connectors: Pressure hoses: male Ø 5 .0 mm USB: Mini B Weight: 170 g... -
Page 5: Unpacking
● Carry strap (attached to the device) COMMISSIONING The PHM-V1 works using four AAA alkaline batteries or rechargeables . The device has been fitted with alkaline batteries from the factory, so there is no need to install batteries when first starting to use the device . -
Page 6: Using The Meter
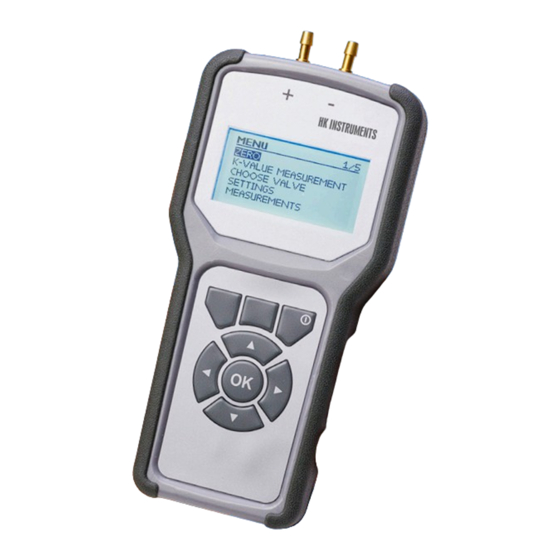
USING THE METER Button functions Recently used valves Enter menu Power on/off Adjust para- meters / up in menu Adjust params . / change K-factor table Accept value / Adjust parameters / down in menu Adjust params . / back in menu / change K-factor table Picture 2. -
Page 7: Menu
MENU The menu is accessed by pressing the top left-hand corner button . When navigating the menus, OK moves forward and left arrow moves back . Main menu Following choices are available in the main menu: ● ZERO ● K-VALUE MEASUREMENT ●... -
Page 8: Settings
SETTINGS General device settings are altered in the settings menu. The following settings are available: ● CHOOSE UNITS ● MEAS. TYPE ● DISP SETTINGS ● DATE ● CLOCK ● AUTO OFF ● TEMPERATURE SETTINGS CHOOSE UNITS MEAS. TYPE DISP SETTINGS DATE 17.11.2016 CLOCK... -
Page 9: Measurement Type
MEASUREMENT TYPE The user may select from four different measurement methods: averaging, three-point measurement single-point or multiple points measurement . (See “Making measurements”, page 12). Average measures pressure and volume flow averages from time period selected by the user . The period can be changed when Averaging is selected and OK is pressed . The period will start to blink. -
Page 10: Date
DATE Date is set by pressing OK and changing values using the up and down buttons . Active selection will blink on the screen . You may move to the next value by pressing right button and to the previous by pressing left button . When the date is set, press OK to confirm . CLOCK Time is set by pressing OK and changing values using the up and down buttons . -
Page 11: Saving On
MEASUREMENTS All previously recorded measurements are available for viewing in the Measurements menu . The device will sort all records by date and time so that the oldest is first and latest is last . Each recording contains the following information: - space/room (for example, bathroom) - valve type and size (for example KSO-100) - K-factor... -
Page 12: Making Measurements
MAKING MEASUREMENTS There are two distinct measurement modes; measuring using K-factor and measuring using chosen valve . K-factor measurement the chosen measurement parameter is the K-factor . In valve measure- ment, the K-factor is derived from the chosen valve and a parameter relating to, for example, its opening value . -
Page 13: Saving The Measurement Results
MENU MANUFACTURER TYPE EH-Muovi ZERO EHKTS K–VALUE MEASUREMENT Fläkt W oods CHOOSE VALVE Halton SETTINGS Lindab EHSS MEASUREMENTS Pitot measurement EHTH K-TABLE EHKTS–100–K1 K:1.60 SIZE EHKTS–100 a(mm) EHKTS–125 When a valve has been selected, valve parameter (f.e. valve opening) can be adjusted using up and down arrow keys . -
Page 14: Notifications
. PHM-V1 MANAGER -PROGRAM With the PHM-V1 MANAGER -program you can select and remove types of valves from the gauge, download measuring data on your PC and create measurement records . Hand-held... -
Page 15: Installation
INSTALLATION 1. Download the installer from the website: https://hkinstruments.fi/products/micromanometer/phm-v1-2/ Password to the download page of the installer will be delivered in product package. Run the downloaded file PHM-V1_Manager_Setup.exe. Picture 2. Language selection 2 . After language selection the installer program gives overview of the installation process in an information window . - Page 16 3 . Select destination folder for the program . Picture 4. Selecting destination folder 4 . Select Start Menu shortcut folder name . Picture 5. Selecting start menu folder...
- Page 17 5 . An overview of installation choices will appear . If you have PHM-V1 connected to the computer’s USB port, please remove it before clicking Install . Picture 6. Installation overview 6 . Installer will install PHM-V1 Manager and necessary run-time libraries . After they have been installed, installer will install the USB device driver .
-
Page 18: Starting The Program
STARTING THE PROGRAM The setup program has created shortcuts labeled “PHM-V1 Manager” in the Start menu. Run program by clicking on the Start menu shortcut . Picture 14. Main window... -
Page 19: Valve Database
VALVE DATABASE The “Valve database” is the database for the handheld meter valves. The program comes with a valve database, that is pre-installed in the device . The file extension is * .hki . Open the valve database from the menu: 1. - Page 20 By clicking on the name of the manufacturer, the valves they provide will appear on the tree view (shown in picture 16) Select valve to display its detailed information (picture 17) Picture 16. Database directory In this tree view you can see and modify the following information: - size of valve...
-
Page 21: Adding Data Into Database
ADDING DATA INTO DATABASE New manufacturers, valves and terminals can be easily added and modified in the database 1. Adding a database. If you want to create a new database, add a database by right-clicking “database” on the directory. Select “Add database”. A new window will appear. Name the database. Picture 18. - Page 22 3. Adding a valve. Add a valve by right-clicking the name of the valve shown in the directory. Select “add valve type”. A new window will appear. Enter the information of your chosen valve. Picture 20. Add valve type 4. Adding valve data a.
- Page 23 Picture 22. TÄTÄ EI OLLUT WORDISSA, TULEEKO TÄHÄN TEKSTIÄ?? c. Enter variable name in “Variable name”, for example “o(mm)” for opening in millimeters. Authorize changes by clicking “Replace”. d. Enter the number of K-value tables. The number will vary depending on the valve. For example, with the KSO-valve the number is one, whilst the STI-valve the number is three .
- Page 24 Picture 24. Overview of the valve type window e. If you want to re-name the K-value tables (that are named K1, K2, K3… by default), click on “Change”. In picture 25 “K1” is renamed “k” Picture 25. Changing K-value table names...
- Page 25 Enter variables and the corresponding K-factors in the index displayed in the window (picture 26). Click “replace” when changes are ready . Picture 26. Entering variables and K-values g. Enter new valve size by clicking on “add”. Select “add new” to create a new size or “create copy”...
-
Page 26: Saving Valve Database
DOWNLOADING DATABASE FROM THE METER AND ONTO THE METER Transferring all data between the meter and PHM-V1 Manager is done in the control window . Control window is opened in the menu bar, the key is a picture of a meter . Open the control window by clicking on the key . - Page 27 Connect the device into the computer by switching the device on first and then the cable (as instructed on page 18) PHM-V1 Manager recognizes automatically when the device is properly connected . The device is connected when the control window button is green, if not, the button is shown in red .
- Page 28 1 . To transfer the database from your computer to the meter open the control window and select the key with the arrow pointing downward . This opens a new window from which you can track the transferring of data . When transferring is complete and you do not wish to transfer other data to or from the meter, disconnect the USB cable .
-
Page 29: Downloading Measurement Data From The Meter
DOWNLOADING MEASUREMENT DATA FROM THE METER To download measuring data onto your computer, open the control window . Click on “Device’s measuring data”. Download measuring data by clicking on the arrow pointing up in “Measurement data on device”. Picture 34. Download or transfer measuring data Tracking download can be seen in the new window that pops up . -
Page 30: Creating Measurement Data Manually
Picture 36. Measurement data CREATING MEASUREMENT DATA MANUALLY Measurement can also be created manually with the PHM-V1 Manager . This is useful when measuring with another device, for example. Right-click on the “measurements”-key and select “add other than PHM-V1 measurement” (picture 37) -
Page 31: Creating A Measurement Record
CREATING A MEASUREMENT RECORD You can create measurement records with the PHM-V1 Manager. You must first download or manually enter all measurement data into the program . To modify a measurement, click on the picture of a lock located on the upper left-hand side of the window. - Page 32 A list of previously created items will appear. Click on “Add customer”. Enter contacts of the place that is measured . Picture 41. Add measurement place With high rise buildings, rowhouses or any types of buildings with multiple flats, you can calculate the difference between the exhaust and supply air by each flat and create a meas- urement table.
- Page 33 The “measurement”-directory will now display a new place (building) and below that an amount of blank rows that correspond to the number of flats in the building. Picture 43. New customer By clicking on the specific flat in a building on the menu, a new window will open in which you can label the flat with a number, if the building contains several flats.
- Page 34 After you have labeled the flats with a number the corresponding numbers will be shown in the measurement places-directory Picture 45. Flat numbers shown in the directory By double-clicking an item on the measurement places -directory you can move the object into the measurement of your choice.
- Page 35 When clicking on the created item in the directory (picture 47) a new window will open with three tabs . In the Measurement place specifications-tab you can modify previously entered data. The Measurement place measurements-tab lets you create a measurement table etc . Measurement table-tab lets you view measurements done in the flat.
- Page 36 Picture 49. Measurements per flat Select a flat from the directory. You can give the the valve/terminal a planned flow value and a decibel value for the space . Enter the missing data and the planned values for every measurement object, if necessary . The necessary data for the measurement table is now complete .
-
Page 37: Adding Business Contact Information
ADDING BUSINESS CONTACT INFORMATION Enter business contact information in the program before printing, if they haven’t already been entered. Business contact information only needs to be entered once, after which they will be automatically entered in the measurements table by the program. Click on the key located in the upper bar (see picture 51) to open the window in which you can enter the business contact information. -
Page 38: Printing
PRINTING If you wish to print all the measurements of the measurement places at once (or the meas- urement place contains only one flat), click on the date in the measurement directory to activate. If you only wish to print one measurement, click on the measurement. If you wish to print the measurements of only one flat, select the flat from the measurement directory and then the date, as shown in picture 54 . -
Page 39: Saving Measurement Data
SAVING MEASUREMENT DATA When you have downloaded or modified measurements, added measurement objects etc., save the measurement data and its measurement objects in the upper menu bar: File-> Save as…-> Format as Measurement file (*.phm) (picture 55). Select a file to save in, name the file and click save . -
Page 40: Service
Service The meter requires very little service in order to function impeccably. CALIBRATION To preserve measurement accuracy, we recommend sending the meter to the manufacturer to be re-calibrated annually . To send the meter to be re-calibrated, contact your retailer or manufacturer . - Page 44 Keihästie 7 FIN-40950 MUURAME FINLAND Phone . +358 14 337 2000 Fax. +358 14 337 2020 info@hkinstruments .fi www .hkinstruments .fi...
Need help?
Do you have a question about the PHM-V1 and is the answer not in the manual?
Questions and answers