Table of Contents
Advertisement
Available languages
Available languages
Quick Links
Imprint
0726267 AN 010522-EN / Master_1621001
Manual for „Chipz", Art.Nr. 7617127
© 2022 Franckh-Kosmos Verlags-GmbH & Co. KG ∙ Pfizerstraße 5–7 ∙ 70184 Stuttgart, Germany
This product and all of its parts are protected by copyright. Any use outside of the narrow copyright law
limits is not permitted without the publishing house's approval and is punishable. This especially applies to
reproductions, translations, microfilming and storage and processing in electronic systems, networks and
media. We assume no guarantee that all information in this product is free of property rights.
Project management: Jonathan Felder
Technical product development: Deryl Tjahja; CIC Components Industries Co., Ltd., Taiwan
Design concept for instructions: Atelier Bea Klenk, Berlin
Layout of instructions: Studio Gibler, Stuttgart
Material images: CIC Components Industries Co., Ltd., Taiwan
Comic story: Bianca Meier, Hamburg (Artwork); Murat Kaya, Hamburg (story and text) Instruction photos:
picsfive (all pin needles); askaja (all paper clips); Jaimie Duplass (all adheisve strips); Jenson, S. 35 o; VTT
Studio; p. 35 u; Andrey_Popov, p. 36 o (all previous ©shutterstock.com); niekverlaan, p. 35 m (pixabay.com);
Design concept for the packaging: Peter Schmidt Group GmbH, Hamburg
Layout of the packaging: Peter Schmidt Group GmbH, Hamburg
Photos for the packaging: Matthias Kaiser, Stuttgart (cover model); CIC Components Industries Co., Ltd.,
Taiwan
The publishing house had made every effort to find the owners of the image rights for all photos used.
If an image right holder was not taken into consideration in individual cases, we ask said holder to prove
ownership of the image right to the publishing house so that the publishing house can pay the photo fee
to the right holder that is standard for the industry.
Subject to technical changes.
Printed in Taiwan
KOSMOS customer ser vices
Do you have
any questions?
Tel.: +49 (0)711-2191-34 3
Our customer services
Fax: +49 (0)711-2191-145
will be happy to help you!
ser vice@kosmos.de
© 2022 KOSMOS Verlag
Pfizerstraße 5-7
70184 Stuttgar t, DE
kosmos.de
Manual
Chipz
Your intelligent robot
Franckh-Kosmos Verlags-GmbH & Co. KG ∙ Pfizerstraße 5 – 7 ∙ 70184 Stuttgart, DE ∙ Phone +49 (0) 711 2191-343
Languages available:
English – Deutsch
SCAN
Français – Italiano
QR CODE
Español – Nederlands
Česky – Slovensky
Polski – Magyar
TO DOWNLOAD
Български – Русский
FULL-COLOUR
MANUAL
... and more
or go to: www.kosmos.de/int/Chipz
Advertisement
Table of Contents

Related Manuals for Kosmos Chipz


Summary of Contents for Kosmos Chipz
- Page 1 Pfizerstraße 5-7 Our customer services Fax: +49 (0)711-2191-145 70184 Stuttgar t, DE will be happy to help you! ser vice@kosmos.de kosmos.de Franckh-Kosmos Verlags-GmbH & Co. KG ∙ Pfizerstraße 5 – 7 ∙ 70184 Stuttgart, DE ∙ Phone +49 (0) 711 2191-343...
-
Page 2: Safety Information
We hope you and your child have lots of fun with They must be delivered to a collection location for electronic waste, as indicated by the following symbol: Chipz, the intelligent robot! Please contact your local authorities for the appropriate disposal location. -
Page 3: Table Of Contents
Chipz › › › CONTENTS Safety information ........Inside front cover Contents ................1 Equipment ................. 2 Adventure comic part 1 ............. 3 Assembly instructions ............7 Changing the batteries ............ 29 Get started ............... 30 Follow-me mode ............. 31 Explorer mode .............. -
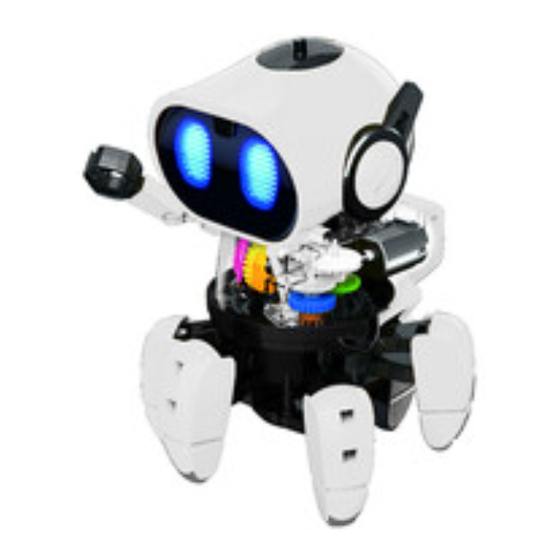
Page 4: Equipment
› › › EQUIPMENT What’s in your experiment kit: P10 P9 Checklist: Search – view – check off No. Description Quantity No. Description Quantity Small pinion - white P13 Motor with connection cables Gear wheel 32/10T - grey P14 Motor with connection cables Gear wheel 32T - blue P15 Battery compartment with connection cables... -
Page 5: Adventure Comic Part 1
ADVENTURE COMIC... - Page 6 While the others go to bed, Tom and Izzy are still busy. There where other people only see scrap, heroes see endless possibilities. I found The thrust something! needs to be increased by a factor of We were missing this part still! …to We need...
- Page 7 Tom, on the other Izzy can repair hand, is a scientist They can build anything and is through and through... anything together! a master of mechanics. I think it's done! ...but he can also lend a hand. We did it! Nothing can stop us now! Where should...
- Page 8 ADVENTURE COMIC It seems like we have a little problem... That was my mistake..I should have differentiated the navigation together with the exoplanet’s coordinate system. The battery Why don’t we broke when We need new look there? we crashed. electrolyte fluid.
-
Page 9: Assembly Instructions
Assembly instructions BODY MODULE Body Module Assembly Body Module Assembly Blau Blau Schwarz Schwarz P11x3 Blue Black P11x3 P11x3 (short) (kurz) (kurz) (orange) (Orange) (Orange) (white) (Weiß) (Weiß) (orange) (Orange) (Orange) Blau Blau Schwarz Schwarz Blue Black (pink) (Pink) (Pink) - Page 10 BODY MODULE P9x3 P9x3 P9x3...
- Page 11 Assembly instructions Drehe die vier P10- Drehe die vier P10- Screw in the four P10 Schrauben komplett ein. Drehe die vier P10- screws all the way. Schrauben komplett ein. Schrauben komplett ein. ENTFERNEN ENTFERNEN ENTFERNEN REMOVE Entferne das Hilfsteil A15 Entferne das Hilfsteil A15 Entferne das Hilfsteil A15 nachdem du die Schritte 1 bis 7...
- Page 12 BODY MODULE Schwarz Black Schwarz Schwarz Schwarz (lang) (lang) (long) (lang) (lang) (Weiß) (Weiß) (white) (Weiß) (Weiß) (Grün) (Grün) (green) (Grün) Side view (Grün) P12(lang) P12(lang) P12(lang) P12 (long) P12(lang) (Grau) (Grau) (Grau) (Grau) (grey) (Blau) (Weiß) P2(Grau) (Blau) (Blau) (Weiß) P2(Grau) (Weiß)
- Page 13 Assembly instructions P9x3 P9x3...
- Page 14 BODY MODULE Make sure you have removed Stelle sicher, dass du das Stelle sicher, dass du das Stelle sicher, dass du das the part A15 before performing Teil A15 entfernt hast, bevor Teil A15 entfernt hast, bevor Teil A15 entfernt hast, bevor step 14 du Schritt 14 durchführst du Schritt 14 durchführst...
- Page 15 Assembly instructions HEAD MODULE Körper-Modul Körper-Modul Body module D2&D3 D2&D3 D2&D3 D2&D3 Wichtig! Important! Wichtig! *P17 befindet sich auf der weißen Sticker-Folie. *P17 is on the white sticker film. Pay attention to the exact alignment of the sticker. Achte auf die genaue Ausrichtung des Stickers. *P17 befindet sich auf der weißen Sticker-Folie.
- Page 16 HEAD MODULE P9x2 P9x2 P9x2 Drehe die zwei P9-Schrauben, Drehe die zwei P9-Schrauben, Screw in the two P9 screws Drehe die zwei P9-Schrauben, wie hier gezeigt, ein. wie hier gezeigt, ein. as shown here. wie hier gezeigt, ein. Remove all residue before Entferne vor der Montage Entferne vor der Montage Entferne vor der Montage...
- Page 17 Assembly instructions Schwarz Blau Black Blue Schwarz Black Press the cables downwards Kabel nach unten drücken...
- Page 18 HEAD MODULE › Einen Kurzschluss der Batterien vermeiden. Ein Kurzschluss kann zum › Einen Kurzschluss der Batterien vermeiden. Ein Kurzschluss kann zum › Einen Kurzschluss der Batterien vermeiden. Ein Kurzschluss kann zum Überhitzen von Leitungen und zum Explodieren der Batterien führen. ›...
- Page 19 Assembly instructions...
- Page 20 HEAD MODULE Seitenansicht Seitenansicht Seitenansicht Side view...
- Page 21 Assembly instructions Lass dir von einem Erwachsenen helfen, sollte dir einer der nächsten Schritte schwerfallen. Get help from an adult if one of the following steps is difficult for you. Setze die Unterlegscheibe auf Place the washer under the die Schraube und drehe sie dann screw and then screw it in.
- Page 22 LEGS A18x2 A18x2 Ensure that A18 engages with a “click” Achte darauf, dass A18 mit einem „Klick“ Achte darauf, dass A18 mit einem „Klick“ einrastet einrastet Achte darauf, dass A18 mit einem „Klick“ einrastet Click Klick Klick Klick Klick Click Klick Klick View from bottom...
- Page 23 Assembly instructions Originalgröße Originalgröße Originalgröße Originalgröße Original size Do not A1 nicht A1 nicht A1 nicht mit A2 confuse mit A2 mit A2 verwechseln. A1 with A2. A1 nicht verwechseln. verwechseln. mit A2 verwechseln. Drücke Press Drücke Press Drücke Drücke Drücke Drücke Drücke...
- Page 24 LEGS Drücke Drücke Drücke Press Drücke Press...
- Page 25 Assembly instructions View from bottom View from bottom...
- Page 26 LEGS Achte auf die richtige Ausrichtung von A19 Pay attention to the correct alignment of A19 Achte auf die richtige Ausrichtung von A19 Achte auf die richtige Ausrichtung Pay attention to the correct alignment Achte auf die richtige Ausrichtung von A17 of A17 von A17...
- Page 27 Assembly instructions Originalgröße Original size A1 nicht Scale 1:1 Scale 1:1 Scale 1:1 mit A2 verwechseln. A2 nicht mit A1 verwechseln. Do not confuse A2 with A1. A2 nicht mit A1 verwechseln. A2 nicht mit A1 verwechseln. Drücke Drücke A1+B1 A2+B15 A1+B1 A1+B1...
- Page 28 LEGS P9x2 P9x2 P9x2 P9x2 P9x2 P9x2 P9x2 P9x2 P9x2...
- Page 29 Assembly instructions...
- Page 30 ARMS Grat Burr Remove all residues before assembly. Grat Burr Grat Burr Remove all Entferne vor der Montage alle residues before Rückstände. assembly. Grat Burr...
-
Page 31: Changing The Batteries
Changing the batteries CHANGING THE BATTERIES Done! Changing the batteries Auf- Unscrew Entfernen schrauben Entfernen Entfernen Remove Batterie ( AAA) x 4 Battery (AAA) x 4 Batterie (AAA) x 4 Please observe the instructions for handling batteries on page 16... -
Page 32: Get Started
Switching on and standby mode To switch on Chipz, simply hold down the button on his “forehead” for 2 seconds. Chipz’ eyes light up and he will make sounds. He is now in the standby mode and is waiting for an input from you. -
Page 33: Follow-Me Mode
FOLLOW-ME MODE Follow-me mode To activate follow-me mode, Chipz must be in standby mode. Now you just have to press the button on his “forehead” once briefly and the follow-me mode is activated. Chipz indicates this mode by only lighting up his left eye briefly. -
Page 34: Explorer Mode
EXPLORER MODE Explorer mode If Chipz is in standby mode, press the button on his “forehead” twice in a row to activate explorer mode. If Chipz is in follow-me mode, you just have to press the button once. Chipz indicates the explorer mode by only lighting up his right eye briefly. -
Page 35: Adventure Comic Part 2
He is also intelligent and will map out this labyrinth! Then we can relax. BEEP. FOLLOW ME! No idea, but Do you Chipz seems to know where know the way. we are? BEEP-BOOP. WE'RE NEARLY THERE. Ahhhhhh! What the... VRE BEEP! - Page 36 ...and give Finally ADVENTURE COMIC someone us a hug! came. over here... I was starting to think no one But how are Can you saw my SOS you going to fix my But if you help signal. find the way rocket? us, then we can out of the...
- Page 37 CHECK IT OUT CHECK IT OUT...
- Page 38 CHECK IT OUT...
Need help?
Do you have a question about the Chipz and is the answer not in the manual?
Questions and answers