Table of Contents
Advertisement
Quick Links
More exciting
experiments!
cyborg-hand –
Your XXL hydrauLic hand
FLip MonStER –
YouR
DynaMIc robot
Do you have
KOSMOS-Customer Service
any questions?
Tel.: +49 (0)711-2191-343
Our customer service
Fax: +49 (0)711-2191-145
will be glad to help you!
kosmos.de/ser vicecenter
solar-Bots –
BUILD EXcITInG
solAR MoDElS
© 2024 KOSMOS Verlag
Pfizerstrasse 5-7
70184 Stuttgart, DE
kosmos.de
Manual
Bitsy
Your smart robot friend
I'll show you
how I feel!
Franckh-Kosmos Verlags-GmbH & Co. KG • Pfizerstraße 5 – 7 • 70184 Stuttgart, DE • Phone +49 (0) 711 2191-343
SCAN QR CODE FOR FULL-COLOUR MANUAL
LANGUAGES:
English, D eutsch,
Français, Italiano,
E spañol, N ederlands
AND MANY MORE
or go to: www.kosmos.de/int/Bitsy
I'll locate and follow
you using my super
hearing
Advertisement
Table of Contents

Related Manuals for Kosmos Bitsy


Summary of Contents for Kosmos Bitsy
- Page 1 Pfizerstrasse 5-7 Our customer service Fax: +49 (0)711-2191-145 70184 Stuttgart, DE will be glad to help you! kosmos.de/ser vicecenter kosmos.de Franckh-Kosmos Verlags-GmbH & Co. KG • Pfizerstraße 5 – 7 • 70184 Stuttgart, DE • Phone +49 (0) 711 2191-343...
-
Page 2: Equipment
0728336 AN 150124-EN / Master_1621094 Manual for „Bitsy“, Art.Nr. 7617424 © 2024 Franckh-Kosmos Verlags-GmbH & Co. KG • Pfizerstrasse 5–7 • 70184 Stuttgart, DE This kit, including all the parts thereof, is protected by copyright. Any use outside the restrictions imposed by the copyright law, without permission from the publisher, is prohibited and may incur a penalty. -
Page 3: Table Of Contents
Insert, remove and change batteries ..43 Design of sound clicker ......44 Sticker ............45 Adventure comic part 2 ......46 Playing with Bitsy - Game modes ....48 Handling ............. 51 Troubleshooting ......... 54 Imprint ............55 No. -
Page 4: Safety Information
— SAFETY INFORMATION INSTRUCTIONS FOR HANDLING WITH BATTERIES: WARNING › To operate the models, you will need four AAA batteries (1.5 Volt,type AAA/LR03), which could not be included in the kit due to their limited Not suitable for children shelf lifed. The batteries should be inserted, removed and replaced by an adult or under the supervision of an adult. - Page 5 Children want to marvel, understand and create something new. They want to try everything out and explore things by themselves. They want to know more! They can do all this with our KOSMOS experimental kits. And much more than just an experiment comes of this - a strong person grows.
- Page 7 While the others go to bed, Tom and Izzy are still busy. There where other people only see scrap, heroes see endless possibilities. I found thrust something! needs to be increased by a factor of 10. We were missing this part still! …to We need...
- Page 8 Tom, on the other hand, is They can build Izzy can a scientist through and anything together! repair anything through... and is a master of mechanics. I think it's done! ...but he can also lend a hand. We did it! Nothing can stop us now! Where...
- Page 9 definitely foggy. The planet seems relatively flat, Izzy. and foggy. What kind of strange noise is that? I feel somehow so..nnnno! ...gnaaaaaaaaaaaa... activate ear protectors! Whew! What the...? What are you talking about ... oh, now i notice it too... gnnnn..
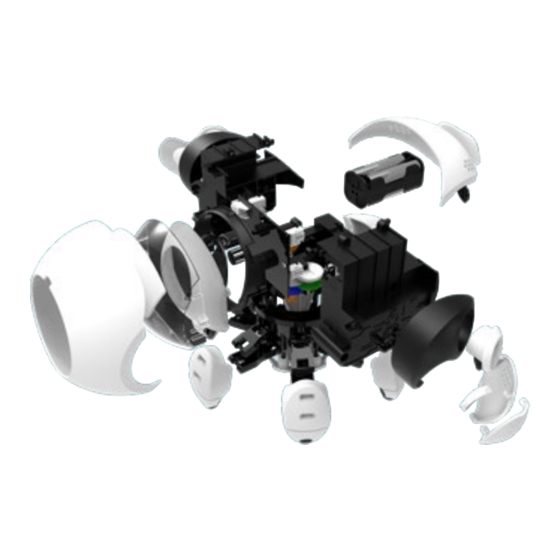
- Page 10 BODY STRUCTURE P2(White) P2(White) P2(White) Green Green Green...
-
Page 11: Assembly Instructions
— Assembly instructions P11 x 4 180°... -
Page 12: Body Structure
BODY STRUCTURE P9x3 P9x3 180° 180° Body Module Body Module Body module L... - Page 13 — Assembly instructions 180° 180° P11 x 5 P11 x 5...
- Page 14 BODY STRUCTURE Auxiliary Hilfsteil B11 Hilfsteil B11 piece B11...
- Page 15 — Assembly instructions P12 x 2 P12 x 2 P12 x 2 P12 x 2 P12 x 2 P12 x 2 Screw in the four P12 screws Tighten P12 x4 Tighten P12 x4 all the way. Tighten P12 x4 to firmly. to firmly.
- Page 16 BODY STRUCTURE 1 180°...
- Page 17 — Assembly instructions Measuring & making Measuring & making Measuring & making Filzstift MEASURE AND MARK Filzstift Filzstift Felt-tip pen 4 cm 4 cm 4 cm Mark the cable at the position shown. 12 13 14 15 16 17 18 19 20 21 22 23 Battery Holder with Connector 12 13 14 15 16 17 18 19 20 21 22 23 12 13 14 15 16 17 18 19 20 21 22 23...
- Page 18 BODY STRUCTURE Body module L P11 x 3 P11 x 3 P11 x 3 Body Module Body Module Body module Body Module...
- Page 19 — Assembly instructions Press PUSH...
- Page 20 BODY STRUCTURE...
- Page 21 — Assembly instructions Press PUSH...
- Page 22 BODY STRUCTURE Body Module Body module Body Module Body Module...
-
Page 23: Structure Head
— Assembly instructions STRUCTURE HEAD drücken drücken Press drücken drücken drücken drücken Press drücken drücken... - Page 24 STRUCTURE HEAD P11 x 2 Mask Module Mask module...
- Page 25 — Assembly instructions P11x2 Press drücken...
- Page 26 STRUCTURE HEAD 180° 180° Microphone F Microphone R Microphone L Motor Motor Batteries Engine R Motor Batteries Motor Batteries Motor L...
- Page 27 — Assembly instructions...
- Page 28 STRUCTURE HEAD Mask module Mask Module (Black)
- Page 29 — Assembly instructions...
- Page 30 STRUCTURE HEAD Ask an adult for help if you have difficulties installing the washer (P15). 180° Place the washer on the tip of the screw. Hold the washer with your thumb and index finger and turn the screw approx. 2 turns to the right. Then screw them tight.
-
Page 31: Structure Legs And Arms
— Assembly instructions STRUCTURE LEGS AND ARMS Top view B19x2 B19x2 Make sure B19 are snapped on Ensure that B19 engages Make sure B19 are snapped on with a “Click” sound. with a “Click” sound. with a “click”. Klick Klick Click Klick Klick... - Page 32 STRUCTURE LEGS AND ARMS Don’t mix up Don’t mix up B1 & B7. Scale 1:1 B1 & B7. Scale 1:1 drücken Do not confuse Press drücken B1 and B7.
- Page 33 — Assembly instructions drücken Press 180°...
- Page 34 STRUCTURE LEGS AND ARMS Top view...
- Page 35 — Assembly instructions Klick Klick Click Ensure B5 opening faces Ensure B5 opening faces Pay attention to the correct towards the right direction. installation direction of B5. towards the right direction. Pay attention to the correct The side with “B6” mark faces up. The side with “B6”...
- Page 36 STRUCTURE LEGS AND ARMS Do not confuse B7 and B1. Don’t mix up Scale 1:1 B7 & B1. B1+B12 B1 + B12 B7+D13 B7 + D13 B7+D13 B7 + D13 B2+B12 B2 + B12 B2+B12 B2 + B12 B1+B12 B1 + B12 B7+D13 B7 + D13 B1+B12...
- Page 37 — Assembly instructions P11x2 P11x2 P11x2...
- Page 38 STRUCTURE LEGS AND ARMS Do NOT tear off the glossy film on the foam stickers. 180° 180°...
- Page 39 — Assembly instructions 90° 90° 90° 90° Hand Module Hand Module Hand Module Hand module L Hand Module...
- Page 40 STRUCTURE LEGS AND ARMS Hand Module Hand module L Press...
- Page 41 — Assembly instructions Hand Module Hand Module Hand Module Hand module R...
- Page 42 STRUCTURE LEGS AND ARMS Press PUSH Done Done!
-
Page 43: Insert, Remove And Change Batteries
— Assembly instructions INSERT, REMOVE AND CHANGE BATTERIES OPEN OPEN Unscrew OPEN REMOVE REMOVE REMOVE The screw remains in the cover. AAA(x4) 4x AAA AAA(x4) AAA(x4) batteries When inserting the batteries, observe the correct polarity (+/-). 4x AAA batteries Please observe the instructions for handling batteries on page 4. - Page 44 STRUCTURE OF THE SOUND CLICKER Pull the ribbon taut and tie a tight knot.
-
Page 45: Sticker
— Assembly instructions for the sound clicker STICKER With the black, reusable stickers and Bitsy's moveable eyelid, you can create a variety of moods and facial expressions. You can stick stickers that have already been used back on the sheet and use them again later. - Page 46 Bitsy can follow sounds and, as a robot, is immune to the brainwashing effect. That's how we'll find the source of the noise and switch it off. Any questions? Huh? Great. Let's get started! On second thought, I have come to the conclusion that it...
- Page 47 That must be it! The alien colleague has apparently already been caught! Huh? But Bitsy can! With the clicker here I can remote control it! Thank you! Done! I just wanted to The sound is...
- Page 48 SWITCHING ON AND STANDBY MODE How To Play To turn Bitsy on, simply press and hold the button for 2 seconds until the eye lights up. He is now in the Power On standby mode and is waiting for an input from you.
- Page 49 The individual game modes are called up by pressing the button. The modes can be selected at any time as shown here. Bitsy then indicates with his eye which mode he is in: MODE 1: FOLLOW ME In this mode, Bitsy can locate and follow sounds.
- Page 50 PLAYING WITH BITSY MODE 2: SOUND REMOTE CONTROL In this mode, the sound clicker serves as a remote control. Bitsy reacts to the number of clicks. In his eye you can see how many clicks Bitsy has perceived. 1x click: forward / backward...
-
Page 51: Handling
Do not pick up Bitsy as shown. Never put your fingers between moving parts. Make sure that Bitsy's hands do not touch his Bitsy may become confused and behave feet so that they do not collide during operation. differently than expected if multiple sound... - Page 52 For example, if the microphone on the left side of his head reports the highest reading, Bitsy knows that he has to turn to the left. If the microphone in his eye reports the highest value, he runs straight ahead.
- Page 53 How does "spatial hearing" in humans work? We humans only have two ears and not three like Bitsy, but we can still tell pretty well from which direction a sound is coming. This is mainly because our brain can process signals much better than Bitsy's electronics.
-
Page 54: Troubleshooting
TROUBLESHOOTING PROBLEM SOLUTION What should I do if Bitsy 1. Make sure the batteries are inserted with the correct does not respond after I have polarity. Please check p. 43, step 2. switched him on? 2. Make sure that all cables are firmly and correctly connected.
Need help?
Do you have a question about the Bitsy and is the answer not in the manual?
Questions and answers