Table of Contents
Advertisement
Quick Links
Advertisement
Table of Contents

Related Manuals for Harman AKG CMS380


Summary of Contents for Harman AKG CMS380
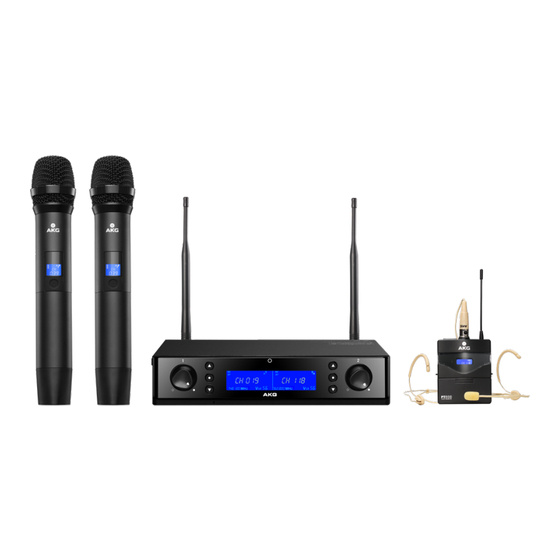
- Page 1 CMS380 UHF WIRELESS MICROPHONE SYSTEM USER MANUAL...
-
Page 2: Table Of Contents
CMS380 CONTENTS Symbols Used ..................... 3 Important Safety Information ................4 Introduction to CMS380 ..................5 Features ......................5 Unpacking ......................6 Description ......................7 SR380 ......................7 HT380 ......................10 PT380 ......................12 HC380 ......................14 Installation & Preparation .................. 15 SR380 ...................... -
Page 3: Symbols Used
CMS380 SYMBOLS USED The lighting flash with arrowpoint in an equilateral triangle means that there are dangerous voltages present with the equipment. The exclamation point in an equilateral triangle on the equipment indicates that it is necessary for the user to refer to the User Manual. In the User Manual, this symbol marks instructions that the user must follow to ensure safe operation of the equipment. -
Page 4: Important Safety Information
CMS380 IMPORTANT SAFETY INFORMATION Read and keep these instructions. Heed and follow all warnings. SAFETY Do not use this apparatus near water. Clean only with a dry cloth. Do not block any ventilation openings. Install in accordance with the manufacturer’s instructions. Do not install near any heat sources such as radiators, heat registers, stoves, or other apparatus (including amplifiers) that produce heat. -
Page 5: Introduction To Cms380
CMS380 INTRODUCTION TO CMS380 Thank you for purchasing AKG CMS380! AKG CMS380 is a UHF Wireless Microphone System designed for applications where wireless transmission is in demand. CMS380 is available in two sets: Vocal Set Mix Set 1 x SR380 Dual-channel Receiver... -
Page 6: Unpacking
CMS380 UNPACKING Please unpack and inspect your purchase package for any damage that may have occurred during transit. If damage is found, notify the transportation company immedi- ately. Only you can initiate a claim for shipping damage. Save the shipping carton as evidence of damage for the shipper’s inspection. -
Page 7: Description
CMS380 DESCRIPTIONS SR380 SR380 Front View Volume: Rotate the knob to set output level of CH1 or CH2. Up: Press the button to select transmission channel. Menu: Supports short press and long press: • Short press: Short press the button to toggle between manual tuning or auto scan of transmission channels. - Page 8 CMS380 DESCRIPTIONS SR380 SR380 Rear View Antenna: Detachable antenna. Attach the UHF antennas provided. DON’T hand hold or block this area while SR380 is working. ON/OFF: Press the switch to turn on or off SR380. 12 V DC: Connect the power adapter provided. 10.
- Page 9 CMS380 DESCRIPTIONS SR380 SR380 LCD 13. Channel: The channel designated for transmitting audio signal of CH1 or CH2. 14. AF: Indicates intensity of audio signal detected. 15. RF: Indicates intensity of radio signal detected. 16. Lock Status: “ ” appears when the navigation buttons are locked through long press the Menu button on the front panel.
-
Page 10: Ht380
CMS380 DESCRIPTIONS HT380 HT380 Front View Voice Pick-up: For vocal or instrument sound pick-up. DON’T hand hold or block this area while HT380 is working. IR Sensor: For frequency synchronization with SR380. LCD Display: Shows status of HT380: battery level, transmission channel, au- to-mute status. - Page 11 CMS380 DESCRIPTIONS HT380 HT380 LCD Battery Level: Indicates the battery level when HT380 is powered on. Flashes when the battery is low. Channel: The transmission channel designated for HT380. 10. Auto Mute: Short press the On/Off button for 3 times to activate or deactivate auto-mute.
-
Page 12: Pt380
CMS380 DESCRIPTIONS PT380 PT380 Front & Top View LCD Display: Shows the following information of battery level (when powered on), transmission channel, and status (off, mute/program). Belt Clip: To attach the pocket transmitter to a belt. Battery Compartment: Remove the cover to install one 1.5V AA battery. Antenna: Integrated flexible antenna. - Page 13 CMS380 DESCRIPTIONS PT380 Gain Control: Inside the Battery Compartment. Set to desired level using the battery cover pin-out or a flat-head screwdriver. PT380 LCD Channel: The transmission channel designated for PT380. 10. Mute Status: Shows mute status of PT380. “ ”...
-
Page 14: Hc380
CMS380 DESCRIPTIONS HC380 Audio Output Jack: Uses a 3-pole mini female XLR connector for connection with PT380. Ear Hookers: To wear the headset to your head. Voice Pick-up: For voice picking up. DON’T hand hold or block this area while HC380 is working. -
Page 15: Installation & Preparation
CMS380 INSTALLATION & PREPARATION SR380 Please follow the guidance to install your SR380. Place SR380 on the flat and stable work-desk or mount it onto an equipment rack (refer to the image below for rack-mounting). RACK-MOUNTING OF SR380 Mounting 1xSR380 Mounting 2xSR380 Attach the antennas provided to SR380. -
Page 16: Ht380 / Pt380
CMS380 INSTALLATION & PREPARATION HT380 / PT380 Please follow the guidance below to prepare your HT380 or PT380. To prepare HT380: 1. Insert two pieces of 1.5V 2. Select appropriate trans- 3. Long press the On/Off AA batteries. mission power. button to power on. -
Page 17: Frequency Synchronization
CMS380 FREQUENCY SYNCHRONIZATION SR380 Please follow instructions below to set up transmission channel between SR380 and HT380 or PT380. Set transmission channel for SR380. Transmission frequency of SR380 can be set up via manual tuning or auto scan. A) Manual Tuning: Simply short-press the Up or Down button to select the channel. -
Page 18: Ht380 / Pt380
CMS380 FREQUENCY SYNCHRONIZATION HT380 / PT380 Synchronize transmission channel for HT380 or PT380. 1) Long press the Up button of SR380. 2) The LCD flashes “ ”. 3) Power on HT380 or PT380. Position their IR sensor next to IR sensor of SR380. When frequency synchronization is done, HT380 or PT380 will share the same trans- mission channel with SR380. -
Page 19: Specifications
CMS380 SPECIFICATIONS PT380 SR380 Switching Bandwidth 30 MHz Carrier Frequency 740 - 770 MHz Modulation Switching Bandwidth 30 MHz RF Output Power 50 mW Modulation ≥75 dB Spurious Suppression -60 dB Spurious Suppression Antenna External antenna Antenna External antenna Frequency Response 20 to 18K Hz Frequency Response 20 to 18K Hz... -
Page 20: Troubleshooting
CMS380 TROUBLESHOOTING Problem Possible cause Remedy AC adapter is not connected to receiver Connect AC adapter to receiver and/or and/or power outlet. power outlet. Receiver is OFF. Push ON/OFF switch to switch receiver ON. Receiver is not connected to mixer or Connect receiver output to mixer or amplifier amplifier. -
Page 21: Channels & Frequencies
CMS380 CHANNELS & FREQUENCIES CHANNEL A CH10 740.000 740.450 740.900 741.350 741.800 742.250 742.700 743.150 743.600 744.050 CH11 CH12 CH13 CH14 CH15 CH16 CH17 CH18 CH19 CH20 744.500 744.950 745.400 745.850 746.300 746.750 747.200 747.650 748.100 748.550 CH21 CH22 CH23 CH24 CH25 CH26... - Page 22 CMS380 CHANNELS & FREQUENCIES CHANNEL B CH101 CH102 CH103 CH104 CH105 CH106 CH107 CH108 CH109 CH110 755.150 755.600 756.050 756.500 756.950 757.400 757.850 758.300 758.750 759.200 CH111 CH112 CH113 CH114 CH115 CH116 CH117 CH118 CH119 CH120 759.650 760.100 760.550 761.000 761.450 761.900 762.350...
- Page 23 CMS380...
- Page 24 CMS380 UHF Wireless Microphone System 23042018...
Need help?
Do you have a question about the AKG CMS380 and is the answer not in the manual?
Questions and answers