Table of Contents
Advertisement
Quick Links
Advertisement
Table of Contents

Subscribe to Our Youtube Channel
Related Manuals for Avidsen WEAT C2N


Summary of Contents for Avidsen WEAT C2N
- Page 1 Installation and owner’s manual DRIVE KIT FOR SLIDE GATES WEAT C2N This document is part of the kit and must always be kept with it. Important: Read this manual in full and follow the safety instructions BEFORE INSTALLING, USING or SERVICING this product.
- Page 2 WEAT B2N 230 VAC 30 mA 10 A WEAT V2N TEST WEAT C2N WEAT G2N Neutral (blue wire) Phase, at the level of the automatic system connect it Earth connection to the terminal near the fuse “D”...
- Page 3 1. GENERAL SAFET Y INSTRUCTIONS Caution for or the safety of individuals and property, follow these instructions and keep them in a safe place. We recommend you carefully read and follow these instructions. Improper use and programming can be dangerous and can cause serious injury. If you are unsure about installing this product, seek assistance from our technical department.
- Page 4 Concrete structures must be professionally made; if required, contact a professional. A gate or door in poor condition or badly installed cannot be automated. If you are unsure, contact a professional. d – RECOMMENDATONS FOR INSTALLING YOUR AUTOMATED SYSTEM Badly handled or damaged parts must be returned to us for checking or repair. - Check that the clearance area for operators (worm screws, arms or sliders) is clear and obstacle-free (cut bushes and hedges if necessary).
- Page 5 f – PROTECT THE ENVIRONMENT - Packaging materials (cardboard, plastic, polystyrene, etc) must not be dumped and must not be left within children’s reach, because they are a potential source of danger. g – USERS GUIDE Do not touch the parts of the automated system and the gate itself when it is moving (The gate must installed at a distance from children’s play areas).
- Page 6 every problem or external intervention. This kit does not need any lubrication; you should check the condition of connections and the various electrical cables and completely test the safety units (photo-electric cells, flashing light, obstacle stop, sensor bar, emer- gency shutdown, etc.). Check the condition of hinges for a leaf gate, wheels for a sliding gate and sliders for a garage door (lubricate these parts if required) REMINDER : DO NOT FORGET TO CUT THE 230 V POWER SUPPLY AND THE BATTERIES BEFORE ANY...
- Page 7 Installation address : Reference of your automated system: WEAT _ _ _ Serial number (above the bar code) : CFI/0811/_ _ W _ _ / _ _ _ _ Date of purchase : _ _ / _ _ / _ _ _ _ Shop: Installed on: _ _ / _ _ / _ _ _ _ Date...
-
Page 8: Table Of Contents
6. GATE CHECK..............6 7. LOCATION OF MOTOR ........... 8 8. INSTALLATION ..............9 9. CONTROL BOX .............. 10 10. RADIO CONTROLS............15 11. TROUBLESHOOTING GUIDE........16 12. SENSOR BARS (FOR SAFETY) OPTIONAL ....17 WEAT C2N – V1 - EN... -
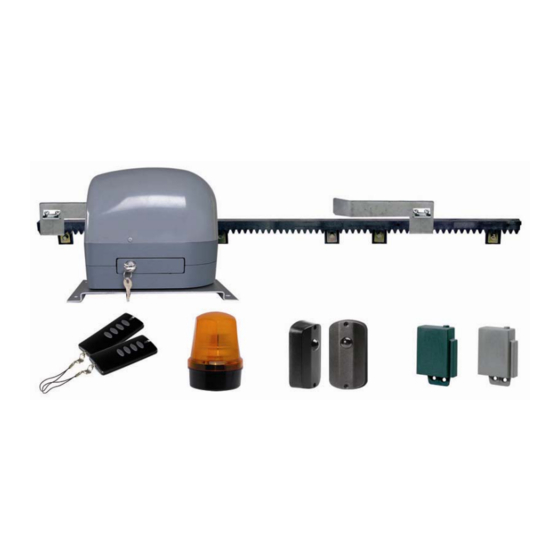
Page 9: Kit Contents
WEATBT B2: backup battery kit that provides for WE 8111 BIS and ATCR 2 WEATAN 2:external antenna for extended range - :emergency bar 2 m. WEATDT 80301 WEATER 3: Two WEATEM 3 remote control units and one12 VDC, 2-channel radio receiver. WEAT C2N – V1 - EN... -
Page 10: Complete Installation
Max. width of gate Power supply 230 VAC 24 VAC Current consumption 0.9-3.5 A Power 40 W Force 500 N Operating temperature -20°C / +55°C Degree of protection IP44 Limit switches Electromechanical Opening speed 10 m/min. WEAT C2N – V1 - EN... -
Page 11: Dimensions
Neutral a 10 A two-pole circuit breaker and a 30 mA Live Ground Fault Cicrcuit earth Interrupter , connect it to 230 V~ mains power the terminal block inside the motor assembly. WEAT C2N – V1 - EN... -
Page 12: Gate Check
ROLLERS: The shape and dimensions of the rollers must be compatible with section of the bottom tracks. The rollers must be fitted near each end of the gate and must be kept in good condition to ensure smooth opening and closing. Fig. 4 WEAT C2N – V1 - EN... - Page 13 The limit cams must be installed at both ends (see drawing below). To do so, interlock all four sections with tenons to the left then interlock the four sections with mortises to the right. Install to left of gate Install to right of gate WEAT C2N – V1 - EN...
-
Page 14: Location Of Motor
If this clearance is greater, the pinion will not be 2 to 3 mm able to drive the rack. If it is less, the gate’s entire weight will be placed on the pinion. fig. 4 WEAT C2N – V1 - EN... -
Page 15: Installation
Fold the front of the stops slightly to make it easier to guide the switch onto the stops. Direction of opening Direction of opening To prevent premature wear, fit the drive unit so that the pinion moves at a 90° angle (see illustration opposite). WEAT C2N – V1 - EN... -
Page 16: Control Box
Emergency stop Auxiliary control Beacon Limit switches The Off button or switch connected must be equipped with a manual release. If you do not wish to use it, bridge the STP input to ground. WEAT C2N – V1 - EN... - Page 17 2-wire door phone or video Neutral door phone Live 230 V~ Control for lighting the white black protected gate's path. WE 8111 Bis, supplied Lamp : 100 W max. Delay fixed : 2 min 30 WEAT C2N – V1 - EN...
- Page 18 10 A two-pole circuit breaker and a 30 mA Ground Fault Neutral Circuit Interrupter, connect it to the Live terminal block inside the motor earth assembly. 230 V~ mains power supply WEAT C2N – V1 - EN...
- Page 19 3 seconds Gate opens for 4 Motor stops seconds then closes Paragem do Gate opens Motor stopped after 3 motor seconds Gate closes Motor stops Green LD1 off End of learn procedure WEAT C2N – V1 - EN...
- Page 20 0 and 90 seconds. Turning the trimmer all the way to the bottom of the scale (jog mode) will inhibit automatic mode WEAT C2N – V1 - EN...
-
Page 21: Radio Controls
Channel A: FULL control (if JP1 removed from board) Channel B: PARTIAL control, one leaf (if JP1 removed from board) Channel C: FULL control (if JP1 on board) Channel D: PARTIAL control, one leaf (if JP1 on board) 11. TROUBLESHOOTING GUIDE WEAT C2N – V1 - EN... - Page 22 List of checks to be done for AT C2N machine 1. Check there is 230v multimeter or check the electical installation when the sector is connected, the small green led flashes on the card 2. Check that the motor release the motor, open half the gate, re-lock is properly connected If the green led does not flash after pressing on P1/SET, check there carry out a test (P1/SET for 1s or 2s)
-
Page 23: Sensor Bars (For Safety) Optional
A : Wiring terminal block B : Cable tension screw Mechanisation Card Product available in DIY hypermarkets CFI Reference : WEATDT 80301 If installing several sensor bars, the switches must be connected in series (see below) Mechanisation card WEAT C2N – V1 - EN...
Need help?
Do you have a question about the WEAT C2N and is the answer not in the manual?
Questions and answers