Garmin GPSMAP 2006 Owner's Manual
Hide thumbs
Also See for GPSMAP 2006:
- Owner's manual & reference (104 pages) ,
- Owner's manual (84 pages) ,
- Installation manual (9 pages)
Advertisement
Quick Links
Advertisement

Related Manuals for Garmin GPSMAP 2006


Summary of Contents for Garmin GPSMAP 2006
- Page 1 GPSMAP 2006/2010 chartplotters owner’s manual reference guide (GPSMAP 2006C and 2010C shown)
- Page 3 Except as expressly provided herein, no part of this manual may be reproduced, copied, transmitted, disseminated, downloaded or stored in any storage medium, for any purpose without the express prior written consent of Garmin. Garmin hereby grants permission to download a single copy of this manual GARMIN , Autolocate , GPSMAP ®...
- Page 4 This manual covers both the monochrome and color models of the GPSMAP 2006 and 2010, software version 5.2 and higher. This manual is broken down into Garmin’s Technical Support Department can be reached two sections for your convenience.
- Page 5 – and, as always, the user is responsible for their prudent use. Use the GPSMAP 2006/2010 at your own risk. To reduce the risk of unsafe operation, carefully review and MAP DATA INFORMATION: One of the goals of Garmin understand all aspects of this Owner’...
- Page 6 Serial Number: Garmin retains the exclusive right to repair or replace the unit or software or offer a full refund of the purchase price at its sole discretion. SUCH REMEDY SHALL BE YOUR SOLE AND EXCLUSIVE REMEDY FOR ANY BREACH OF WARRANTY.
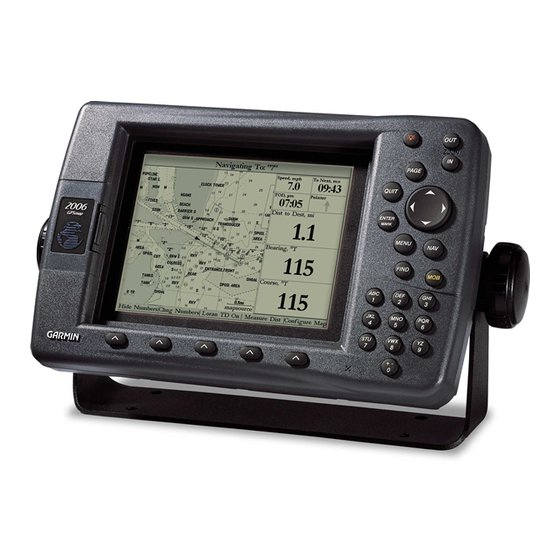
- Page 7 Capabilities Precision Performance • The GPSMAP 2006/2010 features a high-contrast, ten-level gray, 640 x 480 LCD display with adjustable contrast and backlighting. • The GPSMAP 2006C/2010C features a high resolution, 256-color, 640 x 480 color LCD display with adjustable brightness.
- Page 8 “How To” Index ..........vi Tide Tab ............60 Trip Tab ............61 Section One: Getting Started ......1-13 Celestial Tab ..........62 Looking at the GPSMAP 2006/2010 ....1 Tracks Tab ............63 Learning the Keypad ...........2 DSC Tab ............64 Quick Start Tour - Learning the Basics ....3 User Card Tab ..........69...
- Page 9 GPSMAP 2006/2010. Pan using the map arrow ......... .9, 14 Zoom in or out on the Map page .
- Page 10 Getting Started Getting Started Data Card Slots Looking at the 2006/2010 Main Page Sequence Function Keys Mounting Knobs Data Port Power/Data Cable Port for future use Soft Keys Data Entry Keys...
- Page 11 Function Keys Getting Started Getting Started Key — adjusts the map scale to show a smaller area with more detail. (Zooms in) Main Page Sequence 2006/2010 Keys Key — adjusts the map scale to show a larger area with less detail. (Zooms out) PAGE Key —...
- Page 12 Main Page Sequence Main Page Sequence Before moving ahead to the features of the GPSMAP 2006/2010, you will need to learn basic opera- tions. Many times throughout this manual you will be prompted to press a key. When instructed, press, then release the key.
- Page 13 first Main Page displayed is the Map Page. To scroll through the Main Display Pages: 1. Press the PAGE key. Each time the PAGE key is pressed the GPSMAP 2006/2010 will display the next Main Page.
- Page 14 Activating the Simulator Mode: Getting Started Getting Started 1. Press the MENU key. Using the Built-in Simulator Main Page Sequence 2. With the ‘GPS Info’ tab displayed, at the lower left of the display will be a SOFT KEY label ‘Start Simula- tor’, press the SOFT KEY that corresponds with this option.
- Page 15 Creating Waypoints There will be many times that you will need to enter data in the GPSMAP 2006/2010, an example is naming a waypoint. We have already taken a brief look at entering data, but let’ s practice some more.
- Page 16 2. Using the ARROW KEYPAD , highlight the ‘Information’ symbol and then press the ENTER/MARK key. Getting Started Getting Started Main Page Sequence Entering Data We will enter a new waypoint name using the DATA ENTRY keys. Each DATA ENTRY key has mul- tiple characters assigned to it.
- Page 17 Getting Started Getting Started Now that you have finished modifying the waypoint you will need to save it to the Waypoint List. To Save the Waypoint: Main Page Sequence Soft Keys 1. Using the ARROW KEYPAD , highlight the ‘OK’ button at the bottom of the “New Waypoint” window. 2.
- Page 18 1. Press the SOFT KEY located below the ‘Set Up Map’ tag located at the bottom of the display. Getting Started Getting Started The Map Setup Page Menu will be displayed. The Map Setup Page will be discussed in detail in the Main Page Sequence Basic Navigation Reference Section of this manual.
- Page 19 tion. See pg. 6) The “New Map Waypoint” Page is displayed. Getting Started Getting Started Change the waypoint name to “MAP 1”, and assign the ‘Information’ symbol. Save the waypoint by Main Page Sequence Basic Navigation highlighting the ‘OK’ button and pressing the ENTER/MARK key. Press the QUIT key to hide the Map Pointer and center the display on the current GPS location.
- Page 20 To head toward your destination, turn until the Bearing Pointer is realigned with the vertical line in the Compass Ring. The GPSMAP 2006/2010 will allow you to simulate a turn so you can see what will happen. To simulate a turn: 1.
Need help?
Do you have a question about the GPSMAP 2006 and is the answer not in the manual?
Questions and answers