DATALOGIC Memor X3 - Mobile Computer Quick Start Guide
- User manual (154 pages) ,
- Troubleshooting manual (10 pages) ,
- Quick start manual (2 pages)
Advertisement
THE PACKAGE
The Memor X3 package includes the following items:
- 1 Memor X3 mobile computer
- 1 AC/DC power supply
- 1 plug kit
- 1 standard Micro USB cable (laser and 2D Imager models only)
- 1 hand strap with stylus holder (laser and 2D Imager models only)
- 1 extensible stylus (laser and 2D Imager models only)
- 1 guitar pick + cord
- 1 Quick Start Guide
- 1 Safety and Regulatory Addendum
- 1 Wavelink Avalanche Insert
- 1 End User License Agreement (EULA) Sheet
- 1 Offices Address Addendum
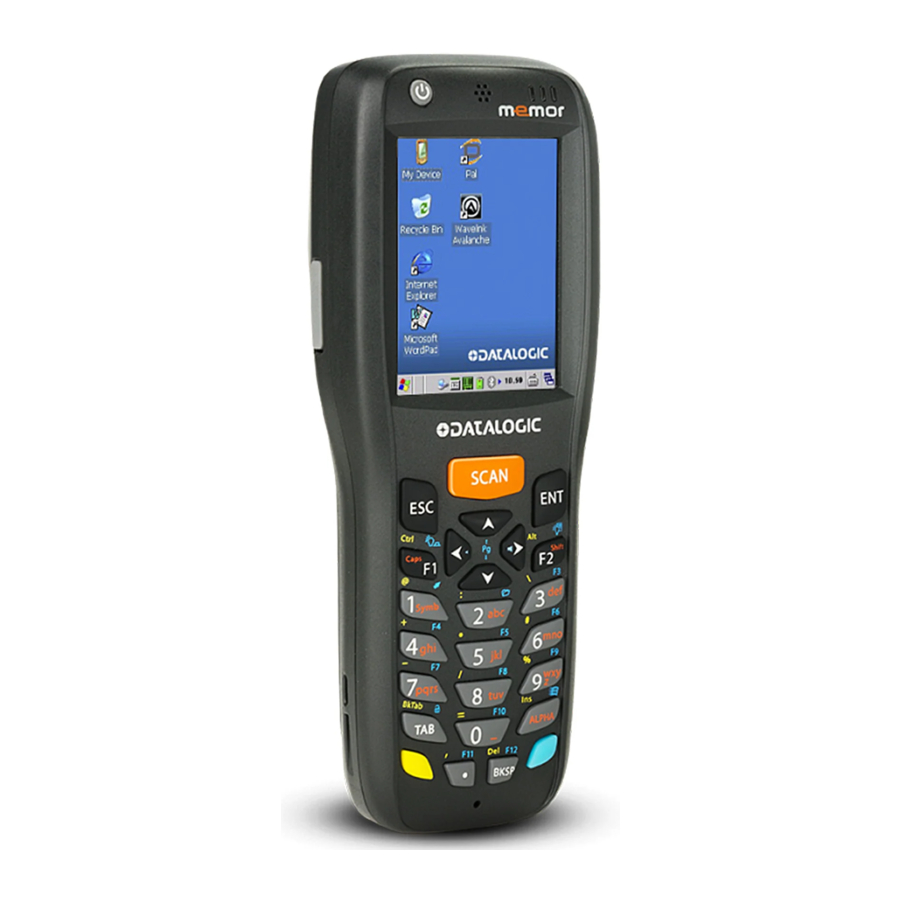
THE TERMINAL


- QVGA 64K color display
- ON/OFF power key
- Speaker
- LEDs
- Scan key
- Keyboard
- Microphone
- Guitar pick stylus
- Laser safety label
- Rear speaker
- Product label (under battery)
- Battery cover
- Programmable side key (on both sides of the mobile computer)
- Data capture window*
- DC charger connector connector
- Communication/charger (through cradle)
- MicroUSB communication connector (through cable)
 NOTE | Before using the device, remove the protective film from the display and from the data capture window. |

KEYPADS

- Cursor Keys
- Scan Key
- Yellow Modifier
- Blue Modifier
Special Function Icons
ICON / FUNCTION

After a blue modifier key press, it opens the Start menu.

After a blue modifier key press, it opens the file manager.

After a blue modifier key press, it switches ON/OFF the display backlight.

After a blue modifier key press, it switches ON/OFF the keyboard backlight.

After a blue modifier key press, it locks and unlocks the keyboard.

After a blue modifier key press, it disables the touchscreen and allows the user to control the device through a joystick-driven cursor, with Memor X3 side keys acting as left and right buttons
GETTING STARTED
Insert the Battery
- Push the latch release button and pull the latch down; then remove the battery cover.

- First insert the upper side (contacts), then the bottom side of the battery pack into the slot:
")
- Reinsert the cover. First insert first the upper side and then press the latch release button and pull the latch down to insert the bottom. Push the knurled section of the latch upwards to close the cover:


")

Charge the Battery


 Do not use the Memor X3 until batteries are charged for minimum 4 hours. |
SYNCHRONISE YOUR DEVICE WITH THE PC
Set up Synchronisation using Windows Mobile® Device Center
Windows Mobile® Device Center can be Microsoft website www.microsoft.com. It is only coows Vista and Windows 7; if you run Windows XP or earlier, you have to download Microsoft ActiveSync.
You can establish a connection to your Memor X3 through the following interfaces:
- USB either directly or through the Single Dock
- RS232 either directly or through the Single Dock
- Bluetooth®
To establish a partnership between the Memor X3 and a host PC, start Windows Mobile® Device Center and follow the steps below:
- Connect the Memor X3 to the host PC. Windows Mobile® Device Center configures itself and then opens.
- On the license agreement screen, click Accept.
- On the Windows Mobile® Device Center's Home screen, click Set up your device.
- Select the information types that you want to synchronize, then click Next.
- Enter a device name and click Set Up.
When you finish the setup wizard, Windows Mobile® Device Center synchronizes the mobile computer automatically. Microsoft® Office Outlook® emails and other information will appear on your device after synchronization.
Communicate with Host

INSTALLING A MICROSD CARD
- Turn off the Memor X3.
- Push the latch release button and pull the latch down (see section GETTING STARTED); then remove the cover and the battery pack:

- Open the microSD card slot by lifting up the locking plate:

- Shift the cardholder upwards and then pull it up:

- Insert the microSD card with the written part upward:

- Lock the card into place by pushing the cardholder down and then shifting it downwards; push the locking plate down:

- Reinsert the battery cover (see section GETTING STARTED).


SCANNING AND IMAGING
Laser Data Capture


2D Imager Data Capture

Linear barcode

2D Matrix symbol

Relative Size and Location of Aiming System Pattern

Linear Imager Data Capture


Scanning with a Memor X3 Linear Imager
When beams reflect directly back into the scanner from the bar code, they can "blind" the scanner and make decoding difficult.
To avoid this, don't keep the terminal perpendicular to the barcode: moving it of a small angle of ±2° is usually enough to enable proper reading. But don't scan at too oblique an angle either: keep the scanner within an angle of ±30° from the perpendicular to the barcode in order to guarantee effective scanning.
Side Views

REFERENCE DOCUMENTATION
For further information regarding Memor X3 refer to the SDK Help online and to the Memor X3 User's Manual.
For information regarding safety and regulatory refer to the Safety and Regulatory Addendum or to the dedicated section of the Memor X3 User's Manual.
PATENTS
See www.patents.datalogic.com for patent list.
SUPPORT THROUGH THE WEBSITE
Datalogic provides several services as well as technical support through its website.
Log on to www.datalogic.com and click on the SUPPORT link which gives you access to:
Downloads by selecting your product model from the dropdown list in the Search by Product field for specific Data Sheets, Manuals, Software & Utilities, and Drawings;
Repair Program for On-Line Return Material Authorizations (RMAs) plus Repair Center contact information;
Customer Service containing details about Maintenance Agreements;
Technical Support through email or phone.
WARRANTY TERMS AND CONDITIONS
The warranty period is 1 year for the device and 90 days for consumables (e.g. battery, power supply, cable etc.) from date of purchase at our company.
©2013-2017 Datalogic S.p. A. and/or its affiliates. All rights reserved. Datalogic and the Datalogic logo are registered trademarks of Datalogic S.p. A. in many countries, including the U.S. and the E.U.
Memor is a trademark of Datalogic S.p. A. and/or its affiliates. All other brand and product names may be trademarks of their respective owners.
www.datalogic.com

Documents / Resources
References
Microsoft – Cloud, Computers, Apps & Gaming
![www.patents.datalogic.com]() Patents - Datalogic
Patents - Datalogic![www.datalogic.com]() Datalogic | Automatic Data Capture and Process Automation - Datalogic
Datalogic | Automatic Data Capture and Process Automation - Datalogic
Download manual
Here you can download full pdf version of manual, it may contain additional safety instructions, warranty information, FCC rules, etc.
Download DATALOGIC Memor X3 - Mobile Computer Quick Start Guide
Advertisement


Need help?
Do you have a question about the Memor X3 and is the answer not in the manual?
Questions and answers